Copyright © 2019 AudioNote Kits
www.AudioNoteKits.com
[email protected]
Page 50
11.1 Power On and Voltage Checks
There are a couple of voltage basics that can really help the cause. There are two types of
voltage: DC and AC. DC is a constant voltage, for example the High Voltage in a 300B amplifier
is typically 425V DC, so when you measure from the high voltage point to any ground in the
circuit (even the chassis), you will measure 425V DC. The other type of voltage is AC voltage,
this is basically a voltage that is constantly changing in the form of a SIN wave. The filament
voltages on an EL34 are 6.3V AC or alternating voltage. With your voltmeter, you can measure
DC or AC and makes troubleshooting straightforward. The other key tool on your meter is the
OHM meter, you can take a resistor and measure the resistance in Ohms. For example, you pick
up a resistor, put a probe on each end and set your meter to OHMs and measure 1000 ohms for
example, this is then a 1K resistor. Just as important as resistance, being able to measure
continuity is one of the most powerful debug tools, in other words, is there zero ohms or a
straight connection between this point in the amp and another point?
11.1.1 Mains Fuse Installation
Install the fuse in the small plastic fuse holder and insert it into the IEC. (If you are operating in
120V you can disregard the lettering that says 240V only – there is only one type of fuse holder,
no matter whether it's for 120V or 240V.) Note that the kit is supplied with several 2A slow blow
fuses. After the amplifier has been "up and running" for a while, if you have any issues with
the Mains fuse blowing occasionally you may increase the fuse rating up to 6A slow blow. If
you have any issues or concerns regarding this please contact [email protected].
When you turn on the amplifier for the first time you can turn it on without installing any
tubes and do some voltage checks as follows:
11.1.2 AC Voltage Checks
As long as the fuse has not blown then you are in business. With no tubes – let's check some AC
voltages first.
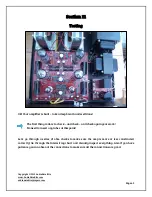
On the ECF80/EL34 PCB check the 6V3 6A filaments. Look for 6V3 6A on the ECF80/EL34
PCB near the Output Transformers – use your voltmeter leads and with one lead on each
pad check for 6.3 - 6.7V AC. Also on the ECF80/EL34 PCB check the 6V3 3A filaments on the
side near the Power Supply PCB.
Check the Blue & Yellow wires coming into the Power Supply PCB and you should see
approximately 300V AC here.


