background image

UG-447 

Evaluation Board User Guide 


Rev. 0 | Page 12 of 16 


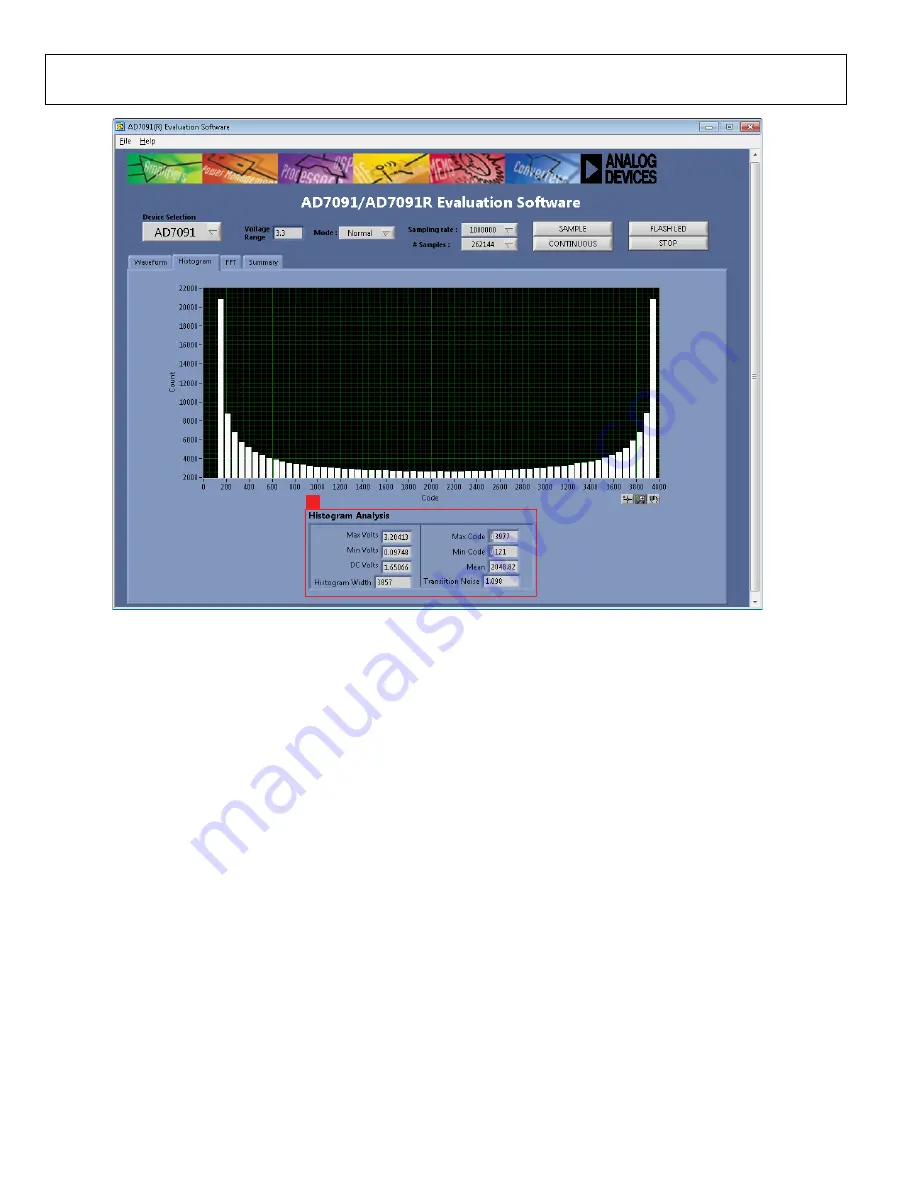
Figure 17. Histogram Capture Tab 

AC TESTING—HISTOGRAM 

Figure 17 shows the histogram capture tab. This tests the  
ADC for the code distribution for the ac input and computes 
the mean and standard deviation, or transition noise of the 
converter, and displays the results.  
Raw data is captured and passed to the PC for statistical 
computations. To perform a histogram test, select the 

Histogram

 tab in the evaluation software main window and 

click the 

SAMPLE

 button.  

Note that an ac histogram requires a quality signal source 
applied to the input VIN. 

DC TESTING—HISTOGRAM 

The histogram is more commonly used for dc testing. Similar to 
ac testing, this tests the ADC for the code distribution for the dc 
input and computes the mean and standard deviation, or transi-
tion noise of the converter, and displays the results.  
Raw data is captured and passed to the PC for statistical 
computations. To perform a histogram test, select the 

Histogram


tab in the evaluation software main window and click the 

SAMPLE

 button.  


10922-

017

1

Summary of Contents for EVAL-AD7091SDZ

Page 1: ...ll featured evaluation board designed to allow the user to easily evaluate all features of the AD7091 analog to digital converter A 7 V to 9 V external bench top supply is regulated to 5 V and 3 3 V to supply the AD7091 and support all necessary components The EVAL AD7091SDZ board connects to the USB port of the PC by connecting to the EVAL SDP CB1Z motherboard The EVAL AD7091SDZ software provides...

Page 2: ...Link Options 4 Power Supplies 4 Sockets Connectors 5 Test Points 5 EVAL AD7091SDZ Basic Hardware Setup 6 Evaluation Board Software 7 Software Installation 7 Launching the Software 8 Description of Main Software Window 10 Waveform Capture 10 AC Testing Histogram 12 DC Testing Histogram 12 AC Testing FFT Capture 13 Summary Tab 14 Save File 15 Open File 15 Evaluation Board Schematics and Ordering Inf...

Page 3: ...irmly together 5 Connect the power supply adapter included in the kit to Connecter J700 on the EVAL AD7091SDZ board 6 Connect the EVAL SDP CB1Z board to the PC via the USB cable For Windows XP you may need to search for the EVAL SDP CB1Z drivers Choose to automatically search for the drivers for the EVAL SDP CB1Z board if prompted by the operating system 7 Launch the AD7091 R software from the Ana...

Page 4: ...ns are set according to the required operating mode See Table 2 for the complete list of link options This evaluation board is supplied with a wall mountable switching power supply that provides a 9 V dc output Connect the supply to a 100 V to 240 V ac wall outlet at 50 Hz to 60 Hz The output from the supply is provided through a 2 0 mm inner diameter jack that connects to the evaluation board at ...

Page 5: ...y In Position B the VDD supply is sourced from the external J702 connector LK800 A This link is used to select the source of the OP_AMP supply line for the on board amplifiers In Position A the OP_AMP supply is sourced from the on board supply In Position B the OP_AMP supply is sourced from the external J800 connector LK801 A This link is used to select the source of the OP_AMP supply line for the...

Page 6: ... power connect the EVAL AD7091SDZ board to Connector A on the EVAL SDP CB1Z board A nylon screw nut set is included in the EVAL AD7091SDZ kit and can be used to ensure that the EVAL AD7091SDZ and EVAL SDP CB1Z boards are connected firmly together Ensure that the link options are in the default positions as outlined in Table 2 After the EVAL AD7091SDZ board and the EVAL SDP CB1Z board are connected...

Page 7: ... 7 to install the EVAL AD7091SDZ software Follow Step 5 to Step 8 see Figure 8 to Figure 11 to install the EVAL SDP CB1Z drivers Proceed through all of the installation steps allowing the software and drivers to be placed in the appropriate locations Connect the EVAL SDP CB1Z board to the PC only after the software and drivers have been installed Figure 3 EVAL AD7091SDZInstallation User Account Co...

Page 8: ...ardware Wizard to run After the drivers are installed you can check that the board is connected correctly by looking at the Device Manager of the PC The Device Manager can be found by right clicking My Computer Manage Device Manager from the list of System Tools as shown in Figure 12 The EVAL SDP CB1Z SDP B board should appear under ADI Development Tools This completes the installation Figure 12 D...

Page 9: ...luation Board User Guide UG 447 Rev 0 Page 9 of 16 Figure 13 Evaluation Software Main Window Figure 14 Connectivity Error Alert 1 MENU BAR 2 CONTROL BUTTONS 3 DATA CAPTURE DISPLAY 1 2 3 10922 014 10922 013 ...

Page 10: ...his is dependent on the Device Selection Mode Selects the operating mode of the AD7091 In Normal mode the ADC is ready to acquire samples In Sleep mode the device enters power down mode when the SAMPLE button is clicked Sampling rate Selects the sampling rate of the data acquisition Samples Selects the number of samples to be completed in a single acquisition SAMPLE Initiates the sampling and read...

Page 11: ...Evaluation Board User Guide UG 447 Rev 0 Page 11 of 16 Figure 16 Waveform Capture Tab 1 1 WAVEFORM ANALYSIS 10922 016 ...

Page 12: ...Histogram tab in the evaluation software main window and click the SAMPLE button Note that an ac histogram requires a quality signal source applied to the input VIN DC TESTING HISTOGRAM The histogram is more commonly used for dc testing Similar to ac testing this tests the ADC for the code distribution for the dc input and computes the mean and standard deviation or transi tion noise of the conver...

Page 13: ...y is to filter the input signal from the ac source There is no suggested band pass filter but consideration should be taken in the choice Furthermore if using a low frequency band pass filter when the full scale input range is more than a few volts peak to peak it is recommended to use the on board amplifiers to amplify the signal thus preventing the filter from distorting the input signal Figure ...

Page 14: ...f 16 Figure 19 Summary Tab SUMMARY TAB Figure 19 shows the summary tab The summary tab captures all the display information providing it on one panel with a synopsis of the information including key performance parameters such as SNR and THD 10922 019 ...

Page 15: ...ile menu and click Save Sample Data The save dialog box opens see Figure 20 Save the file to an appropriate folder location Figure 20 Save File OPEN FILE The software can load captured data for analysis Go to the File menu and click Open Sample Data The open file dialog box opens Load an appropriate file Figure 21 Open File 10922 020 10922 021 ...

Page 16: ...ion Board are reserved by ADI CONFIDENTIALITY This Agreement and the Evaluation Board shall all be considered the confidential and proprietary information of ADI Customer may not disclose or transfer any portion of the Evaluation Board to any other party for any reason Upon discontinuation of use of the Evaluation Board or termination of this Agreement Customer agrees to promptly return the Evalua...

Reviews: