background image

O p e r a t i o n / R e f e r e n c e   G u i d e

V o i c e   a n d   V i d e o   C o m m u ni c a t i o n   S y s t e m s

Metreau


Entry Communicators

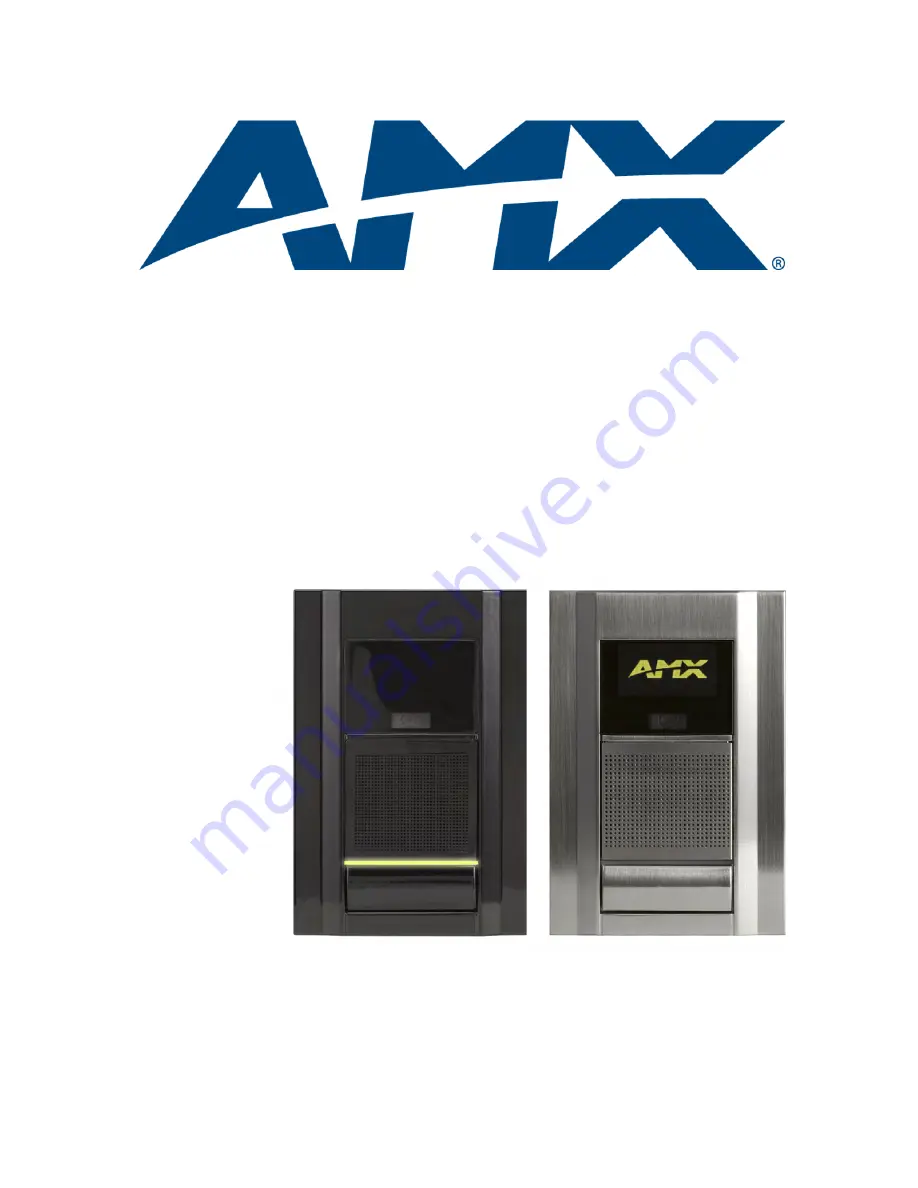
MET-ECOM Metreau Entry Communicator

MET-ECOM-D Metreau Entry Communicator with Display

L a s t   R e v i s e d :  

12

/

04

/ 2 0 0 8

Summary of Contents for MET-ECOM

Page 1: ...Operation Reference Guide Voice and Video Communication Systems Metreau Entry Communicators MET ECOM Metreau Entry Communicator MET ECOM D Metreau Entry Communicator with Display Last Revised 12 04 2008 ...

Page 2: ...rked on the outside of each box The RMA is valid for a 30 day period After the 30 day period the RMA will be cancelled Any shipments received not consistent with the RMA or after the RMA is cancelled will be refused AMX is not responsible for products returned without a valid RMA number AMX is not liable for any damages caused by its products or for the failure of its products to perform This incl...

Page 3: ...nnecting The Device via I O 11 Relay Port Connections and Wiring 11 Ferrite Installation Required 12 System Diagram 13 System Diagram Intercom 13 Mounting and Installation 15 MET ECOM MET ECOM D Installation Overview 15 Dimensions 15 Mounting Specifications 16 Front View 16 Side Views 17 Top View 17 Typical Installation Without Expansion Clips 18 Installing the Wall Box Without the Use of Tabs 20 ...

Page 4: ...guration Page Network IP Settings Tab 37 Setting the IP Address 38 Setting the DNS Address 38 Configuration Page NetLinx Settings Tab 39 Setting the ICSP Connection to the NetLinx Master 39 Configuration Page User Settings Tab 40 Setting a New Username and Password 40 Device Utilities Page 41 Image File Requirements 42 Creating Display Images 42 Creating Dynamic Images 44 TPDesign4 Resource Manage...

Page 5: ...n IP 63 Using the NetLinx Module 65 Overview 65 Incorporating an Intercom Panel Into Your NetLinx System 65 Panel Intercom Configuration 65 Intercom Setup 65 Setting the Intercom Session Timeout 66 Setting Intercom Auto Answer 66 Door Setup 67 Disabling All Doorbells 67 Door Chime Setup 68 Assigning a Chime To a Doorbell 68 Advanced Setup 69 Allowing a Panel To Be Monitored 69 Allowing a Panel To ...

Page 6: ...mmunicators Table of Contents Setup page 76 Someone At The Door page 77 Creating Popup Pages 78 Door Answer Call popup page 78 Doorbell Adjustments popup page 78 Intercom Answer Call popup page 79 More Time popup page 80 ...

Page 7: ...family MET ECOM Metreau Entry Communicator FG2180 01 cc The MET ECOM is suitable for installation in exterior environments MET ECOM D Metreau Entry Communicator with Display FG2180 05 cc The MET ECOM D is suitable for installation in interior or protected environments Both types of Metreau Entry Communicator are available in several popular colors as indicated by the cc suffix in the product nomen...

Page 8: ...rs Front Components The front components of the Metreau Entry Communicators are indicated in FIG 2 FIG 2 Metreau Entry Communicators Front Components Pushbutton Doorbell Speaker OLED display MET ECOM D only Video Camera Microphone Dual Color LED Status Bar ...

Page 9: ...d Color Video Camera Speaker Dual Color LED Status Bar Yellow Red can be used to provide feedback to attract attention for action or as general indicator Pushbutton Doorbell Microphone Integrated Color Video Camera QVGA 320x240 Supports Motion JPEG MJPEG and H 263 codecs Viewing Angle 42 Speaker 8 Ohm 2W 80dB SPL sound pressure level at 1 meter Meets G 711 sound standard Camera Viewing Angle Adjus...

Page 10: ...oltage sensing Input format is software selectable with interactive power sensing for IR ports 2 Low Voltage Relays 1A contact 2 channel single pole single throw relay ports with each relay being independently controlled and supporting up to 2 independent external relay devices Dimensions HWD 5 364 x 3 594 x 1 559 13 62 cm x 9 13 cm x 3 96 cm Note Refer to the Mounting Specifications section on pa...

Page 11: ...n SPD speed Green LED lights On when the connection speed is 100 Mbps and turns Off when the speed is 10 Mbps L A link activity Orange LED lights On when the Ethernet cables are connected and terminated correctly and blinks when receiving Ethernet data packets ID Reset pushbutton Push to set the NetLinx ID Device only assignment for the device Push and hold for at least 10 seconds to reset to fact...

Page 12: ...PB FG2408 01 PB Antique Brass MET ECOM AB FG2408 01 AB Stainless Steel MET ECOM SS FG2408 01 SS Brushed Pewter MET ECOM BP FG2408 01BP Included Accessories Installation Kit FG039 12 includes front mount flange 4 installation screws 4 40 x 3 12 2 Phoenix connectors female 3 5mm and a Ferrite clip Other AMX Equipment PS POE AF Power over Ethernet PoE power supply FG423 80 NXA ENET24 Managed Ethernet...

Page 13: ...nd by default the camera is centered Camera Viewing Angle Adjustment The Camera Viewing Angle Adjustment slider is located on the rear panel of the unit and is intended to be used at the time of installation It is not intended to be used for regular periodic adjustments Once a final installation location has been established use the Camera Viewing Angle Adjustment slider to set the desired camera ...

Page 14: ...5 MET COM D Camera Left and Right Viewing Range L R L R L R Top view when camera is centered at 0 Top view when camera is facing left at 15 Top view when camera is facing right at 15 Camera Viewing Angle 42 Camera 42 Camera 42 Camera Adjustment slider default ...

Page 15: ...ossible avoid facing the device in what would be considered high traffic areas Rear Panel Connectors FIG 6 shows the location of the connectors on the rear panel of the Metreau Entry Communicators and provides pinout information for the Relay and I O connectors To avoid any damage to the electronic component installation must be performed in an ESD safe environment Do not connect power to the Metr...

Page 16: ...t at each point of installation If used with a non PoE capable Ethernet switch such as the NXA ENET24 then an optional PS POE AF Power over Ethernet PoE power supply is required to provide power to the MET ECOM If the MET ECOM is used with a PoE capable Ethernet switch such as the NXA ENET24PoE then no PoE Injectors are required Ethernet Pinouts and Signals Pin Signals Connections Pairing Color 1 ...

Page 17: ...VDC 200 mA The GND connector is a common ground and is shared by all I O ports see table below Connecting The Device via I O When connecting the I O port the GND on the Metreau Entry Communicator must be connected to the ground of the I O device e g a master or any third party I O device Relay Port Connections and Wiring You can connect up to 2 independent external relay devices to the Relay conne...

Page 18: ...he wall box to allow sufficient room for the Metreau Entry Communicator unit FIG 9 FIG 8 Installing the CAT5 Suppression Ferrite FIG 9 Fitting the Ferrite clip and Ethernet cable inside the Conduit Box 1 Release the latch to open the plastic enclosure 2 Insert the Cat5 cable and close the enclosure 3 Installation complete Wall Box front view Ethernet cable and connector Ferrite clip installed on E...

Page 19: ...ystem Diagram Intercom The following system diagram FIG 11 illustrates an AMX system using Metreau Entry Communicators with both wired and wireless touch panels FIG 10 Metreau Entry Communicators System Diagram FIG 11 Intercom System Diagram NetLinx Master NXA ENET24PoE NXD 1000Vi NXD 700Vi MET ECOM D MET ECOM PS POE AF NXA WAP250G MVP 8400i MVP 5200i ...

Page 20: ...Wiring and Connections 14 Metreau Entry Communicators ...

Page 21: ...d MET ECOM D Metreau Entry Communicators To avoid any damage to the electronic component installation must be performed in an ESD safe environment Also note that the Metreau Entry Communicator and wall box must have an earth ground Dimensions FIG 12 provides detailed dimensions for the Metreau Entry Communicators FIG 12 Metreau Entry Communicators Dimensions top view front view side view ...

Page 22: ...ecifications The following illustrations FIG 13 FIG 14 and FIG 15 provide mounting specifications for the Metreau Entry Communicators conduit box FG Reference these measurements when planning and installing the device Front View FIG 13 Mounting Specifications front view ...

Page 23: ...Mounting and Installation 17 Metreau Entry Communicators Side Views Top View FIG 14 Mounting Specifications side views FIG 15 Mounting Specifications top view ...

Page 24: ... with the front surface of the sheetrock While the wall box can be recessed it should never stand proud to the surface 3 Run the Ethernet cable and an Earth ground wire into the wall box Only use the keyholes indicated in FIG 17 4 Place the lug of the ground wire on the device and the Earth ground wire around the provided screw and connect them both to the point shown in FIG 17 FIG 16 Typical Inst...

Page 25: ...t cable in the back of the Metreau Entry Communicator 7 Insert the Metreau Entry Communicator into the wall box and push until the device is flush to the wall FIG 17 Metreau Entry Communicators wall box Expansion clip installation tabs Rough in installation tabs Keyhole Ethernet cable access Earth ground point The device and wall box must have an Earth ground ...

Page 26: ...sert the provided cardboard paint shield into the wall box 4 Place the lug of the ground wire on the device and the Earth ground wire around the provided screw and connect them both to the point shown in FIG 17 5 Install the provided Ferrite clip onto the Ethernet cable see FIG 8 on page 12 6 Connect the Ethernet cable to the back of the Metreau Entry Communicator 7 Insert the Metreau Entry Commun...

Page 27: ...cutout dimensions for the wall box It is recommended that you cutout the surface slightly smaller than what is outlined in the installation drawings so that you can make any necessary cutout adjustments 1 If assembled remove the Metreau Entry Communicator from the wall box 2 Cut out the surface for the Wall Box using the dimensions shown in FIG 18 3 Run the Ethernet cable and an Earth ground wire ...

Page 28: ... the 2 drywall clip sets screws and clips until the wall box is flush against the wall FIG 19 7 Place the lug of the ground wire on the device and the Earth ground wire around the provided screw and connect them both to the point shown in FIG 17 Replacement drywall clip sets must be ordered from AMX FIG 19 Wall Surface Installation Using Expansion Clips Do not over torque the screw doing so can ca...

Page 29: ... assembled remove the Metreau Entry Communicator from the wall box 2 Cut out the surface for the Metreau Entry Communicator wall box using the dimensions shown in FIG 13 3 Run the Ethernet cable and an Earth ground wire into the wall box through one of the provided breakaway access points Leave enough slack in the wiring to accommodate any re positioning of the unit 4 Insert the wall box into the ...

Page 30: ...Wall The installation housing for the Metreau Entry Communicators are made to such exacting specifications it will always be a snug fit Should you ever need to remove the Metreau Entry Communicator from the wall follow these steps 1 Place a flathead screwdriver between the tab of the wall box and the notch of the Metreau Entry Communicator and pop the two apart 2 Pull the bottom of the unit out pi...

Page 31: ...t is available in two colors CB MET ECOMS S paintable Silver FG039 14 S CB MET ECOMS B Black FG039 14 B The Surface Mounting Box FIG 1 allows the Metreau Entry Communicators to be surface mounted with the back panel of the mounting box flush against the surface and the unit protruding Included in the Kit CB MET ECOMS Surface Mount Box 1 Cat5 Suppression Ferrite 2 mounting screws FIG 21 Surface Mou...

Page 32: ...stallation 26 Metreau Entry Communicators Surface Mount Box Specifications FIG 22 provides mounting specifications for the CB MET ECOMS FIG 22 Surface Mounting Box Specifications Top and Side Views TOP SIDE FRONT REAR ...

Page 33: ...the front of the Surface Mount Box via the four mounting tabs two on each side and the mounting clip at the bottom center of the box FIG 24 FIG 23 Installing the CAT5 Suppression Ferrite 1 2 3 complete When positioning the Ferrite clip inside the back box place the bottom of the clip flat against the back inside surface of the back box to allow sufficient room for the Metreau Entry Communicator un...

Page 34: ... Ethernet I O Relay to the Metreau Entry Communicator 4 Place the Metreau Entry Communicator on the front of the Surface Mount Box so that the four slots on the back panel of the Metreau unit align with the four mounting tabs on the box The tabs fit into the slots on the Metreau unit and allow the Metreau unit to slide downward slightly to secure the tabs in the slots 5 Gently slide the Metreau un...

Page 35: ...egin Connecting In a Network With a DHCP Server By using the MET ECOM zeroconf feature and the Bonjour for Windows plug in utility multiple devices can be installed and configured on the network without the need to pre configure each device before installation The dealer only needs to match the serial number printed on the backside of the device or from the label on the box to the serial number th...

Page 36: ... several minutes to ensure the PC reverts to link local addressing b You can confirm that the PC has assigned itself an IP by running ipconfig from a CMD shell The example in FIG 26 shows the Ethernet adapter Local Area Connection could not find a DHCP server and assigned itself the IP address of 169 254 83 124 with Subnet Mask 255 255 0 0 This is a valid link local address If the PC did not assig...

Page 37: ...et mask to 255 255 0 0 4 Launch Internet Explorer and select the Bonjour Plug in 5 Double click the MET ECOM Metreau 218001XXXnnnnnnn in the Bonjour Plug in pane and login and configure the device as needed see Using the Configuration Manager section on page 33 FIG 27 Internet Properties TCP IP Properties dialog ...

Page 38: ...Using Zero Configuration 32 Metreau Entry Communicators ...

Page 39: ...consists of a series of web pages that separate device configuration options by category Collectively the pages in the web console are referred to as the Configuration Manager Each page of the Configuration Manager is described in the following sub sections FIG 28 Configuration Manager Summary of Settings Page initial view Click to Login Logout Click to refresh Click to access the four main the Co...

Page 40: ...se the options on this page to upload change and display images on the Metreau Entry Communicator see the Device Utilities Page section on page 41 Audio Video Click to access the Audio Video page Use the options on this page to configure Audio Video and Display settings see the Audio Video Page section on page 47 Accessing the Configuration Manager From any PC that has access to the LAN that the M...

Page 41: ... Settings Page Summary of Device Settings Page Device Information Device Type The name of the connected device Firmware The version of the firmware running on the device Serial The serial number of the device Location The physical location of this device as entered on the Device Utilities Page Utility Meta Information See the Device Utilities Page section on page 41 Description A comment further d...

Page 42: ...the unit Subnet Mask The subnet mask associated with IP addressing Gateway The IP gateway used by this unit MAC Address The MAC address of the unit NetLinx Settings Status The connection status of the device System Number The NetLinx system number Device Number The ICSP device number of this unit Master IP The IP address of the NetLinx master connected to the device Master Port Port number for the...

Page 43: ...uration Page NetLinx Settings Tab section on page 39 User Settings Use the options in this tab to set the Username and Password for access to the Metreau Entry Communicators web server pages see the Configuration Page User Settings Tab section on page 40 Configuration Page Network IP Settings Tab Select the IP Settings tab of the Configuration page to access the Network IP Settings tab FIG 32 Use ...

Page 44: ...P Dynamic IP address and subnet mask are requested from the DHCP server Static User provides IP address information Host The hostname of the unit IP Address The IP address of the unit Subnet Mask The IP subnet mask of the unit Gateway The gateway used for IP routing DNS Address Domain Suffix The domain name Primary DNS Secondary DNS Domain Name System IP numbers associated to the domain suffix Zer...

Page 45: ...Settings tab Configuration Page NetLinx Settings Tab Connection Displays the ICSP connection status Not Connected Connected Mode Master connection mode URL TCP The device connects to the specific IP URL of a master via a TCP connection Auto The device connects to the first master that responds This setting requires you set the System Number Listen The device listens for the master to initiate cont...

Page 46: ... a New Username and Password 1 In the Configuration page select the User Settings tab 2 In the text field next to New Username type the new name 3 In the text field next to New Password type the new password 4 Confirm the password in the Re type Password field 5 Click Accept Setting the Host Name requires DNS implementation on the IP network FIG 34 Configuration Page User Settings page Configurati...

Page 47: ...d change and display images on the MET ECOM D FIG 35 Device Utilities Page Device Utilities Page Utility Meta Information Location Enter a descriptive text string that indicates the physical location of this device Description Enter a text string to provide any additional comments on this device as desired Submit Click to submit the Location and Description entries Create New Folder Image Selectio...

Page 48: ...the MET ECOM D using a standard JPG image file as a starting point 1 Open the image file that you want to use with the MET ECOM D FIG 36 Device Utilities Page Cont File Upload Browse Opens the file browse window where you can locate and select Display Images Submit Submits the selected file image for upload Images Location The file directory location of the selected image New Folder Creates a new ...

Page 49: ...or count to 2 Colors 1 bit monochrome as shown in FIG 39 These are the basic steps involved However there are nuances involved in selecting images that will translate effectively to the required size using only 1 bit color For best results avoid complex images that rely on substantial color gradations as they will tend to be much less readable once they are converted and resized Generally the clos...

Page 50: ...se with the MET ECOM D If you do not already have TPD4 installed download and install the latest version from www amx com TPDesign4 Resource Manager The Dynamic Images tab of TPD4 s Resource Manager dialog FIG 40 allows you to manage images that exist on an HTTP server or FTP server external to the panel Dynamic images can be refreshed at specified regular intervals or via the Panel Refresh Dynami...

Page 51: ...Path must be a valid HTTP URL minus the protocol and host The only exception to this is the inclusion of special escape sequences and in the case of the FTP protocol regular expressions For Metreau Entry Communicators Path must be set to pages as shown in FIG 41 File Enter a file name that must be the full path to the location of the file or pro gram that will return the resource For Metreau Entry...

Page 52: ...hing resources will cause the button displaying that resource to refresh as well The default value is zero 0 which means that the resource is only downloaded once Refresh only at Panel Startup This option is only available if the Refresh Rate is set to 0 and causes the dynamic image to refresh only upon restart of the panel as opposed to upon each visit to the page as is the default When images of...

Page 53: ... these options 4 Click Accept FIG 42 Audio Video Page Audio Settings tab Audio Video Page Audio Settings Tab Audio Codec G 711 Codec An ITU T standard for audio companding ALAW A standard companding algorithm used in European digital communications systems to optimize the dynamic range of an analog signal for digitizing ULAW A companding algorithm primarily used in the digital telecommunication sy...

Page 54: ...n JPEG codec H 263 A low bitrate compressed format standard codec Note Do not change the Video Codec setting during a call Camera Video Stream Configuration Orientation Normal Sets the video stream to normal view Mirror Sets the video stream to a mirrored view Flip Flips the video stream to view Light Level Normal Setting for a normal light level environment no changes Low Light Setting for a lowe...

Page 55: ...ick Accept Audio Video Page Display Settings Tab Click the Display tab in the Audio Video Page to access the Display Settings tab FIG 44 Use the options in this tab to view edit display specific settings Audio Video Page Video Settings Tab Cont Red 0 255 scale for the Red balance Green 0 255 scale for the Green balance Blue 0 255 scale for the Blue balance Flicker Correction Anti flicker Mode The ...

Page 56: ...nge the Intensity Rate level 5 Use the sliders to change the Dimness Rate level 6 Use the sliders to change the Motion Detector Sensitivity level the higher the value the more sensitive the device becomes 7 Note the image currently displayed is correct 8 Click Accept Audio Video Page Display Settings Tab Contrast 0 255 scale for contrast display from device Intensity 0 255 scale for image intensit...

Page 57: ... Panels that support intercom may be able use intercom with the Metreau Entry Communicators Touch Panel Intercom Commands STREAM SET Sets the parameters for a audio or H 263 video stream The communication parameters must include IP address port used stream type mode and stream ID See the SET VIDEO command for details on specifying the H 23 codec Note It is not necessary to set up a video stream fo...

Page 58: ...STREAM PLAY This command notifies the Metreau Entry Communicator to start streaming by enabling the micro phone speaker and video source and then transmitting packets and playing received packets Syntax SEND_COMMAND DEV STREAM PLAY stream id Variable stream ID integers are from 1 20 Example SEND_COMMAND MET1 STREAM PLAY 1 STREAM STOP Stops transmission and receive of stream This command terminates...

Page 59: ...tion of the video system Information returned includes codec resolution and bit rate Codec can be either H 263 or MJPEG Syntax SEND_COMMAND DEV GET VIDEO Example SEND_COMMAND MET1 GET VIDEO Returns VIDEO MJPEG SET VIDEO Sets the configuration of the video system Configuration includes codec resolution and bit rate Note See the STREAM SET command for details on setting up a H 263 video stream Synta...

Page 60: ...ring a call GET GAIN Retrieves the current gain setting on the microphone input Syntax SEND_COMMAND DEV GET GAIN Example SEND_COMMAND MET1 GET GAIN Returns GAIN 127 SET GAIN Sets the gain on the microphone input Syntax SEND_COMMAND DEV SET GAIN Value Variable Value 0 to 255 Example SEND_COMMAND MET1 SET GAIN 0 Mutes the microphone GET VOLUME Retrieves the current volume set ting on the speaker out...

Page 61: ... the LED brightness level ON at 50 GET LED LEVEL Retrieves the brightness of the LED To turn the LED ON or OFF Syntax SEND_COMMAND DEV GET LED LEVEL Example SEND_COMMAND MET1 GET LED LEVEL Returns LEDLEVEL state level SET LED STATE Sets the state of the front button LED Syntax SEND_COMMAND DEV SET LED STATE State Variable State IDLE ACTIVE Example SEND_COMMAND MET1 GET LED STATE ACTIVE Sets the LE...

Page 62: ...BAL HORIZON Sets the display white balance to horizon preset GET CAM WBAL Retrieves the white balance control setting for the camera Syntax GET CAM WBAL Returns CAM WBAL 45 The White balance setting is 45 SET CAM RGB Manually sets the RGB Gain control for the camera Syntax SET CAM RGB R tag G tag B tag Variables R tag Red channel gain setting 00 FF G tag Green channel gain setting 00 FF B tag Blue...

Page 63: ... is 45 SET CAM SAT Sets the display saturation for the camera Syntax SET CAM SAT color saturation Level Variables color Saturation Level a value from 0 100 in percentage Example SEND_COMMAND MET1 SET CAM SAT 50 Sets the display color saturation level to approximately 50 GET CAM SAT Retrieves the saturation level for the camera Syntax GET CAM SAT Variables color Saturation Level a value from 0 100 ...

Page 64: ...COMMAND MET1 SET DISP BANNER mnt amx usr upload do_not_disturb bmp Image file requirements BMP image type 128 x 64 pixels Refer to the Uploading a Display Image To The Device section on page 46 for instructions on uploading image files to the MET ECOM D to be used as display images Refer to the Creating Dynamic Images section on page 41 for instructions on using TPDesign4 to create Dynamic Images ...

Page 65: ...0 SET DISP CST Sets the display con trast Syntax SET DISP CST Contrast Level Variables Contrast Level a value from 0 255 Example SEND_COMMAND MET1 SET DISP CST 128 Sets the display contrast to approximately 50 GET DISP CST Retrieves the contrast setting for the LCD dis play Syntax GET DISP CST Contrast Level Example SEND_COMMAND MET1 GET DISP CST Returns DISP CST 50 SET DISP STATE Sets the display...

Page 66: ...tact closure Channel changes Pushes and Releases generate reports based on their active state Setting an input to ACTIVE HIGH will disable the output for that channel Syntax SEND_COMMAND DEV SET INPUT Channel State Variable State LOW or HIGH Example SEND_COMMAND IO SET INPUT 1 HIGH Sets the I O channel to detect a high state change and disables output on the channel System Commands MOD Returns the...

Page 67: ... desc_txt Variables Desc_num 1 or 2 Desc_txt max 20 character string Example SEND_COMMAND STORM SET DOOR DESC 1 front door Sets the 1st description to front door GET DOOR DESC Returns the door s description text Syntax SEND_COMMAND DEV GET DOOR DESC desc_num Variable Desc_num 1 or 2 Example SEND_COMMAND STORM GET DOOR DESC 1 Returns DOOR DESC1 front door ...

Page 68: ...etLinx Studio 2 4 or higher From the Online Tree tab of the Workspace window select the NetLinx Master Follow steps outlined in either the Obtaining or Assigning the Master s IP Address sections from your particular NetLinx Master instruction manual to use an address Note the IP Address and Gateway information 2 Launch NetLinx Studio 2 4 default location is Start Programs AMX Control Disc NetLinx ...

Page 69: ...lick the associated System number from the Workspace window and select Refresh System to detect all devices on the current system establish a new connection to the Master and refresh the System list with devices on that system 3 After the Communication Verification dialog window verifies active communication between the PC and the Master verify the Metreau Entry Communicator appears in the OnLine ...

Page 70: ...Do not pull power from device during transfer it can take approximately 5 minutes to finalize firmware transfer The upgrade can still be in progress when the bargraph reaches the end it is a good idea to wait until the process is complete 10 Click Close after the device reboots to return to the main program 11 Right click the associated System number and select Refresh System This causes a refresh...

Page 71: ...s Incorporating an Intercom Panel Into Your NetLinx System Download the module for the intercom panel from www amx com and include it in your NetLinx project file For searching purposes the module manufacturer is AMX and the model is Intercom Panel Intercom Configuration Intercom Setup The Intercom Setup page FIG 47 allows you to set the session timeout for intercom calls toggle intercom auto answ...

Page 72: ...eout the panel provides you with a popup FIG 48 to extend the session 3 Press Exit when you are finished The session timeout can be disabled by setting the time to 0 zero If both panels have a timeout of 0 then the call must be manually terminated Setting Intercom Auto Answer 1 Select the Setup button on your intercom page 2 Press the button beneath Auto Answer to toggle the option The button indi...

Page 73: ...l doorbells and configure the Door Chime for each Metreau Entry Communicator doorbell in the system Disabling All Doorbells Press the Disable All Doorbells button on the Door Setup page to disable all of the doorbells in the system Once disabled no calls can be received by the doorbells until they are re enabled By default this option is off indicated by NO on this page FIG 49 Intercom Door Setup ...

Page 74: ...By default there are six different Chime sounds to choose from and up to five doorbells to which any Chime can be assigned 1 Press a Chime button in the Pick Sound column 2 Press a Doorbell button in the Assign To column Chimes can be assigned to Doorbells in any combination i e a single Chime can be assigned to all doorbells a different Chime can assigned to each doorbell or any combination there...

Page 75: ...nels intercom call directory pages Allowing a Panel To Be Monitored 1 Select the Setup button on your intercom page 2 On the intercom setup page press Advanced Setup This launches the password numeric keypad 3 Enter the password and press Done The default password is Password 4 of the panel s firmware Password Setup 4 Press the button beneath Allow This Panel to be Monitored to toggle the option T...

Page 76: ...ware Password Setup 4 Press in the area under Panel Name This launches a on screen keyboard 5 Type the name of the panel and press Done This is the name that is displayed in other panels intercom call directory pages 6 Press Back to return to the intercom setup pages 7 Press Exit when you are finished Answering an incoming Intercom call The provided intercom pages include an call answering popup w...

Page 77: ...intercom session with the doorbell View Press to initiate one way communication with the doorbell In this case you will see and hear the doorbell but the doorbell will not see or hear you End Call Press to terminate the call from the doorbell Ignore Pressing this button denies the intercom session with the doorbell Someone At The Door Page When an incoming call from a doorbell is answered the Some...

Page 78: ...ress the Mute button to mute the panel speaker Ending a Doorbell Call Press the End Call button in the Someone At The Door page to terminate the intercom session with the doorbell Creating Intercom Pages The easiest method of creating your own intercom pages is to start with the pages provided by AMX in the module You can change the aesthetics of the pages as long as the channel address level and ...

Page 79: ...he name of doorbell 2 as it appears in other doorbell pages 1 213 1 225 Back Door The name of doorbell 3 as it appears in other doorbell pages 1 214 1 229 Garage The name of doorbell 4 as it appears in other doorbell pages 1 215 1 233 Lobby The name of doorbell 5 as it appears in other doorbell pages 1 216 1 237 Back Navigates to the Door Setup page This requires a standard page flip to Door Setup...

Page 80: ... on page 70 0 265 2 Page All Pages all connected intercom panels 1 6 3 Place Call Initiates an intercom call to a panel 1 7 4 End Ends an intercom call to a panel 1 8 5 Call Privacy Off Toggles the privacy option of the intercom When enabled other panels cannot contact the panel 1 9 6 Door Privacy Off Toggles the privacy option of the doorbell When enabled doorbells in the system cannot contact th...

Page 81: ... in a call 1 21 14 Call Panel Display only indicates the panel is currently in a call 1 24 15 Call Panel Display only indicates the panel is currently in a call 1 27 16 Call Panel Display only indicates the panel is currently in a call 1 30 17 Call Panel Display only indicates the panel is currently in a call 1 33 18 Panel Privacy Display only indicates the panel has privacy enabled 1 22 19 Panel ...

Page 82: ...33 Intercom Setup Page Navigates the intercom panel to the intercom Setup page This requires a standard page flip to Setup Setup Name Description Channel Port Code Address Port Code Auto Answer OFF Toggle the panel s auto answer feature off and on 1 12 Session Timeout A display of the current session timeout 1 9 Increment Up Increments the intercom session time up 1 15 Increment Down Increments th...

Page 83: ...incoming doorbell 1 39 Door Speaker Level Up Raises the speaker level on the incoming doorbell 1 40 Door Speaker Level Bargraph Displays the current speaker level on the incoming doorbell 1 0 1 0 1 2 Panel Microphone Level Mute Mutes the microphone on the panel 0 Panel Setup Intercom Mic Level Mute Panel Microphone Level Down Lowers the microphone level on the panel 0 Panel Setup Intercom Mic Leve...

Page 84: ... name of the doorbell as it appears in other doorbell pages See Naming a panel section on page 70 1 211 Doorbell Adjustments Popup Name Description Channel Port Code Address Port Code Level Port Code Door Microphone Level Mute Mutes the microphone on the incoming doorbell 1 371 Door Microphone Level Down Lowers the microphone level on the incoming doorbell 1 373 Door Microphone Level Up Raises the...

Page 85: ...0 setup port Panel Setup Intercom Mic Level Panel Speaker Level Mute Mutes the speaker on the panel 0 Panel Setup Intercom Sound Level Mute 1 0 Panel Speaker Level Down Lowers the speaker level on the panel 0 Panel Setup Intercom Sound Level Down 1 0 Panel Speaker Level Up Raises the speaker level on the panel 0 Panel Setup Intercom Sound Level Up 1 0 Panel Speaker Level Bargraph Displays the curr...

Page 86: ...e NetLinx Module 80 Metreau Entry Communicators More Time popup page More Time Popup Name Description Channel Port Code Address Port Code Confirm More Time Select to extend intercom session beyond timeout 1 20 ...

Page 87: ...Programming 81 Metreau Entry Communicators ...

Page 88: ...registered trademarks of AMX AMX reserves the right to alter specifications without notice at any time It s Your World Take Control 3000 RESEARCH DRIVE RICHARDSON TX 75082 USA 800 222 0193 469 624 8000 469 624 7153 fax 800 932 6993 technical support www amx com ...

Reviews: