Replacing HDDs in MAX Servers
39
MAX HT Servers
3.
Install and secure the replacement drive into the drive tray.
4.
Slide the replacement drive/tray assembly fully into the slot, and push the hinged latch back into its
locked position. The LEDs on the front of the HDD should light to indicate that it has been
connected and is communicating properly.
5.
Return the faceplate to its locked position.
Step 3: Add the New Drive to the System
When an HDD is replaced in an HT Server, it must be added to the system:
1.
In the Admin Menu, select
Authenticate HDD
.
2.
Select
Add
, then select
OK
to proceed to the
Add HDD
window.
3.
Enter the
Serial Number
for the new drive.
The Serial Number for each replacement drive is printed on a decal placed on the top panel of the
HDD.
When entering the Serial Number, use the following syntax (no quotes): “
WD-
WXXXXXXXXXXX
”
4.
Enter the 16-digit
Key
supplied by AMX for that HDD (printed on a slip of paper included with the
replacement drive).
5.
Select
Restart MAX Daemon
(in the Admin Menu).
6.
Note
: Restarting the MAX Daemon will disconnect WinMAX from the server.
7.
Terminate the Telnet session.
The HT Server will rebuild the new drive and add it to the RAID array. There is no need to reboot the
server; the new drive is ready to use.
MAX Admin Menu
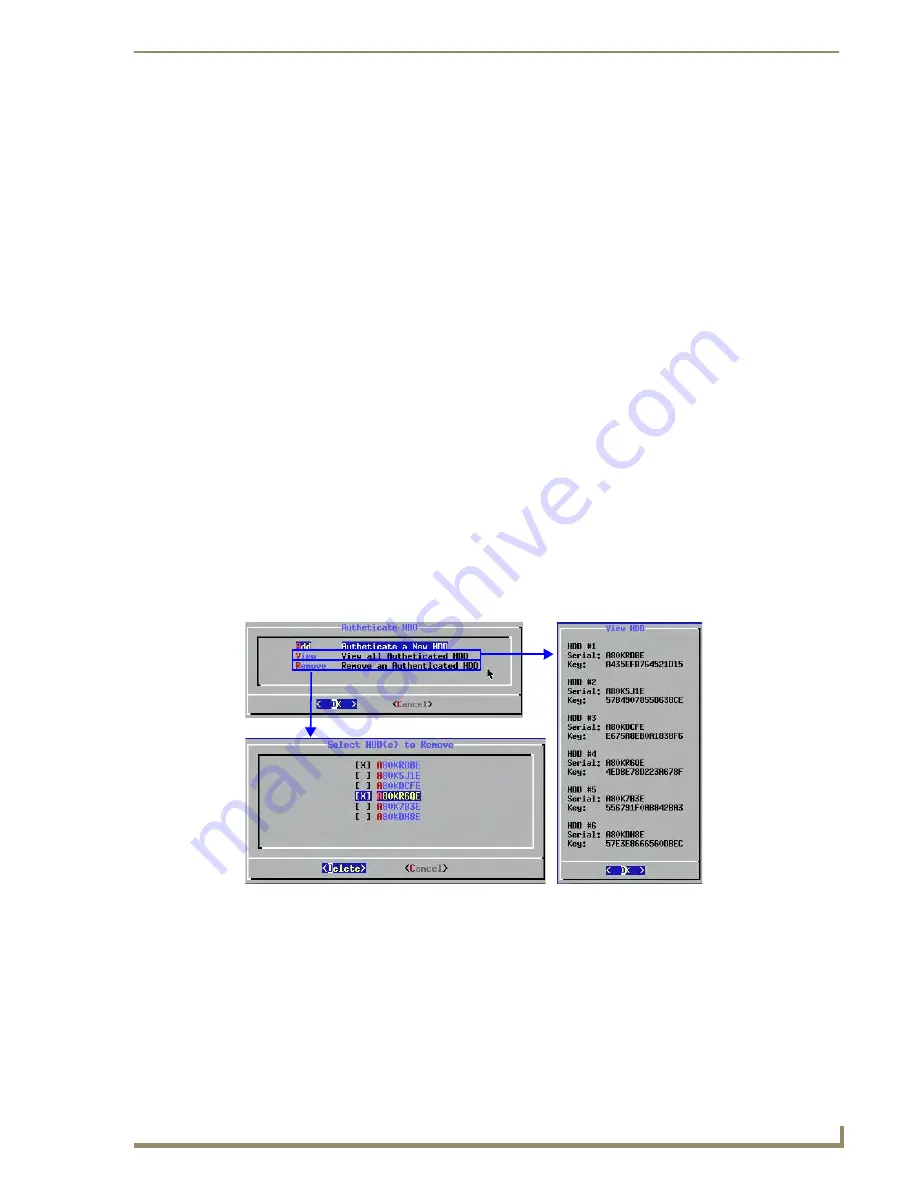
Use the other options in the
Authenticate HDD
menu (accessible via the Admin Menu), to manage all
HDDs in the server, as shown in FIG. 40.
The options in the Authenticate HDD menu are described below:
Refer to the
MAX Admin Menu
section on page 13 for more information.
FIG. 40
Authenticate Menu - View HDD and Select HDD(s) to Remove dialogs
• Add:
Select to authenticate a new HDD, as described in the previous section.
• View:
Select to view all the serial numbers and keys for HDDs in the system. Note that this list only indi-
cates HDDs that have been successfully authenticated.
• Remove: Select to remove a selected HDD from the system. One or more drives can be removed at a time.
Summary of Contents for MAX-HT04
Page 6: ...iv MAX HT Servers Table of Contents...
Page 18: ...MAX HT Servers Setup and Configuration 12 MAX HT Servers...
Page 36: ...MAX Admin Menu 30 MAX HT Servers...
Page 42: ...MAX Servers DVD Drives Supported Formats 36 MAX HT Servers...
Page 46: ...Replacing HDDs in MAX Servers 40 MAX HT Servers...
Page 54: ...Rack Mounting MAX Servers 48 MAX HT Servers...


