background image

Replacing HDDs in MAX Servers

38

MAX HT Servers

4.

Select 

RAID 5 Status

. This option displays a listing of HDDs in the HT Server. Look for the drive 

that is labeled as “

Degraded

”.

Step 2: Physical Removal and Replacement of the Drives

There are two pieces of data that you must provide to complete the process of adding the replacement 
HDD: The new HDD’s 

Serial Number

, and 

Key

.


The 

Serial Number

 is printed on a label placed on the top of the HDD. The Serial Number is 

located directly beneath the barcode (“

S/N WXXXXXXXXXXX

”). 


The 16-digit 

Key

 is printed on a slip of paper included with the HDD.

1.

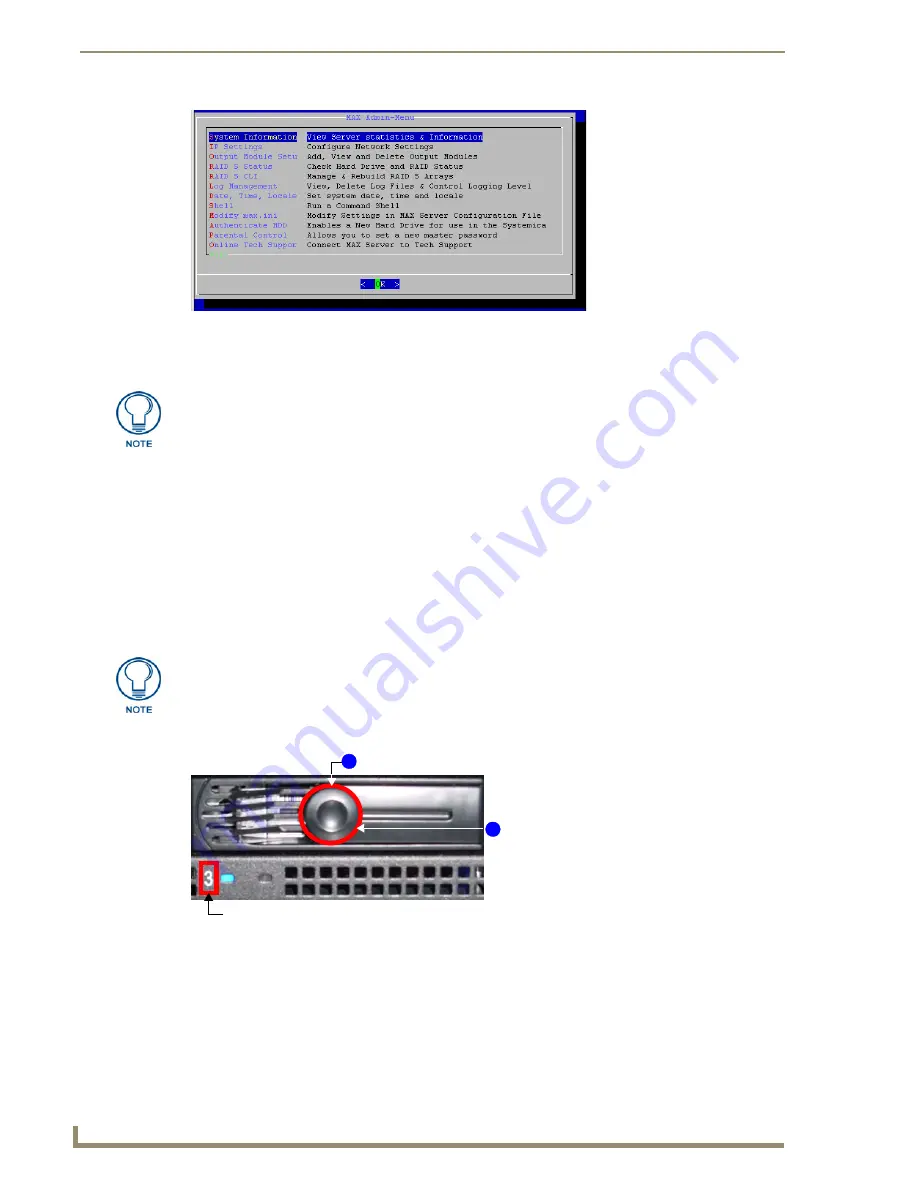
Lower the faceplate on the front panel of the server. to access the HDDs (FIG. 39). 

2.

Remove the damaged HDD. Each HDD is mounted in a tray that slides in and out of the server. To 
remove the drive/tray assembly:

a.  

Pull the latch forward to unlock the drive tray. Flip the hinged panel out and use it as a handle to 

gently pull the drive/tray assembly out of its slot.

b.  

Remove the drive from the drive tray. The drive is secured to the tray with four screws on the 

bottom panel.

FIG. 38  

Admin Menu

The drives on HT Servers are physically labeled with numbers on the front panel. 
HT04 Servers use drives labeled 1-4, and HT12 Servers use drives 1-12 (see 
FIG. 39). However, the drives are listed in the RAID 5 Status window (of the Admin 
Menu) starting with zero (0). Therefore, note that drive “0” in the Raid 5 Status 
window equates to the drive labeled “1” on the front of the HT Server. Remember that 
each drive number in the Raid 5 Status list is offset by one relative to the labels on 
the front of the HT Server.

Be sure to record the Serial Number before inserting the new drive into the server.

FIG. 39  

Removable drive/tray assembly (front panel)

Pull the latch forward to unlock the drive tray

Carefully slide the 

2

1

drive/tray assembly
out of its slot.

Drive number (silk-screen)

Summary of Contents for MAX-HT04

Page 1: ...Operation Reference Guide MAX by AMX MAX HT Servers Digital Media Servers MAX HT04 MAX HT12 MAX HT04T MAX HT12T Last Revised 9 03 2009...

Page 2: ...ked on the outside of each box The RMA is valid for a 30 day period After the 30 day period the RMA will be cancelled Any shipments received not consistent with the RMA or after the RMA is cancelled w...

Page 3: ...min Menu 7 Step 4 Add MAX AVPs and AVM AOM Modules to the Server 8 Adding MAX AVP Players and or MAX AVM Modules 8 Adding MAX AOM Audio Only Modules 8 Additional Information on USB Ports 9 Step 5 Conn...

Page 4: ...enticate HDD 24 Authenticating a new HDD 24 Viewing All HDDs In the MAX Server 25 Removing HDDs From the MAX Server 25 Parental Control 26 Online Tech Support 26 Cover Art 27 Change Region 27 Changing...

Page 5: ...rives 38 Step 3 Add the New Drive to the System 39 MAX Admin Menu 39 Rack Mounting MAX Servers 41 CAUTION Safety Instructions 41 Rack Mounting HT Servers 42 Step 1 Install Chassis Sections Onto The Se...

Page 6: ...iv MAX HT Servers Table of Contents...

Page 7: ...at Additionally MAX servers provide playback of MP3 files MAX servers support up to 25 MAX AVP Audio Video Players via Ethernet MAX servers support 1 or 2 MAX AOM audio only modules each of which can...

Page 8: ...switched GB Control segment to NetLinx Master or PC switched GB Content segment to MAX AVPs mouse ports Power switch cable connector Power ON OFF toggle switch IMPORTANT MAX HT Servers require a 24 ho...

Page 9: ...otup Power Cycle Peak 6 0A 120V 720 watts Normal Usage Peak 3 0A 120V 360 watts 240 VAC Bootup Power Cycle Peak 3 0A 240V 720 watts Normal Usage Peak 1 5A 240V 360 watts BTU HR 1229 5 Front Panel Comp...

Page 10: ...90 22 23 cm x 43 50 cm x 48 00 cm 5 RU mounts in a standard 19 equipment rack Weight servers only MAX HT04 HT04T 60 lbs 27 22 kg MAX HT12 HT12T 68 lbs 30 84 kg Shipping Weight including mounting equip...

Page 11: ...of 25 AVPs AVMs These steps apply to all MAX servers unless otherwise noted Networking Specifications for MAX Servers It is required that the control segment of the network using the ETHERNET CONTROL...

Page 12: ...Server for any length of time more than one hour the RAID batteries will begin to discharge Partially discharged batteries may cause performance problems during media playback In the event that the H...

Page 13: ...e MAX Admin Menu allows access to various administrative functions for the MAX Server Working With the MAX Admin Menu Use the arrow keys on the keyboard to highlight the desired option and press Enter...

Page 14: ...Setup menu select OK again to return to the main menu 5 Select Restart MAX daemon Adding MAX AOM Audio Only Modules Complete these steps for each MAX AOM module that you want to add to the HT 1 In th...

Page 15: ...ult the AOM connected to USB port 2 will switch from providing AOM zones 5 8 to providing audio zones 1 4 the next time the server is rebooted Step 5 Connect the Modules to the Server Once the AVP pla...

Page 16: ...en the System Information tab where you can specify the network address of the MAX Server 3 Change the Server s IP Address or URL field to match that of the MAX Server you are connecting to Click on t...

Page 17: ...on Periodic Updates The MAX Server can receive periodic updates for its system software and internal information database In order to receive updates the PC running WinMAX and the server must be on th...

Page 18: ...MAX HT Servers Setup and Configuration 12 MAX HT Servers...

Page 19: ...ult User Name root Password mozart If you have connected directly to the MAX Server you will not be prompted for a User Name or Password Accessing the Admin Menu via WinMAX If there is already a PC ru...

Page 20: ...IP Settings These options allow you to view and configure the IP settings of the server for compatibility with your network Output Module Setup This set of options allows you to add view and delete e...

Page 21: ...page allow you to change the region code setting for the MAX Server s DVD ROM Update Firmware The options on this page allow you to schedule when the server should automatically check for firmware upd...

Page 22: ...n If this option is not selected then you can use the remaining fields in this screen to manually specify an IP address NetMask Default Gateway IP and Primary nameserver for the MAX Server Press OK to...

Page 23: ...ngs 3 In the System Information tab click the Server Configuration button to access the Server Configuration dialog 4 Copy the Default Gateway and first DNS Server settings from step 2 into the Gatewa...

Page 24: ...are adding a MAX AVP Audio Video Player the range is 1 25 MAX HT04 and MAX HT12 servers support up to a total of 25 AVMs and or AVPs Click OK to save your changes Viewing all Modules in the System Sel...

Page 25: ...D 5 Status This page displays read only status information for the servers RAID 5 array including individual status for each of the disc drives FIG 16 Press OK to return to the MAX Admin Menu RAID 5 C...

Page 26: ...ere you can select which events to include in the logs RS232 ADA TCP IP and DEBUG By default all of the log options are selected for inclusion Use the spacebar to select deselect these options as desi...

Page 27: ...enu 21 MAX HT Servers Date Time Locale This set of options allows you to specify adjust the system s date time and location settings FIG 20 FIG 19 Example of a log display FIG 20 MAX Admin Menu Date T...

Page 28: ...hat you want to adjust Then use the up and down arrow keys to adjust the selected element To change the month move the highlighted cursor to the Month window and use the up down arrow keys to scroll f...

Page 29: ...ur changes and return to the MAX Admin Menu Shell This option opens an MS DOS window for sending specific commands directly to the server Modify max ini These options on this page are only for use by...

Page 30: ...Select to remove a selected HDD from the system One or more drives can be removed at a time Authenticating a new HDD 1 Select Authenticate a New HDD from the MAX Admin Menu 2 Enter the 8 digit serial...

Page 31: ...erver Select Remove from the Authenticate HDD menu to remove a selected HDD from the system One or more drives can be removed at a time Select the HDD s that you want to remove from the system then se...

Page 32: ...e parental control enter a new parental control password and select OK Online Tech Support This option allows you to establish a connection between the MAX Server and AMX Technical Support for remote...

Page 33: ...code setting At that point there is no way to change the region code setting again The number of resets still available is indicated at the top of the Change Region page The region code setting for th...

Page 34: ...update the system immediately if updated firmware is detected Scheduling Automatic Firmware Updates Select Schedule from the Update Firmware page to schedule a day of the week and time to check for fi...

Page 35: ...deamon This option restarts the MAX daemon Restart the daemon to activate any configuration changes made via the options in the MAX Admin menu Shutdown This set of options allows you to either Reboot...

Page 36: ...MAX Admin Menu 30 MAX HT Servers...

Page 37: ...gion locks will play on any DVD player in any country DVD discs may have multi region codes such as Region 1 2 and 4 and will play in drives coded with the corresponding region code On the back of eac...

Page 38: ...d by the DVD CCA licensing organization Each DVD ROM drive adheres to the requirement that the drive must be set to a region specific code to play authorized DVDs for that region The requirement allow...

Page 39: ...e is indicated at the top of the Change Region page see FIG 36 In the event that you expect to load large numbers of DVDs with different region codes you should group the DVDs together by region to mi...

Page 40: ...n your keyboard to scroll down and highlight the Change Region option 4 Press the Return Enter to open the Change Region page 5 Use the up down arrow buttons on your keyboard to select the appropriate...

Page 41: ...8124B DVD Drives MDL Series DVD Drives The following table indicates the compatibilities of the DVD Drives in the MDL Series Powerfile DVD Drives Compatible Formats Drive Model DVD ROM DVD R DVD RW DV...

Page 42: ...MAX Servers DVD Drives Supported Formats 36 MAX HT Servers...

Page 43: ...one has failed There are several operations that are required to successfully replace an HDD in an HT Server all of which are described in this document 1 The physical removal of the damaged HDD and...

Page 44: ...nlock the drive tray Flip the hinged panel out and use it as a handle to gently pull the drive tray assembly out of its slot b Remove the drive from the drive tray The drive is secured to the tray wit...

Page 45: ...ey supplied by AMX for that HDD printed on a slip of paper included with the replacement drive 5 Select Restart MAX Daemon in the Admin Menu 6 Note Restarting the MAX Daemon will disconnect WinMAX fro...

Page 46: ...Replacing HDDs in MAX Servers 40 MAX HT Servers...

Page 47: ...he connection of the equipment to the supply circuit and the effect that overloading of circuits could have on overcurrent protection and supply wiring Appropriate consideration of equipment nameplate...

Page 48: ...he Server Chassis The Chassis Sections mount directly to the server chassis using the middle row of screws on the server chassis The server has plastic plugs in the holes that you will use to attach t...

Page 49: ...to allow the Intermediate Section to slide fully into place 3 Slide the Intermediate Section in to the point that the Breaker tab on the Intermediate Section rests against the Stopper on the top guide...

Page 50: ...xtension Bracket should be mounted on the Rail Assemblies Depending on the space required you may choose to use the End Brackets rather than the Extension Brackets 2 Loosely mount the Extension Bracke...

Page 51: ...bottom of the Rack Rail FIG 45 2 Attach an Adapter Bar to the rear of each of the two Rack Rail assemblies FIG 46 Once the Adapter Bars have been attached to the front and rear of both Rack Rail asse...

Page 52: ...properly mounted to the Rack Rail assemblies and vertical mounting rails in the equipment rack FIG 47 Align the holes on the Adapter Bar to the holes on the rails in the equipment rack FIG 48 Adapter...

Page 53: ...he server onto the extended rails Keep the server parallel to the floor when sliding the server rails into the rails Tilting the server up or down could result in damage to the Slide Rails 4 Carefully...

Page 54: ...Rack Mounting MAX Servers 48 MAX HT Servers...

Page 55: ...Rack Mounting MAX Servers 49 MAX HT Servers...

Page 56: ...egistered trademarks of AMX AMX reserves the right to alter specifications without notice at any time It s Your World Take Control 3000 RESEARCH DRIVE RICHARDSON TX 75082 USA 800 222 0193 469 624 8000...

Reviews: