AMIMON AMN060 User Manual Download Page 13

WHDI Reference Design Setup Guide 


Dev Kit-UG1_Rev 1.0.28
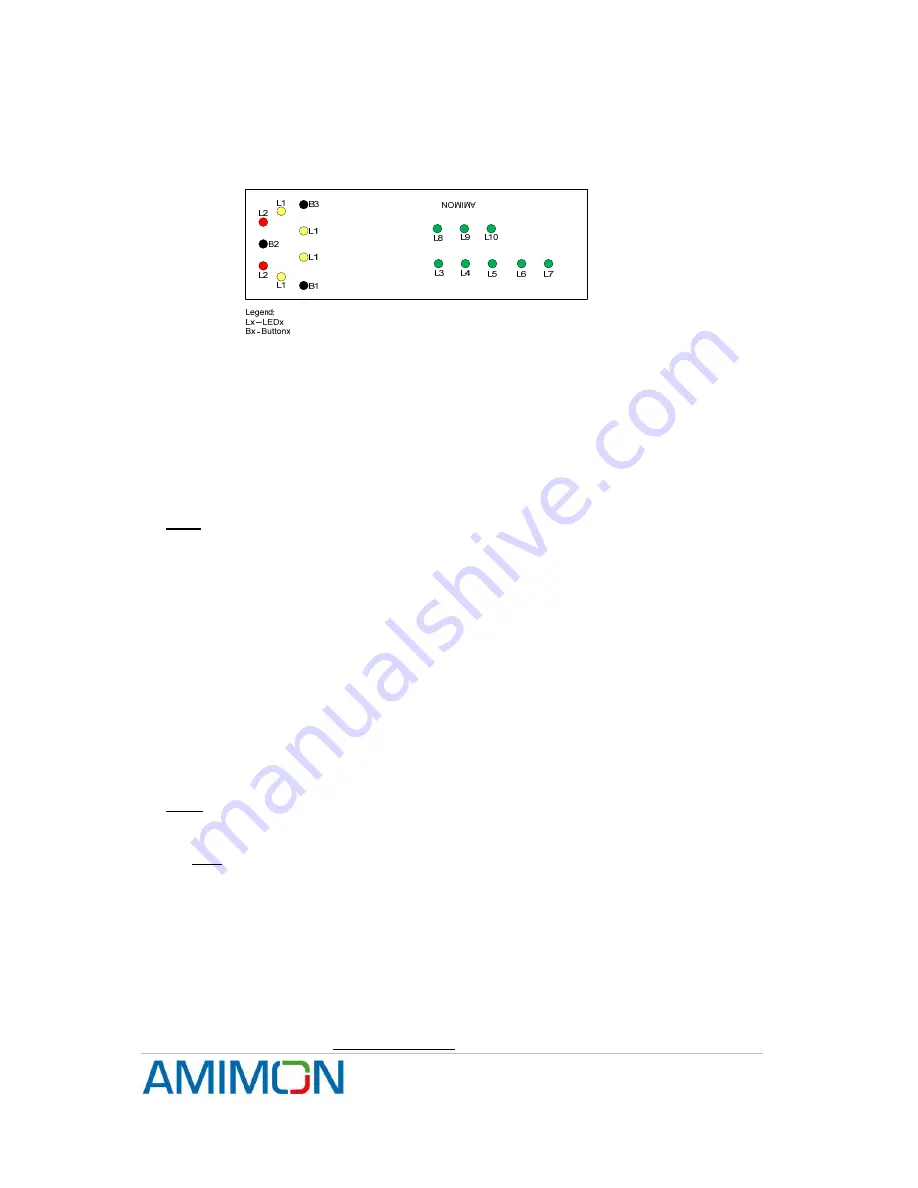


5.  User Interface 


Figure 4 – User Interface General View 

5.1  Video Input selection 

Toggle between video input ports – HDMI 0, HDMI 1, VGA, Component 


Button 

o

  On Tx with Shaldag – no selection can be done via the keypad. Default 

port is HDMI 0 


LEDs

: according to section ‘Video-in status Tx & Rx’ below 

 
Note: 

In some older Shaldag system, short press on B1 button will reverse the output 

pixel clock polarity, and only HDMI 1 is available. This is a temporary solution. 

5.2  Video input status Tx & Rx 

o

  No video input (Rx & Tx) – L2 red 

o


Unsupported video input (Rx & Tx) – L2 blinking red (future implementation)


o


Video input exists and legal (Tx, and if link exist then Rx as well) – L2 green


5.3  Registration (both Tx and Rx) 

Registration is the process where the Tx and Rx exchange a public key and generate 
a unique master key that is stored in non volatile memory.   
Registration needs to be done only once for each pair of Rx and Tx. After successful 
registration the registered Tx and Rx can create link only with each other and cannot 
link with other devices. 
Note: A system sent from Amimon will already be registered 
 

o


Button

: To start the registration process, apply a long press (3 seconds) on B2 of 

both Tx and Rx. 

o


LEDs: 

Upon successful registration a link will be established and L1 LEDs should 

turn solid yellow. L2 will be solid red in case there is no video input or solid green 
in case of video input.


5.4  Association (Tx & Rx) 

Association is the link set-up phase between two registered devices. The Tx and Rx 
create session keys using the master key that was created during registration. 

o


Button

Association starts automatically upon power-up

.  If for some reason 

manual association is required (mostly for debug purposes), apply a long press 
on the B1 button on one of the boards to start association.  Applying a long press 

Confidential


Under NDA


Internal document. Information subject to change


13

 Page


Summary of Contents for AMN060

Page 1: ...WHDI Reference Design Setup Guide Dev Kit UG1_Rev 1 0 28 Confidential Under NDA Internal document Information subject to change 1 Page U U Us s se e er r r M M Ma a an n nu u ua a al l l...

Page 2: ...design and operating safeguards AMIMON does not warrant or represent that any license either express or implied is granted under any AMIMON patent right copyright mask work right or other AMIMON intel...

Page 3: ...K K TK Gotanda Bldg 409 5 10 18 Higashi Gotanda Shinagawa ku Tokyo Japan 141 0022 Tel 81 3 3444 4305 Fax 81 3 3444 4351 contact japan amimon com Korea Office 706 DaerungPostTower2 182 13 Guro dong Gur...

Page 4: ...May 08 Update new TPC 1 0 21 18 Sep 08 Changed from Canary to Pashosh Changed to new application code and new user interface 1 0 22 18 Nov 08 Updated UI to comply with App 1 3 5 1 0 23 Updated for Sp...

Page 5: ...ference in a residential installation This equipment generates uses and can radiate radio frequency energy and if not installed and used in accordance with the instructions may cause harmful interfere...

Page 6: ...YSTEM CONFIGURATION 12 4 1 SUPPORTED RESOLUTIONS 12 4 2 HDMI 12 5 USER INTERFACE 13 5 1 VIDEO INPUT SELECTION 13 5 2 VIDEO INPUT STATUS TX RX 13 5 3 REGISTRATION BOTH TX AND RX 13 5 4 ASSOCIATION TX R...

Page 7: ...s needed for setting up a link with AMIMON s WHDITM Development Platform This is a basic user s guide that includes troubleshooting and a description of the basic features of the system that should al...

Page 8: ...rds unless specifically noted 2 1 Tx side 2 1 1 Wireless Tx board The Shaldag wireless Tx board is the transmission part of AMIMON s wireless system The board has 5 printed antennas 4 of which are for...

Page 9: ...to chapter 5 for a description of the various LEDs and buttons use and indications Figure 2 User Interface Board 2 2 Rx side 2 2 1 Wireless Rx Board The Shaldag Wireless Rx board is the reception part...

Page 10: ...nterface to the various displays and destinations of the wireless link It contains the following video and audio outputs HDMI output Stereo I2 S audio optional Optical SPDIF audio input optional Seagu...

Page 11: ...tch and wait for the status LEDs L2 to turn on They should be red if no source is connected and turn green if a legal source is connected and the video resolution is identified Refer to section 5 5 fo...

Page 12: ...esolution and adjust accordingly Switching sources and resolutions once the link is set is legal and the system should adjust automatically although this may result in a few frames of blank video and...

Page 13: ...ed in non volatile memory Registration needs to be done only once for each pair of Rx and Tx After successful registration the registered Tx and Rx can create link only with each other and cannot link...

Page 14: ...table below and only then power up the Seagull board Wait until L2 LEDs are blinking 1 Release the pressed buttons 2 The Application will continue the boot process and will start working with the des...

Page 15: ...elevant LEDs will blink for a few seconds 5 8 Broadcast mode both Tx and Rx This mode is used to set the system to broadcast mode In this mode the Tx sends the video unencrypted so any Rx that is set...

Page 16: ...as only a DVI port and the Rx is connected to a display via an HDMI to DVI cable you should set the Rx in DVI mode which removes the audio from the link This mode can also be used to mute an HDMI link...

Page 17: ...source Tx and or Rx L1 blinking slow One or more of the link sides are in broadcast mode If only one of them is in broadcast mode a link will not be established Either set both to broadcast mode or b...

Page 18: ...WHDI Reference Design Setup Guide Dev Kit UG1_Rev 1 0 28 Confidential Under NDA Internal document Information subject to change 18 Page...

Reviews: