American DJ
®
- www.americandj.com - X-Move LED Plus R Instruction Manual Page 16
American DJ
®
- www.americandj.com - X-Move LED Plus R Instruction Manual Page 15
X-Move LED Plus R
Operation
traits.
2. To control your fixture in DMX mode, follow the set-up procedures
on pages 5-7 as well as the set-up specifications that are includ-
ed with your DMX controller.
3. Use the controller’s faders to control the various DMX fixture traits.
4. This will allow you to create your own programs.
5. Follow the instruction on page 9 to set the DMX address.
6. For longer cable runs (more than a 100 feet) use a terminator on
the last fixture.
7. For help operating in DMX mode consult the manual included
with your DMX controller.
Sound Active Mode:
This mode allows either single unit or several
units linked together, to run to the beat of the music.
1. Tap the MENU button until
“
SOUN
” is displayed, and press
ENTER. Tap the UP or DOWN buttons so that “
ON
” is dis
played and press ENTER.
2. The optional
UC3 Controller
(not included)
may be used to con-
trol different functions including blackout.
Show Mode:
This mode allows either a single unit or several units
linked together, to run one of four shows that you choose.
1. Tap the MENU button until
“
SHND
” is displayed, and press
ENTER.
2.
Tap the UP or DOWN buttons until you find your desired show,
and press ENTER.
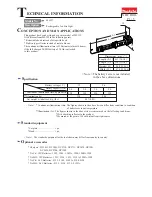
X-Move LED Plus R UC3 Control
Stand By
Blackout the unit
Function
1. Sync. Strobe
2. Async strobe
3. Sound Strobe
Show
1-4
1. Select Color
2. Select Gobo
Mode
Sound (LED OFF)
Show (LED
Slow Blinking)
LED ON
The optional
UC3 Controller
(not included)
may be used to con-
trol different functions including blackout.
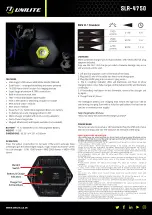
X-Move LED Plus R
DMX Traits
Channel
Value
Function
1
0 - 255
PAN
2 0 - 255 TILT
3 COLORS
0 - 14 WHITE
15 - 29 RED
30 - 44 BLUE
45 - 59 GREEN
60 - 74 YELLOW
75 - 89 PINK
90 - 104 LIGHT BLUE
105 - 119 LIGHT GREEN
120 - 127 LIGHT YELLOW
128 - 254 RAINBOW EFFECT SLOW - FAST
255 SOUND ACTIVE
4 GOBO WHEEL
0 - 9 OPEN
10 - 18 GOBO 1
19 - 27 GOBO 2
28 - 36 GOBO 3
37 - 46 GOBO 4
47 - 55 GOBO 5
56 - 63 GOBO 6
64 - 73 OPEN SHAKE
74 - 82 GOBO 1 SHAKE
83 - 91 GOBO 2 SHAKE
92 - 100 GOBO 3 SHAKE
101 - 110 GOBO 4 SHAKE
111 - 119 GOBO 5 SHAKE
120 - 127 GOBO 6 SHAKE
128 - 254 GOBO WHEEL ROTATION SLOW - FAST
255 SOUND ACTIVE
5 GOBO ROTATION
0 - 9 STOP
10 - 120 CLOCKWISE FAST - SLOW
121 - 134 STOP
135 - 247 COUNTER-CLOCKWISE SLOW - FAST
248 - 255 STOP