background image

 BASIC OPERATIONS - BUILT-IN EFFECTS

FLANGER/ECHO/ROBOT EFFECT:

 The flanger effect distorts the output signal 

and  create  an  effect  similar  to  the  frequency  phasing  in  and  out  of  each  other. 

The  ECHO  effect  adds  an  echo  to  your  output  signal. The  ROBOT  effect  distorts 

the output to simulates a sci-fi robot voice. When the FLANGER effect is selected 

the 

FLANGER/ECHO BUTTON (30) 

will glow. When the ECHO or ROBOT effect is 

selected the 

FLANGER/ECHO BUTTON (30) 

will flash repeatedly. 

ROBOT  EFFECT: 

The  ROBOT  effect  is  activated  in  the  ECHO  parameters. To 

activate the ROBOT effect select the ECHO effect. After the Echo effect is activated 

enter  the  PT  Parameters  and  turn  the  hold  function  on.  Set  the  Parameter  Time 

(PT)  value  to  0010  and  use  the  Jog  Wheel  to  create  the  effect  by  adjusting  the 

Parameter Ratio (PR).

FLANGER  EFFECT: 

The  FLANGER  Effect  has  two  adjustable  parameters, 

Parameter  Time  (PT)  and  Parameter  Ratio  (PR). The  PT  will  adjust  the  Flanger 

Mode and The PR will adjust the Flanger Frequency Range.

ECHO  EFFECT: 

The  ECHO  Effect  has  two  adjustable  parameters,  Parameter 

Time (PT) and Parameter Ratio (PR). The PR will adjust the length of the echo (drop 

off time), and the PT will adjust the echo gap length.
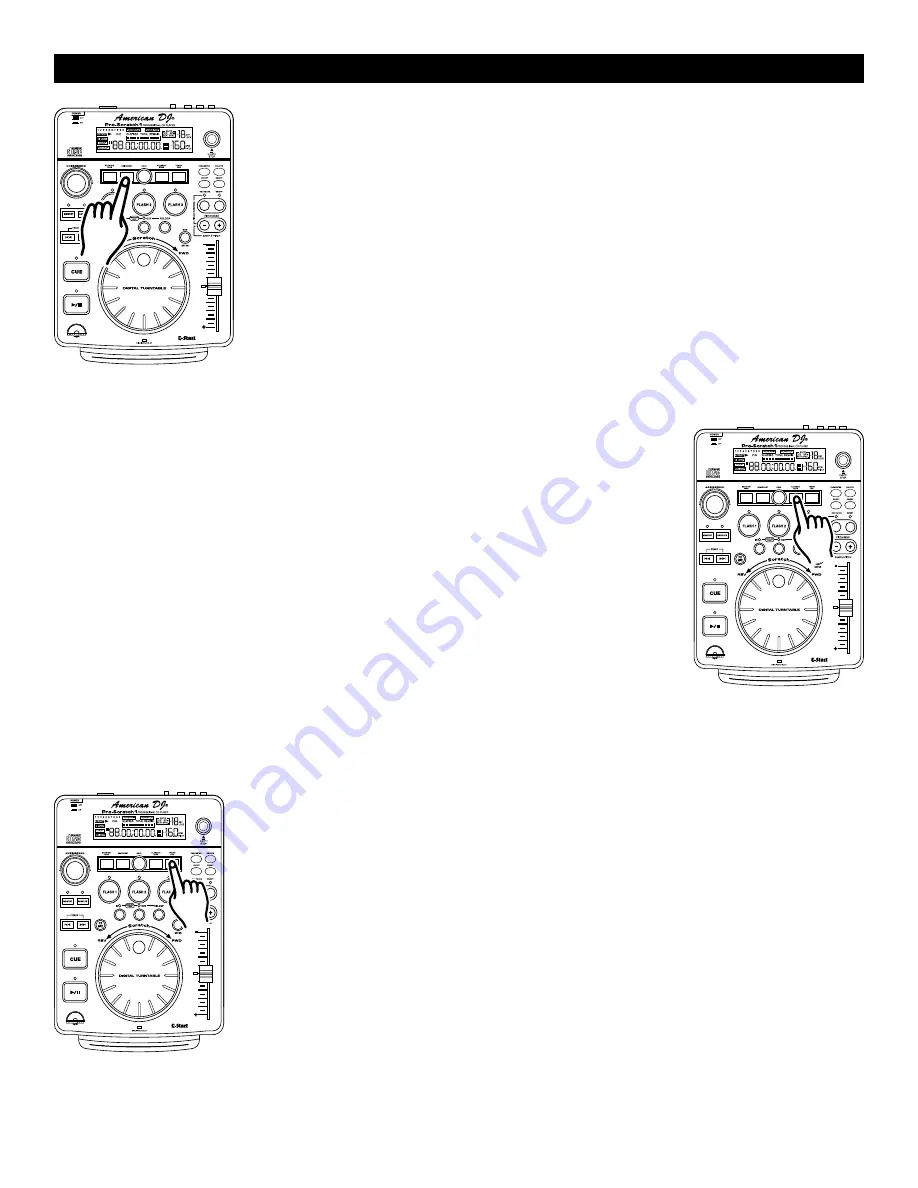
TRANS/PAN EFFECT:


The TRANS effect simulates a real-time mixer transformer 

effect.  The  PAN  effect  allows  you  to  pan  the  output  from  the  left  channel  to 

the  right  channel.  Pressing 

TRANS/PAN  BUTTON  (29)

  once  will  activate  the 

TRANSFORMER  effect  (figure  47). When  the TRANSFORMER  effect  is  activated 

the 

TRANS/PAN  BUTTON  (29)

  will  glow. To  activate  the  PAN  effect,  press  and 

hold the 

TRANS/PAN BUTTON (29)

 until it begins to flash. A flashing 

TRANS/PAN 

BUTTON (29)

 will represent the PAN effect. The fade time can be adjusted in the 

parameters setting from 0010 to 9990. 9990 will give you the longest fade out time. 

The Pan Value ranges from 10ms to ten seconds.

TRANS EFFECT: 

The TRANS Effect has two adjustable parameters, Parameter 

Time  and  Parameter  Ratio. The  PT  will  adjust  the Trans  Speed  and The  PR  will 

adjust the Trans Audio Length. The lower the PT value the faster the TRANS effect 

(PT 0500 = 1/2 second, PT 1000 = 1 second).

PAN EFFECT: 

The PAN effect uses the PT value to pan left to Right. PT 0500 is 

the default setting which is center pan.

Figure 46

Figure 45

Figure 47

American DJ

®

 AUDIO • Pro Scratch 1™ INSTRUCTION MANUAL • PAGE 22

SKID/COAST EFFECT:


The Skid effect simulates the sudden platter stop of a 

turntable, like pressing the stop button on a turntable. The COAST effect simulates 

a  turntable  slowly  revving  up  to  it's  proper  speed,  or  slowly  winding  down  to  a 

stop, like tuning the power off when a turntable is running. When the SKID effect 

is  selected  the 

SKID/COAST  BUTTON  (3) 

will  glow. When  the  COAST  effect  is 

selected  the 

SKID/COAST  BUTTON  (3) 

will  flash  repeatedly. The  fade  effect  will 

fade  the  music  out  and  bring  back  in. Both  the  Skid  and  Coast  time  parameters 

can be adjusted from 0010 to 9990. 9990 will give you the longest Skid and Coast 

times. The SKID/COAST value ranges from a 10ms to ten seconds. 

Summary of Contents for Pro Scratch 1

Page 1: ...American DJ AUDIO Los Angeles CA 90058 USA www americandj com Featuring Sampling Sampling FLIPFLOP...

Page 2: ...removing from wall outlet Do not pull on the cord 2 To avoid electric shock do not open the top cover when the unit is plugged in If problems occur with the unit call your local American DJ AUDIO deal...

Page 3: ...Player 9 Grounding or Polarization Precautions should be taken so that the grounding or polarization means of an appliance is not defeated 10 Power Cord Protection Power supply cords should be routed...

Page 4: ...n DJ AUDIO Pro Scratch 1 INSTRUCTION MANUAL PAGE 4 Avoid high temperatures Allow for sufficient heat dispersion when installed in a case Handle the power cord carefully Hold the power cord from the pl...

Page 5: ...ican DJ mixers that also feature Fader Q Start For FLIP FLOP results you must use two 2 Pro Scratch 1 players Connect your Pro Scratch 1 s as described in the set up section of this manual This featur...

Page 6: ...comfortable angles see page 4 The display ICONS will be explained in the section D 2 HOLD BUTTON This button allows you to set and lock any new parameters you set to the effects This button will glow...

Page 7: ...e pitch percentage up to 100 American DJ AUDIO Pro Scratch 1 INSTRUCTION MANUAL PAGE 7 and turning the wheel in the counter clock wise direction will decrease the pitch percent age up to 100 The pitch...

Page 8: ...rned on to get a LED reading 24 PITCH ON OFF BUTTON This button is used to turn the PITCH SLIDER 17 function on and off The PITCH BUTTON s LED will indicate the pitch function has been activated GENER...

Page 9: ...ged 47 PAUSE INDICATOR This indicator will glow when the drive is in pause mode 48 TRACK INDICATOR This indicator describes which track is currently cued or is playing 49 CUE INDICATOR This indicator...

Page 10: ...N OFF RELOOP OUT IN SEAMLESS LOOP American DJ 8800 00 00 160 EFFECT ELAPSED SINGLE TOTAL REMAIN CUE T M S F CUE BPM BEAT SYNC AUTO 18LOCK LOOP RELOOP PITCH KEY BPM PROGRAM NONSTOP 1 2 3 4 5 6 7 8 9 0...

Page 11: ...SE BUTTON 15 was pressed Pressing the PLAY PAUSE BUTTON 15 will switch between play and pause modes When the unit is in pause mode the PAUSE INDICATOR 46 in the LCD DISPLAY 1 will glow The green PLAY...

Page 12: ...tting your custom cue points There are two 2 ways to set a CUE point American DJ AUDIO Pro Scratch 1 INSTRUCTION MANUAL PAGE 12 BASIC OPERATIONS CONT 1 You may press the IN BUTTON 12 on the fly while...

Page 13: ...rresponding Flash Button LED will flash briefly The LED will remain lit indicating either a sample or cue point is stored in memory The red Memory Cue LED will now shut off 2 Repeat the above steps to...

Page 14: ...oint in the track Figure 21 BASIC OPERATIONS CONT 3 Press the OUT BUTTON 18 to set the ending point for your SEAMLESS LOOP Figure 13 The IN BUTTON 12 and OUT BUTTON 18 LEDs will begin to flash indicat...

Page 15: ...ON MANUAL PAGE 15 2 Press the MEMORY BUTTON 7 The MEMORY CUE BUTTON 1 Red LED will glow indicating memory is ready to be stored 3 Select one of the three FLASH BUTTON 6 you wish to store your loop in...

Page 16: ...EARCH FX MIX MEMORY SAMPLER TRACK DISC IN OUT SLOT BOP ENTER SAMPLE PITCH PITCH BEND PITCH CONTROL 8 12 16 ON OFF REV PLAY SGL CTN ON OFF HOLD FLANGER ECHO TRANS PAN SCRATCH FADE SKID COAST PARAMETER...

Page 17: ...in reverse mode If a sample is activated over a track both the track and the sample will play in reverse until the reverse function is turned off 14 Creating a BOP Effect The Bop Effect is a stutter...

Page 18: ...player begin playback when the other ends You can Flip Flop single tracks the entire disc or a combination of the two To FLIP FLOP single tracks 1 Connect your system as described in the set up secti...

Page 19: ...8 9 0 FLASH 1 FLASH 2 FLASH 3 DIGITAL TURNTABLE Pro Scratch1 CUE REV FWD Scratch SEARCH FX MIX MEMORY SAMPLER TRACK DISC IN OUT SLOT BOP ENTER SAMPLE PITCH PITCH BEND PITCH CONTROL 8 12 16 ON OFF ON O...

Page 20: ...ONAL CD PLAYER POWER ON OFF RELOOP OUT IN SEAMLESS LOOP American DJ 8800 00 00 160 EFFECT ELAPSED SINGLE TOTAL REMAIN CUE T M S F CUE BPM BEAT SYNC AUTO 18LOCK LOOP RELOOP PITCH KEY BPM PROGRAM NONSTO...

Page 21: ...to ten seconds Figure 43 Figure 42 American DJ 8800 00 00 160 EFFECT ELAPSED SINGLE TOTAL REMAIN CUE T M S F CUE BPM BEAT SYNC AUTO 18LOCK LOOP RELOOP PITCH KEY BPM PROGRAM NONSTOP 1 2 3 4 5 6 7 8 9 0...

Page 22: ...e will activate the TRANSFORMER effect figure 47 When the TRANSFORMER effect is activated the TRANS PAN BUTTON 29 will glow To activate the PAN effect press and hold the TRANS PAN BUTTON 29 until it b...

Page 23: ...from one track to a programmed sample STEP ONE Be sure you have created a sample and stored it in to the FLASH 3 BUTTON 6 see creating a sample on page After a sample has been created and store begin...

Page 24: ...GE 24 STEP ONE Be sure you are in continuous play mode and a track is playing Turn the FADE effect on By pressing holding down the SCRATCH FADE BUTTON 4 until it begins to flash as in figure 52 Figure...

Page 25: ...playing Turn the SKID effect on By pressing down the SKID COAST BUTTON 5 until it begins to glow as in figure 57 Figure 57 Figure 59 Figure 58 STEP TWO Select the FX MIX BUTTON 11 to activate the FX M...

Page 26: ...After playing a disc always unload it from player Always store the compact disc in the jewel case protecting from dirt or damage Do not place discs in the following areas a Areas exposed to direct su...

Page 27: ...2 0Vrms 1dB 2 0V 1dB 1KHz 0dB Channel balance 0 5dB 1 0dB 1KHz 0dB Frequency response 0 5dB 1 0dB 20Hz 20KHz 0dB De emphasis response 2 5dB 3dB 16KHz 20dB Channel separation 82dB 75dB 1KHz 0dB T H D N...

Page 28: ...American DJ Audio World Headquarters 4295 Charter Street Los Angeles CA 90058 USA Tel 323 582 3322 Fax 323 582 3311 Web www americandj com E mail info americandj com...

Reviews: