background image

ADJ Products, LLC  -  www.adj.com  - Illusion Dotz 4.4 Instruction Manual Page 32

ADJ Products, LLC  -  www.adj.com  - Illusion Dotz 4.4 Instruction Manual Page 33

  Illusion Dotz 4.4   

                                      Operation

      press ENTER.

3.   Press the UP or DOWN buttons until “

Sound Ctrl.

” is displayed,  

      and press ENTER.

4.   Either “Master” or “Alone” will be displayed. Using the UP or      

      DOWN buttons select “Alone” and press ENTER.

Master-Slave Operation (Sound Active or Auto Program): 

This function will allow you to link up to 16 units together and

 oper

-

ate without a controller.


The units 

can 

run a built-in program or run in 

sound actiive mode

.

 In Master-Slave operation one unit will act as the 

controlling unit and the others will react to the controlling units pro-

grams. Any unit can act as a Master or as a Slave.

1.   Using standard XLR microphone cables, daisy chain your units  

  together via the XLR connector on the rear of the units. Remem- 

  ber the Male XLR connector is the input and the Female XLR    

  connector is the output. The first unit in the chain (master) will use  

  the female XLR connector only - The last unit in the chain will use  

  the male XLR connector only. For longer cable runs we suggest a  

  terminator at the last fixture.

2.   On your “Master” unit, access the main menu, and press the UP 

      or DOWN buttons so that “

Function

” is highlighted, then  


      press ENTER.

3.   Press the UP or DOWN buttons until “

Disp Set

” is displayed, and  

      press ENTER.

4.   Select your desired operating mode. Use the UP or DOWN but- 

      tons to select between “

Auto Pro

” or “

Sound Ctrl

”, press ENTER  

      to select your desired program.

5.   Either “

Master

” or “

Alone

” will be displayed. Using the UP or     

      DOWN buttons select “

Master

” and press ENTER.

6.   For your “Slave” units, access the main menu, and press the UP 

      or DOWN buttons so that “

Function

” is highlighted, then  


      press ENTER.

7.   Press the UP or DOWN buttons until “

Disp Set

” is displayed, and  

      press ENTER.

8.   Press the UP or DOWN buttons until “

Slave Mode

” is displayed,  

      and press ENTER.

9.   Either Slave 1, Slave 2, or Slave 3 will be displayed. Select your  

      desired Slave setting and press ENTER.

10. Press MODE if you want to return to the main menu.

  Illusion Dotz 4.4   

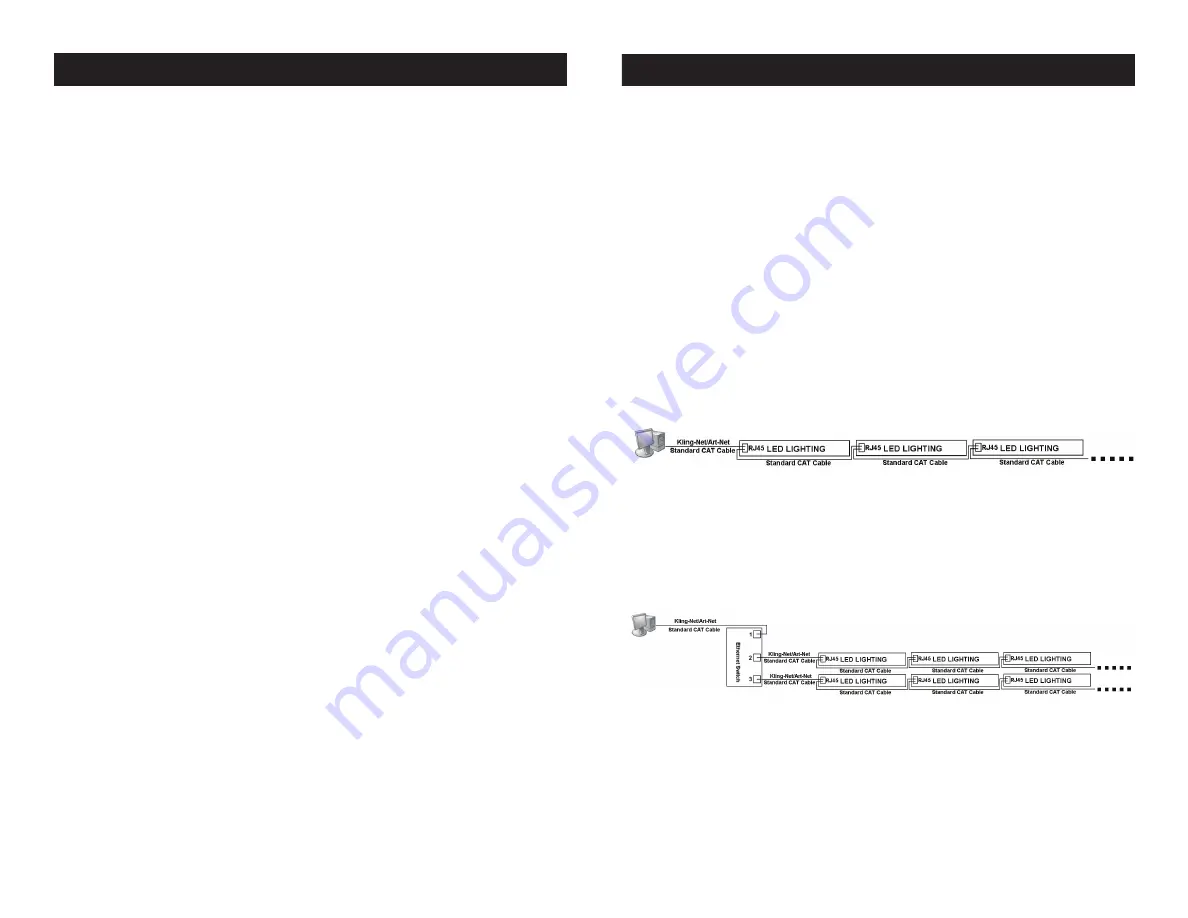
     Kling-Net or Art-Net Operation

1.  Activate the Net Switch using the instructions on page 20 under  

  “

Net Switch

”. Select your software using the instructions on page  

  20 under “

Kling-Net/Artnet

”.

2.  Install one of the recommended operating softwares onto your  

  computer. Recommended softwares; Arkaos Media Master 

  Express, Media Master Pro, or LED Master (Sold Separately).

3.  Connect the panels via CAT 5 Straight Network cable. 

When 

  creating your own custom cable, use RJ45 Straight Network  

 cable.

4. 

Map the fixtures using KlingNetMapper or Art-Net Mapper.

5.  Control the fixtures using ArKaos or Art-Net software. Please refer  

  to the media playback software user manual for further instruc- 

 tions.

Note:

 ArKaos Kling-Net requires a gigabit (1000 mbps) Ethernet card 

and network router for a smoother operation.

When connecting you must use a CAT 5 Straight Network cable.

Installation method 1:

Note: Do not daisy-chain more thean 25 units when connected directly from the computer. 

Use a Ethernet Switch if more than 25 units are being controlled.

When connecting you must use a CAT 5 Straight Network cable.

Installation method 2:

Note:1.The Ethernet Switch must be Gigabit Switch.

2. Do not daisy-chain more than 25pcs units from a single network port of the Ethernet Switch.
3. Maximum 2 output network ports of the Ethernet Switch can be used. So the system can control 25pcs

maximum.

Summary of Contents for Illusion Dotz 4.4

Page 1: ...rands and product names are trademarks or registered trademarks of their respective companies ADJ Products LLC and all affiliated companies hereby dis claim any and all liabilities for property equipm...

Page 2: ...ults use fog or special effects smoke to enhance the beams projections Customer Support ADJ Products LLC provides a toll free cus tomer support line to provide help and to answer any question should y...

Page 3: ...d by the manufacturer See page 46 for cleaning details Heat This fixture should be situated away from heat sources such as radiators heat registers stoves or other appliances including amplifiers that...

Page 4: ...your purchase All returned service items whether under warranty or not must be freight pre paid and accompany a return authorization R A number The R A number must be clearly written on the outside of...

Page 5: ...avels from fixture to fixture via the DATA IN and DATA OUT XLR terminals located on all DMX fixtures most controllers only have a DATA OUT terminal DMX Linking DMX is a language allowing all makes and...

Page 6: ...mination When longer runs of cable are used you may need to use a terminator on the last unit to avoid erratic behavior A terminator is a 110 120 ohm 1 4 watt resistor which is con nected between pins...

Page 7: ...e to change channel numbers Edit A Edit B Edit C Max Channel PAN Preset User modes Test Reset M Pan Tilt Reset Pan Tilt Test Chan PAN Test function Panel Ctrl PAN XXX Adjustment of the lamp Calibrate...

Page 8: ...t set the address that is currently assingned to the unit Then set Channel 1 s Illusion Dotz 4 4 System Menu Illusion Dotz 4 4 System Menu value to 7 Channel 2 s value to 7 and Channel 3 s value to 57...

Page 9: ...ion or press MODE to exit MOVEMENT SPEED With this function you can set the pan and tilt Illusion Dotz 4 4 System Menu movement speed 1 Press the MODE button to access the main menu Press the UP or DO...

Page 10: ...uttons until RDM PID is displayed and press ENTER 4 XXXXXX will be displayed XXXXXX represents the units current RDM ID 5 Press ENTER or press MODE to exit Illusion Dotz 4 4 System Menu DEVICE IP ADDR...

Page 11: ...tons until Head Fan is displayed press ENTER 3 Either Auto Fan Speed default Low Fan Speed or High Fand Speed will be displayed use the UP and DOWN buttons to Illusion Dotz 4 4 System Menu toggle betw...

Page 12: ...your selection or press MODE to exit Dimmer Curve DIM CURVE Select 1 of 5 dimming curves See page 45 for the dimming curve chart Illusion Dotz 4 4 System Menu 1 Press the MODE button to access the ma...

Page 13: ...can run the individual scenes either automatically i e with the adjusted Step Time 1 Access the main menu and press the UP or DOWN buttons so that Function is highlighted then press ENTER 2 Press the...

Page 14: ...will display the timer password 1 Press the MODE button to access the main menu Press the UP or DOWN buttons so that Information is highlighted then press ENTER Illusion Dotz 4 4 System Menu 2 Press...

Page 15: ...ion 4 Press MODE to exit Illusion Dotz 4 4 System Menu TEST RESET MOTORS With this function you can reset the Pan Tilt motors 1 Press the MODE button to access the main menu Press the UP or DOWN butto...

Page 16: ...bsequently used to create the user defined programs Universal DMX Control This function allows you to use a uni versal DMX 512 controller such as the Elation DMX Operator or Elation Show Designer to c...

Page 17: ...ENTER 6 For your Slave units access the main menu and press the UP or DOWN buttons so that Function is highlighted then press ENTER 7 Press the UP or DOWN buttons until Disp Set is displayed and press...

Page 18: ...BLACKOUT BY MOVEMENT 246 255 NO FUNCTION 12 LAMP ON OFF RESET PROGRAMS 0 79 NORMAL 80 84 ALL MOTOR RESET 85 96 NO FUNCTION 97 99 OTHER MOTOR RESET 100 119 INTERNAL PROGRAM 1 120 139 INTERNAL PROGRAM 2...

Page 19: ...ue Function 1 0 255 PAN MOVEMENT 8bit 2 0 255 PAN FINE 16bit 3 0 255 TILT MOVEMENT 8bit 4 0 255 TILT FINE 16bit 5 ALL RED 0 255 0 100 6 ALL GREEN 0 255 0 100 7 ALL BLUE 0 255 0 100 8 SHUTTER STROBE 0...

Page 20: ...4 14 Channel DMX Mode Channel Value Function 11 AUTO PROGRAMS 0 10 PROGRAM 1 11 20 PROGRAM 2 21 30 PROGRAM 3 31 40 PROGRAM 4 71 80 PROGRAM 8 81 90 PROGRAM 9 91 100 PROGRAM 10 101 110 PROGRAM 11 111 12...

Page 21: ...1 RED 3 0 255 0 100 12 GREEN 3 0 255 0 100 13 BLUE 3 0 255 0 100 14 RED 4 0 255 0 100 15 GREEN 4 0 255 0 100 16 BLUE 4 0 255 0 100 17 RED 5 0 255 0 100 18 GREEN 5 0 255 0 100 19 BLUE 5 0 255 0 100 Ill...

Page 22: ...MS 0 10 PROGRAM 1 11 20 PROGRAM 2 21 30 PROGRAM 3 31 40 PROGRAM 4 71 80 PROGRAM 8 81 90 PROGRAM 9 91 100 PROGRAM 10 101 110 PROGRAM 11 111 120 PROGRAM 12 121 130 PROGRAM 13 131 140 PROGRAM 14 141 150...

Page 23: ...ON 59 LAMP ON OFF RESET PROGRAMS 0 79 NORMAL 80 84 ALL MOTOR RESET 85 96 NO FUNCTION 97 99 OTHER MOTOR RESET 100 119 INTERNAL PROGRAM 1 120 139 INTERNAL PROGRAM 2 140 159 INTERNAL PROGRAM 3 160 179 IN...

Page 24: ...ll implied warranties made by ADJ Products LLC in connection with this product including warranties of merchantability or fitness are limited in duration to the warranty period set forth above And no...

Page 25: ...ADJ Products LLC www adj com Illusion Dotz 4 4 Instruction Manual Page 48 Illusion Dotz 4 4 Notes ADJ Products LLC www adj com Illusion Dotz 4 4 Instruction Manual Page 49 Illusion Dotz 4 4 Notes...

Page 26: ...fications and improvements in the design of this unit and this manual are subject to change without any prior written notice Illusion Dotz 4 4 Specifications Auto Sensing Voltage This fixture contains...

Reviews: