background image

EN

13

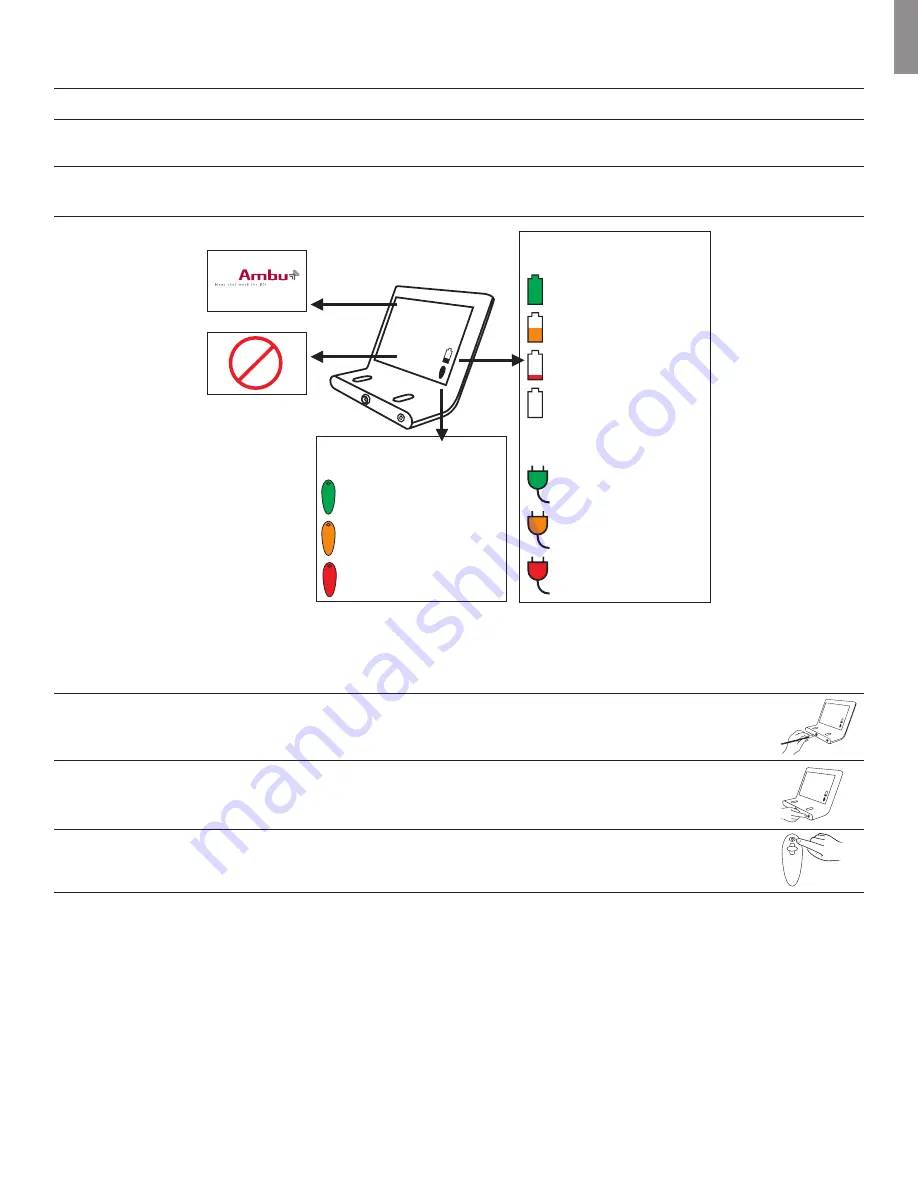
8.2.2 Advisory screen symbols on the Ambu® aScope™ Monitor

Total lifetime of the Ambu® aScope™

8 hours from first switching on.

Total operating time of the Ambu® aScope™

30 minutes from first switching on. Pay attention to the red symbol  
(less than 5 minutes left) on the Ambu® aScope™ Monitor.

Battery symbol indicator on the Ambu® aScope™ Monitor

Recharge the Ambu® aScope™ Monitor when the green battery symbol  
changes to orange

Fully charged or above half 

battery capacity (green)

Half battery capacity 

(orange)

Low battery capacity (red)

Battery error (the power 

plug is connected but the 

battery is not charging)

Full time left - 8 hours. Operation 

time 30 minutes (green).

Half time left (orange)

Time is expiring. Less than  
5 minutes left (red)

Plug is connected and the 

monitor battery is above half 

charged (green)
Plug is connected and the 

monitor battery is half charged 

(orange)
Plug is connected and the moni-

tor battery power is low (red)

Ambu® aScope™  

operation time icons

Plug icons

Ambu® aScope™  

Monitor battery icons

Please wait...

Start-up picture

Scope time expired

9. Connecting the system

The connection between the Ambu® aScope™ and the Ambu® aScope™ Monitor is illustrated below.

1.   Connect the plug on the Ambu® aScope™ cable to the socket on the front of the Ambu® aScope™ Monitor.

2.   Push the ON/OFF button on the Ambu® aScope™ Monitor to start up the system. After about 10 seconds the Ambu® aScope™ 

Monitor is ready to display the view.

3.   Push the ON/OFF button on the Ambu® aScope™

Figure 3 - Connecting the Ambu® aScope™ and the Ambu® aScope™ Monitor

Summary of Contents for aScope

Page 1: ...ns for use Ambu aScope For Single Patient use only Sterile For use by trained clinicians physicians only For in hospital use Ambu aScope Monitor For use by trained clinicians physicians only For in ho...

Page 2: ...800 ambude www ambu de UK Ambu Ltd 8 Burrel Road St Ives Cambridgeshire PE27 3LE Tel 44 1480 498 403 Fax 44 1480 498 405 www ambu com Italy Ambu S R L Via Paracelso 18 Centro Direzionale Colleoni 2004...

Page 3: ...to an external monitor video recorder 15 10 Clinical Application 15 11 Preparation for Use 15 12 Use of the Ambu aScope system 16 12 1 Injection and control of the Luer channel 17 12 2 Removal proced...

Page 4: ...loose parts or the bending section does not work as intended Do not touch the distal tip of the insertion cord or allow it to strike other objects The lens surface of the distal tip is fragile and vis...

Page 5: ...conventional cleaning and sterilization procedures 2 Intended Use The Ambu aScope is intended for use as an aid in the placement of an Endotracheal Tube ETT directly or through an intubating laryngea...

Page 6: ...e Ambu aScope Working length of the Ambu aScope insertion cord Maximum width of inserted portion Min ETT ID 6 mm Minimum ET tube inner diameter 6 0mm see section 12 Field of view Operating time of the...

Page 7: ...and electrical waste WEEE Only applicable for the Monitor Li ion Battery type Lithium ion Only applicable for the battery inside the Ambu aScope Monitor Re chargeable battery Only applicable for the...

Page 8: ...duct specifications Ambu aScope Optical System Field of View 80 Direction of View 0 forward viewing Depth of Field 2mm 50 mm 0 1 1 968 inch Illumination method LED LTW C282DS5 SE Insertion cord Distal...

Page 9: ...al standard NTSC Video out connection 3 5mm jack socket Video out cable 3 5mm jack plug to RCA jack plug Storage Temperature 10 40 C 50 104 F Relative humidity 10 90 Mounting interface Mounting interf...

Page 10: ...r battery icon on the screen changes from green fully charged battery via orange half battery capacity to red low bat tery capacity within 30 minutes it is recommended that the Ambu aScope Monitor is...

Page 11: ...t Function Material 1 Monitor frame PC Polycarbonate ABS Acrylonitrile Butadiene 2 Monitor screen Shows the picture from the camera Glass 3 Bracket Secures the monitor to e g an IV pole POM GF25 Polyo...

Page 12: ...sportation purposes Cardboard Table 5 Functions and materials 8 2 1 Monitor placement on the bracket The Ambu aScope Monitor can be placed on a flat surface But to secure the Ambu aScope Monitor it is...

Page 13: ...alf time left orange Time is expiring Less than 5 minutes left red Plug is connected and the monitor battery is above half charged green Plug is connected and the monitor battery is half charged orang...

Page 14: ...device should not be used A physician who is familiar with this device can perform the preparation for use in a time range of 1 4 minutes The tests should be conducted in a manner consistent with acce...

Page 15: ...tructions do not explain or discuss clinical intubation procedures They describe only the basic operation and precautions related to the operation of this Ambu aScope system Before initial use of the...

Page 16: ...rocedure turn the Ambu aScope off in between sessions and place it on a sterile surface Be aware of the total operating time limit of 30 minutes during a period of 8 hours from first switching on 12 3...

Page 17: ...d collection schemes for disposal of batteries In order to remove the battery use a Torx screwdriver to remove the battery lid 13 Trouble shooting guide If problems occur with the system please use th...

Reviews: