Orientation Aid for the Start of the Season
- ZA-TS
Version 08/2018
Page 7
6. Creating fertilisers in the implement software
Please note that the individual spreading properties of the spreading material have
a significant influence on the lateral distribution and spread rate. This is why the
setting values in the setting chart are only guideline values.
Entry of the data from the setting chart in the implement software:
→
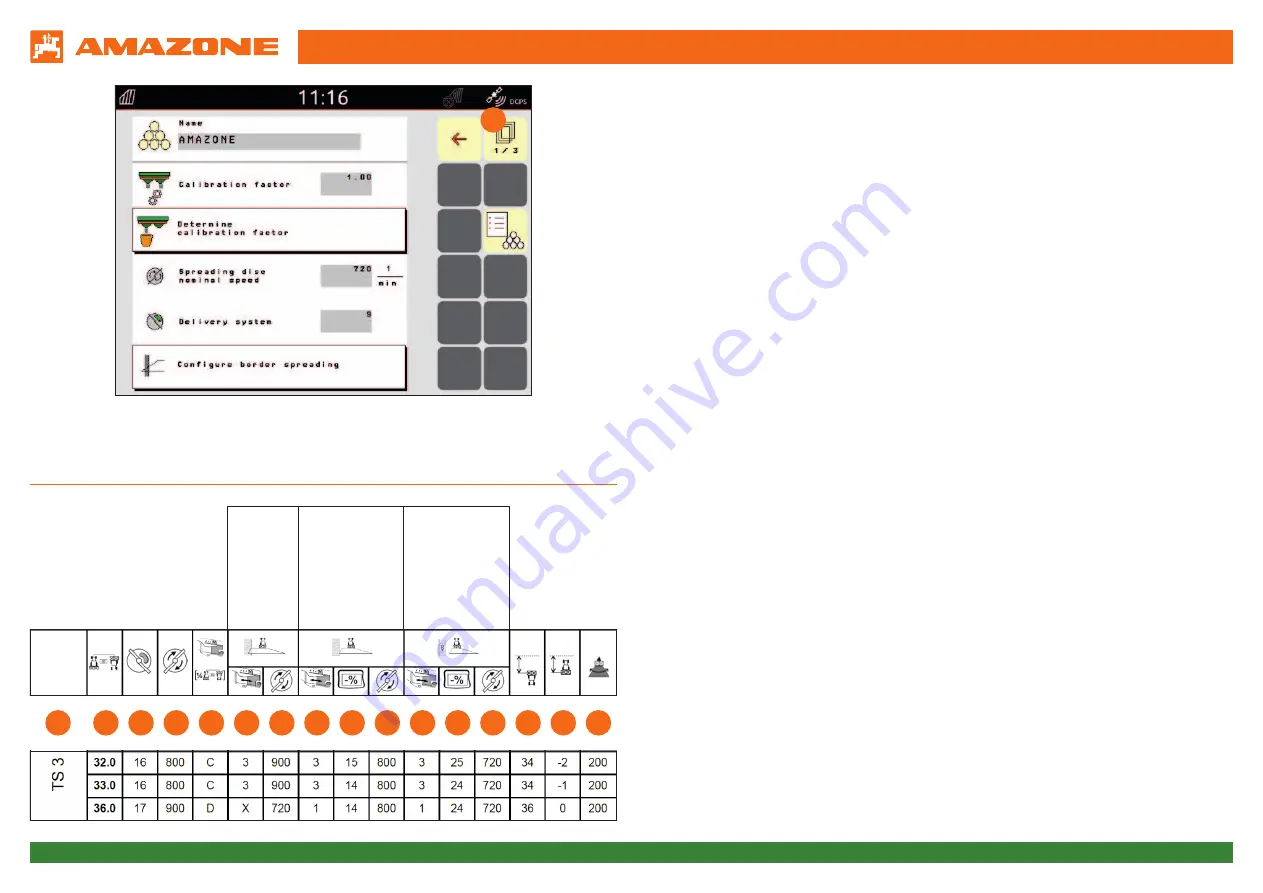
Opening the Fertiliser menu from the Start screen. Enter the following data
on pages 1 to 3 (with ArgusTwin, up to 4 pages). See
(1)
.
(2)
Spreading disc type
(3)
Working width [m]
(4)
Numerical value of delivery system
(5)
Spreading disc speed [rpm]
(6)
Telescope type, ½ the working width [m]
(7)
Telescope setting for border spreading*
(8)
Spreading disc speed for border spreading**
(9)
Telescope setting for boundary spreading
(10)
Rate reduction for boundary spreading [%]
(11)
Spreading disc speed for boundary spreading**
(12)
Telescope setting for ditch spreading
(13)
Rate reduction for ditch spreading [%]
(14)
Spreading disc speed for ditch spreading**
(15)
Switch-on point [m]***
(16)
Switch-off point [m]***
(17)
Throw direction, for ArgusTwin
*
An "x" means that the TS system is not used for border spreading.
The throwing distance reduction is achieved via the speed.
"x"→ Do not set the checkmark for "Switch AutoTS/ClickTS"
No "x" → Set the checkmark for "Switch AutoTS/ClickTS"
**
Be aware that the speed on the side towards the inside of the field may need
to be adjusted (only possible with hydraulic drive)!
*** The specification refers to the centre of the spreading disc and the distance to
the headland tramline. A negative value for the switch-off points means that
you have to drive beyond the headland tramline.
1
2
3
4
5
6
7
8
9
10 11 12 13 14 15 16 17
ZA-TS
Border spreading
Boundary sprea
-
ding
Ditch spreading


