


8
Sending signal to the
β
VERB is only half of the process. With a mixing console, the output of the
β
VERB must
go back to the mixer and turned up in the mix before to be able to hear it. Depending from the mixer, there are
two options for returning the effected signal to the mix:
˙
connecting to dedicated aux return inputs, or
˙
connecting to channel inputs.
Everything is easy if the mixer provides dedicated inputs (called returns) for effect devices like the
β
VERB.
If the mixer does not have these, or the available returns have already been used all, it possible to connect
the
β
VERB to channel inputs (if there are any remaining). The effect returns generally should only contain
effected signal, and not have any unaffected or "DRY" signal mixed with it (since these two signals are blended
together at the mixer). Therefore, it is necessary to set the mix so that only effected ("WET") signal is present
at the
β
VERB's outputs. To do this, turn the Mix control all the way to the right.
MONO IN - STEREO OUT.
STEREO IN - STEREO OUT.
HOW TO SET AUX SEND AND RETURN LEVELS ON THE MIXER.
In the above connections, it is necessary to set proper levels on the mixer's individual Aux Sends, Aux Masters,
and Aux Return masters (as well as the
β
VERB's own controls) to get good, clean, quiet results.
Improper level setting is the most common cause of noise and distortion problems.
By having the correct level at every point in the send/return chain, it is possible to avoid overloading distortion
and minimize noise. The most common mistake using effect units like the
β
VERB is to have too low the input
signal level and to increase too much the output level to compensate the input and reach the desired effects
level: this amplifies the noise, reducing headroom. Here is a procedure that will give good results with most
standard equipment:
1. Set the mixer's input levels correctly.
2. Turn up the mixer channels' AUX SEND and AUX MASTERS (if applicable) to a nominal level (this is usually
between "noon" and "3:00" on a rotary knob).
3. Play the source.
5. Depending on the input sensitivity of the mixer's channels or Aux Returns, the OUTPUT knob of the
β
VERB
should be set somewhere between "2:00" and fully clockwise ("5:00").
6. Turn up the AUX RETURN level until the desired level of effect in the mix is reached. The control in the chain
that may need to be set to a low level is the Aux Return on the mixer itself. Here is where should be increased
or decreased the overall effect level in the mix to minimize the noise.
If you only want to use the
β
VERB for a mono input signal and to connect both of its outputs back to the mixer,
you will need three audio cables. Connect an audio cable from an effect send to the INPUT 2 of the
β
VERB
once set the MONO ON/OFF switch to ON and another 2 audio cable from the OUTPUT 1 and OUTPUT 2 outputs
of the
β
VERB to a couple of effect return or other mixer inputs. On the reverb effect
β
VERB creates a stereo
output, even though only a single input is used.
This connection is similar to the one described above. However, by utilizing two sends from the mixer, we have
to use one more audio cable to send a stereo signal to the
β
VERB's inputs. The use of a stereo input is esp-
ecially useful on the true stereo reverb program.
4. Turn up the
β
VERB's INPUT level until you see the Digital Saturation LED start lighting on peaks; then reduce
it slightly until the LED stops lighting. The ideal input level, to minimize the noise, is just below the Clipping
level. But if other instruments will be added to the mix later, or levels are unpredictable (as in a live Show),
it's preferable to leave additional headroom by turning the input level down a bit more.
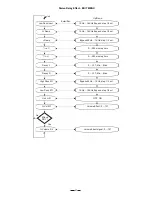
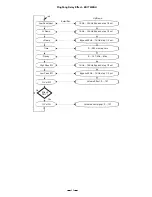
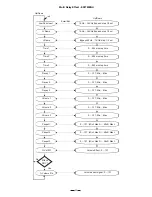
4.4 Operational Overview
Switching ON the
β
VERB, after an initialization procedure, the last stored preset will be loaded and will be lost
all the NOT stored modifications to the last preset itself.
To load exactly the last preset's configuration running before the switching OFF of the
β
VERB, it's necessary to
store these modifications using the STORE Function available in UTILITY Menu.
After the initialization procedure, on the LCD will appear the first field of the UTILITY Menu and the LED related
to the UTILITY Button will turn ON.