Alpine INE-W987HD Owner'S Manual Download Page 131

Jeep Wrangler

X409-WRA-JL 20200825v1

˜

 25/29

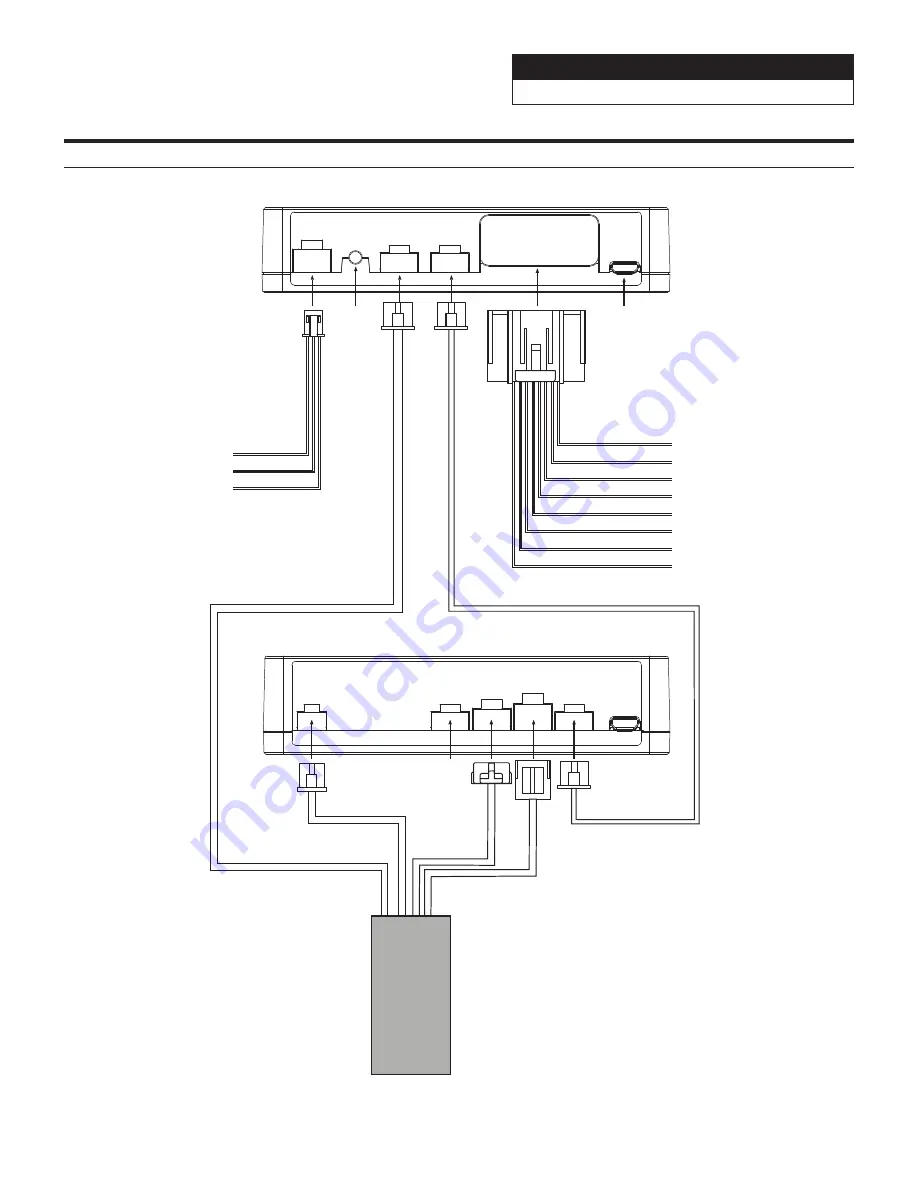
Connection Of KAC-001 (Sold Separately)

4 Pin

Black Data


POWER  RESET  HEADUNIT 

CAN 

OUTPUT 

UPDATE

BATT* (Yellow)

Output 1 (Purple)
Output 2 (White/Red)
Output 3 (Brown)
Output 4 (Blue)
Output 5 (Green)
Output 6 (Pink)
Output 7 (White)
Output 8 (Gray)

Connect to Relay/output to 

accessories (Sold separately)

Reset

Button

Interface Ha

rness (4-pin White)

Power Ha

rness 

(3-pin White)

8ch Output Ha

rness 

(24-pin White)

Interface Cable (4-pin) (included with ADS module)

USB port 

(Firmware 

updates only)

ACC (Red)
GND (Black)

*Fuse Rating: 7A

To 4 Pin Black Data

Connect to IDATALINK I/F

cable from head unit. This is

the 4 pin data connector 

shown on page 12 in the 

installation diagram that

comes directly off of the

main harness

Main Har

ness

3 Pin

Black

4 Pin

Blue

10 Pin

Green

3 Pin

Black

Not

Used

To Head Unit

Maestro Module Side View

KAC-001 Side View

Summary of Contents for INE-W987HD

Page 1: ...ing undnurlAh1erf0 sdlweren tadlld lenVertetzangtr1 INSTALLER UNIQUEMENT DANS LES VOITURES INDIQUEES N installer ce produit que dans les installations prevues a cet effet et uniquement dans les voitur...

Page 2: ...at the following address www alpine usa com registration You will be informed of product and software updates if applicable special promotions news about Alpine Merci d avoir achet ce produit Alpine N...

Page 3: ...se and Risk Although this product is rated IP53 it is not impervious to dust or water damage in all situations Dust and water resistance is not permanent resistance may decrease as a result of normal...

Page 4: ...ing screen Customization 22 How to Input Characters and Numbers Keypad 23 Favorite Function Using the Favorite Function 24 Editing the Favorite Screen 24 Registering Items 25 Changing Item Names 25 Ch...

Page 5: ...41 Setting the TUNER FM Tone Quality Tuner Condition 41 Setting the TUNER FM Frequency Step 41 SiriusXM Setup 42 Setting the Alert individually for an Artist Song Favorite Team 42 Setting ON OFF of a...

Page 6: ...Shuffle 62 Creating a New Station 62 Bookmarking a Desired Track or Artist 62 Connecting a Bluetooth Device Bluetooth Pandora Only 63 Disconnecting the Bluetooth Connection 63 Changing the connecting...

Page 7: ...Book 81 Deleting the Phone Book Entries 82 Searching in the Phone Book 82 Bluetooth Audio Playback 83 Repeat Play 83 Random Play 83 Search Function 83 Connecting a Bluetooth Device 84 Disconnecting th...

Page 8: ...95 External Accessory Control Operation 96 Information Product Software Update 97 About the Supported Formats 97 About MP3 WMA AAC FLAC 97 About WAV Disc 98 In Case of Difficulty 99 If this Message Ap...

Page 9: ...nner and location before attempting operation Make certain that the volume level of the navigation system is set to a level which still allows you to hear outside traffic and emergency vehicles If the...

Page 10: ...REPLACING FUSES Failure to do so may result in fire or electric shock DO NOT BLOCK VENTS OR RADIATOR PANELS Doing so may cause heat to build up inside and may result in fire USE THIS PRODUCT FOR MOBIL...

Page 11: ...l data including destination data routing information and phone book data if your phone book is connected to the unit via Bluetooth 2 Your personal data is not transmitted to any third parties The onl...

Page 12: ...Apple product s identified in the Made for Apple badge and to work specifically with the technology identified in the Works with Apple badge and has been certified by the developer to meet Apple perf...

Page 13: ...een example Frequently used functions and useful functions can be customized for your convenience You can register up to 54 functions You cannot register a function more than once About Swiping the To...

Page 14: ...he screen The Search mode differs depending on the audio source For details see the operating instructions of the audio source Shortcut Setup Screen page 19 Preset button or Quick Search mode Screen Y...

Page 15: ...rations refer to Navigation System OM in the website at http www alpine usa com You can switch the left right positions of the Audio Visual screen and Navigation screen Each time you touch the positio...

Page 16: ...the navigation map screen Press again to switch to Navigation menu screen Press and hold this button for at least 2 seconds to change to Go Home route screen If Home is not set yet it will change to...

Page 17: ...the Language list screen vertically then touch your choice from the list of 23 languages For your driving safety please read the warning prompt displayed on this unit carefully Some of this unit s fun...

Page 18: ...usXM 2 AUX 3 5 Bluetooth Audio 1 Apple CarPlay Music Google Play Music 6 Radio 1 When no USB flash drive iPod HDMI device Smartphone Bluetooth compatible device SiriusXM Tuner is connected this option...

Page 19: ...pending on the selected item Switches to the menu screen or the previous screen Item select button Closes the window Displays the next list page When the next selection item does not exist the list it...

Page 20: ...onnected phone the incoming call screen is displayed Tone Adjustment mode BASS ENGINE SQ mode Button for changing the BASS ENGINE SQ mode screen Balance Fader Image area 1 To reset to the initial sett...

Page 21: ...dphones Rear Seat Entertainment System Setup screen Visual source selection area that is displayed on the Rear monitor 1 Touch the source icon displayed on the Rear monitor Front The image and sound o...

Page 22: ...Road button 3 Activate Deactivate Off Road Mode Depending on the setting and connected devices the displayed icons and orders may differ Touch to display more icons such as Android Auto 4 Apple CarPla...

Page 23: ...es Name When you connect two Hands Free Phones the information of the Bluetooth device set to Primary is displayed Opening screen Customization You can set a BMP image that is stored on a USB flash dr...

Page 24: ...screen area Cursor position alteration switch Cancel Keypad mode finishes Delete Returns to the previous character and erases it Touching here for more than 2 seconds will erase all input characters I...

Page 25: ...by choosing shortcut dialing after the message of confirmation of outgoing phone calls is displayed touch Call For details see Calling by Favorite Function page 79 Editing the Favorite Screen 1 Touch...

Page 26: ...avigation Specific Place You can display places registered in Favorite and set your destination Quick Place Search Displays the address search keypad Help Nearby Displays the nearby search screen Plac...

Page 27: ...ges switch pages or when you make a new page and move to another drag to the end of the screen and lift your finger after the page changes When deleting a selected item 1 Touch the checkbox at the lef...

Page 28: ...nd accordingly on the Smartphone The setting cannot be done on both the Smartphone and this unit at the same time While the sound function of this unit is set via Smartphone the sound function setting...

Page 29: ...e About Basic Operation for List Screen page 18 Setup To display the Setup Menu screen Your vehicle must be parked with the ignition key in the ACC or ON position To do this follow the procedures belo...

Page 30: ...ils see Hands free Device Primary Secondary Setting page 30 3 When the device registration is complete a message appears and the device returns to normal mode The Bluetooth registration process differ...

Page 31: ...then touch OK You can select the character code that is used when transferring the phone book or history from a mobile phone If unreadable characters appear in the transferred data select the correct...

Page 32: ...the main source screen To return to the previous List screen touch in the previous page For details see About Basic Operation for List Screen page 18 Sound Setup Sound is selected on the General Setup...

Page 33: ...s only available when Subwoofer is set to On Media Xpander MX HD makes vocals or instruments sound distinct regardless of the music source The HD Radio Technology FM SiriusXM USB Flash drive and iPod...

Page 34: ...Level to adjust the level of selected band Setting contents 14 to 14 Initial setting 0 Setting the Bandwidth Touch or of Q Factor to select the bandwidth Setting contents Wide Initial setting Medium N...

Page 35: ...d value Touch Preset 1 Preset 2 or Preset 3 on the X Over screen The setting stored in the Preset will be recalled Before performing the following procedures see About Time Correction page 36 Setting...

Page 36: ...al setting 0 Setting contents for Phone Calls 1 to 35 Initial setting 10 Setting contents for Ringtones Alerts 1 to 6 Initial setting 3 Setting contents for other items 1 to 11 Initial setting 5 You c...

Page 37: ...ristics This is caused by the time delay between the sound reaching the listener s right versus the left ear To correct this this unit is able to delay the audio signal to the speakers closest to the...

Page 38: ...c Distance cm Distance inch Time Difference msec Distance cm Distance inch 0 0 0 0 0 0 5 1 173 4 68 3 0 1 3 4 1 3 5 2 176 8 69 7 0 2 6 8 2 7 5 3 180 2 71 0 0 3 10 2 4 0 5 4 183 6 72 4 0 4 13 6 5 4 5 5...

Page 39: ...tup Menu screen in step 2 See General Setup page 31 You can set up the brightness color display etc of the screen 1 Touch Screen Lighting in the Display Key Setup Menu screen The Screen Lighting setup...

Page 40: ...te Off Road Green Off Road Light Blue Off Road Red The initial setting for Off Road on mode is Off Road Green and for Off Road off mode is Street Green Scroll display is available if folder name file...

Page 41: ...el Remote Control SWRC settings are applicable to vehicles with steering wheel media buttons This setting is assigned to the Source Camera View button located between Volume Volume on the back right s...

Page 42: ...details see About Basic Operation for List Screen page 18 Radio Setup Radio is selected on the Source Setup Menu screen in step 1 See Source Setup page 41 This unit can set your preferred tone qualit...

Page 43: ...XM channel Setting item Favorite Team Setup Setting contents On Off 1 Touch Favorite Team Setup A sports league list is displayed 2 Select the desired league The display changes to the team list of th...

Page 44: ...new 4 digit passcode 8 Touch Enter 9 Then use the keypad to enter the new 4 digit passcode a second time to verify it 10Touch Enter Remember to keep a note of the passcode in a safe place in case you...

Page 45: ...details see Setting Multi Camera to On Off page 47 2 When Camera Select is set to Off you cannot select this item 3 You can select this item only when Camera Select is Front or Rear 4 You can select...

Page 46: ...Rear Front Camera only the camera guide will not be displayed When you connect a Multi View compatible camera select a Video Pattern to make a guide adjustment To adjust the guide position of the Rea...

Page 47: ...ually When Hitch Guide is set to On Side Camera 1 Touch Link The 2 vertical guides of the currently selected guide link together allowing them to be adjusted simultaneously Turning Guide Display On Of...

Page 48: ...Initial setting Aftermarket Setting contents Both Factory Aftermarket USB iPod only The iDataLink source icons not displayed on the Menu screen when no iDataLink module is connected even though Both o...

Page 49: ...ee Rear Seat Entertainment Function page 20 External Accessories Setup External Accessories is selected on the System Setup Menu screen in step 1 See System Setup page 44 When using an external audio...

Page 50: ...ion Consult your Alpine dealer or the Alpine website for details Only the iPhone and certain Android Smartphones support this function 1 Set this setting after closing the Alpine TuneIt App 2 Not disp...

Page 51: ...Apple CarPlay screen or you can ignore prompt by touching on the top right The App must be Apple CarPlay compatible in order to appear in the Home screen What is Android Auto Android Auto is designed...

Page 52: ...y high quality sound If there is no HD Radio broadcasting signal in the current area after 10 seconds this unit will switch to receive the RBDS Radio signal automatically However the display is still...

Page 53: ...to store for at least 2 seconds The selected station is stored 3 Repeat the procedure to store up to 11 other stations onto the same band To use this procedure for other bands simply select the desire...

Page 54: ...only You can select and receive the currently receivable stations in the Program Type list screen Program Type list screen example For details on switching to the Program Type list screen see in Prese...

Page 55: ...t the Feature Logos Digital CD quality sound HD Radio Technology enables local radio stations to broadcast a clean digital signal AM sounds like today s FM and FM sounds like a CD Program Service Data...

Page 56: ...mode The USB Video operation screen display during video file playback Touch the screen while the USB Video playback screen is displayed The USB Video operation screen is displayed The operation scre...

Page 57: ...ayback USB Video only Touch during playback STOP indicator is displayed and playback stops Playback starts from the beginning when is touched while playback is stopped Repeat Play 1 Touch The Repeat m...

Page 58: ...sic Operation for List Screen page 18 SwitchingDisplayModes DuringVideoFilePlay Back You can switch the Display Mode while playing a Video File Touch Each time you touch the Display Mode is switched F...

Page 59: ...6s Plus Ver 12 1 iPhone 6s Ver 12 1 iPhone 6 Plus Ver 12 1 iPhone 6 Ver 12 1 iPhone 5s Ver 12 1 iPhone 5c Ver 10 1 1 iPhone 5 Ver 10 1 1 iPhone 4s Ver 9 3 5 iPod touch 6th generation Ver 12 1 iPod to...

Page 60: ...played in the Quick Search mode In this case go to the Full Search mode In Quick Search mode touch the desired list for example Album list The selected Album is played To switch into Quick Search mode...

Page 61: ...with R the search list begins with S Repeat Play 1 Touch The Repeat mode select pop up screen is displayed displays the currently selected mode Random Play Shuffle 1 Touch The Random Play mode select...

Page 62: ...a main screen example Function mode Station name Artist Name Song Name Album Name Playing time Artwork display Listening to Pandora 1 Launch the Pandora on the smartphone 2 Press the AUDIO button to s...

Page 63: ...ntly playing song or artist a personalized Pandora station can be created The new station will play more music like it Free word 1 During playback touch New Station The Key Pad screen is displayed You...

Page 64: ...tooth connection will start 1 Touch Phone Setting The Device Setting select pop up screen is displayed 2 Touch Disconnect The Bluetooth connection is disconnected If multiple Bluetooth devices are reg...

Page 65: ...ch mode screen Album Art The image that corresponds with the channel currently being received is displayed You can change the artwork position For details see Switching the Artwork Position page 39 Pr...

Page 66: ...or Category Down on the category browsing mode screen to select a desired category The Category Name is shown at the top of the display 3 Select the desired channel Changing the Display Text informati...

Page 67: ...choices every time you tune in Instead of pushing every preset button and hearing the live song you can simply use the TuneScan function to get a short preview of songs that you have missed on each o...

Page 68: ...Alerts is described in Receiving and Tuning to an Alert 1 Touch Set Alert on the SiriusXM mode screen The Memory type selection screen is displayed 2 Touch the Artist Saved or Song Saved to choose to...

Page 69: ...he Parental Control passcode see Setting the Parental Lock page 43 When a locked channel is selected Channel xxx Locked is displayed and then the numeric keypad appears for you to enter the passcode I...

Page 70: ...layer For details on operating the Remote Control unit refer to the Owner s Manual of the DVE 5300 For details on the types of playable discs and formats refer to the Owner s Manual of the DVE 5300 DV...

Page 71: ...older are repeatedly played back If the Repeat Play mode is activated during MIX playback the MIX mode will be canceled MIX Random Play Touch during playback The tracks files on the disc will be playe...

Page 72: ...ch the screen while the DVD playback screen is displayed To display the operation screen touch Control The operation screen changes to the visual screen in the DVD mode for 5 seconds after an operatio...

Page 73: ...p 1 Touching Key displays the numeric keypad input mode screen For details of the numeric keypad input mode screen see Numeric Keypad Input Operations page 73 4 Touch Enter to confirm the selected ite...

Page 74: ...starts from the beginning when is touched while playback is stopped Fast forwarding Fast reversing 1 During playback touch and hold Fast reverse or touch and hold Fast forward When pressed for more t...

Page 75: ...discs on which no title numbers are recorded Some disc may not accept any operation You cannot operate them while driving Searching Directly by Chapter Number Use this function to easily move to the b...

Page 76: ...t language is selected instead However the subtitle language may differ depending on the disc For some discs the subtitles will be displayed even when this is set to OFF However the subtitle language...

Page 77: ...ety video is not displayed and only audio can be heard while driving 2 In HDMI player mode the screen of the device displays the content of electronic equipment by mirror image You can select Display...

Page 78: ...features may not be activated by your service provider and or the provider s network settings may limit the feature s functionality Always contact your service provider about feature availability and...

Page 79: ...play it again Touch or swipe downward on on the upper part of the screen During an incoming call or a conversation on the Primary Secondary Hands Free Phone if there is an incoming call on the Seconda...

Page 80: ...page 24 1 Press the Favorite button The Favorite screen is displayed Favorite screen 2 Touch the Short Cut icon A contact s name phone number and a confirmation message of the phone number are displa...

Page 81: ...t may pause depending on version of the connected iPhone In that case touch the microphone icon in the center of the Voice Control mode screen You can continue to use the Voice Control mode 3 To finis...

Page 82: ...d appears 2 Input number You can transmit a Touch Tone signal during a call Phone Book Function Phone Book screen example Use to search by directly inputting a name or phone number with the Keypad For...

Page 83: ...five registered items in the phone book you cannot use the phone book search function If a Bluetooth compatible mobile phone portable player etc is connected by wireless you can play back a song oper...

Page 84: ...d list differs with the connected Bluetooth device You can search for your desired song by using one of two modes the Quick Search mode and the Full Search mode Quick Search mode Touch your desired Gr...

Page 85: ...connection will start 1 Touch Settings The Device Setting select pop up screen is displayed 2 Touch Disconnect The Bluetooth connection is disconnected If multiple Bluetooth devices are registered in...

Page 86: ...rformed To hide the Auxiliary AUX operation screen touch the video display area Example for AUX AUX DVD GAME mode display Display Mode For details see Switching Display Modes page 75 You cannot operat...

Page 87: ...s the program playlist folder up Display Mode You can set the Display Mode For details see Switching Display Modes page 75 Angle Switches angle Audio Switches audio Sub Title Switches sub titles You c...

Page 88: ...Camera and Side Camera at the same time touch Front or Side in the Rear Camera image to switch the Camera image Shift the gear lever to the reverse R position The rear view image is displayed while th...

Page 89: ...oad surface the range of vision may vary The camera has a limited range of vision Objects at extreme angles to the camera e g under the bumper or at opposite ends of the bumper may not be in the its f...

Page 90: ...and touch or to return to the main source screen or previous screen You can perform a Guide Adjustment For details see Adjusting the Rear Front Side Camera Guide page 45 If you connect a Front Camera...

Page 91: ...en is displayed on the screen After a 5 second time out the operation screen returns to the camera display screen 2 Touch Rear or Front The image pattern changes For detailed information about image p...

Page 92: ...e camera and accessory controller buttons will be cleared from the camera screen after 5 seconds of no interaction 2 Touch VIEW to change the camera view You can also cycle the Off Road Camera view by...

Page 93: ...he Rolling angle data is from iDataLink For alert value setting see Inclinometer Setup X409 only page 40 Tracking Back Tracking information Compass with direction of travel arrow The vehicle position...

Page 94: ...wer left and right of the camera screen For details on External Accessory screen see External Accessory Control Operation page 96 Displayed only when iDataLink module is connected The Off Road Camera...

Page 95: ...DOWN UP button to control the volume of Voice Information Operation of the Remote Control unit sold separately is also restricted Access to iDataLink Mode You can check the car s status set the air co...

Page 96: ...ion is displayed only when the Front camera or Rear camera is interlocked Parking Sensor Camera interlock screen example Rear camera You can check for obstacles through an interlocked camera image by...

Page 97: ...me Keypad You can also select a basic name from the Template of the Keypad For details on how to input characters using the keypad see How to Input Characters and Numbers Keypad page 23 When a basic n...

Page 98: ...on this device have the file extensions MP3 mp3 WMA wma AAC m4a FLAC flac fla WMA is not supported for the following files Windows Media Audio Professional Windows Media Audio 10 std or Windows Media...

Page 99: ...he sampling rate the higher the sound quality but also the larger the volume of data Encoding Converting music CDs WAVE AIFF files and other sound files into the specified audio compression format Tag...

Page 100: ...nected replace the antenna or cable if necessary Unable to tune stations in the seek mode You are in a weak signal area Make sure the tuner is in DX mode If the area you are in is a primary signal are...

Page 101: ...Phone and connect to the unit There are no data in the USB flash drive Download data to the USB flash drive and connect to this unit Un readable song was skipped A copy protected WMA file has been det...

Page 102: ...for information on the current channel lineup The unit will revert to the previous channel or to channel 1 automatically Subscription Updated Press OK to Continue Your subscription has been updated To...

Page 103: ...USB requirements USB 2 0 Max Power Consumption 1 500 mA CDP Support USB Class USB Mass Storage Class File System FAT16 32 Number of Channels 2 Channels Stereo Frequency Response 1 5 20 000 Hz 1 dB Tot...

Page 104: ...iscrepancy in layout found in the System The right to use the System shall expire either when the user destroys this software or when any of the terms for use is violated and Alpine Space Machine and...

Page 105: ...anty and if the product was shipped to an Authorized Alpine Service Center or Alpine Alpine will pay the return shipping charges You should provide a detailed description of the problem s for which se...

Page 106: ...io exempts de licence L exploitation est autoris e aux deux conditions suivantes 1 l appareil ne doit pas produire de brouillage 2 l utilisateur de l appareil doit accepter tout brouillage radio lectr...

Page 107: ...rm to you and others and to protect against damage to property These symbols and their meanings are listed below Make sure you fully understand these symbols before you begin reading the main text Exp...

Page 108: ...making a hole in the vehicle body be careful to avoid damaging pipes the fuel tank electrical wiring and the like This kind of damage could lead to an accident or fire When installing and grounding th...

Page 109: ...RA JL 20200825v1 3 29 Tools Required 10mm Socket 8mm Socket 7mm Socket Wire Cutters Extension Ratchet 2 Phillips Screwdriver Torx T20 Torx T47 Panel Removal Tools Wire Fishing Tool Cordless Power Dril...

Page 110: ...ss Power Inverter Bracket Display Bracket Tuner Bracket External Bluetooth Mic USB Power Adapter USB HDMI Aux Interface Aux Preout Harness Documents Chime Speaker Alpine Registration Card Quick Refere...

Page 111: ...WJL FACTORY CAMERA BSV INTERFACE LVDS IN USB Flash DIP1 UP Wrangler Down Gladiator DIP 2 3 4 5 6 7 8 All up DIP7 Down Firmware Update VIDEO OUT Power CAN IN Can1 Can2 X409 Display Unit X409 Source Un...

Page 112: ...e plugin is already installed appears Please skip to step 2 3 CONNECT YOUR MAESTRO MODULE Use your Maestro module to connect to your PC 5 PROGRAM YOUR MODULE Follow the programming steps for your vehi...

Page 113: ...you go through the installation Also the screen size in the pictures may be different if you have the 5 0 display The following chart shows which options are available on the different trim levels fo...

Page 114: ...clips and remove the knee panel under the steering wheel using a panel removal tool 3 The locations of the 6 clips from the previous step 4 Unsnap 10 clips unplug the 2 harnesses and remove HVAC panel...

Page 115: ...d unit Disconnect and remove the radio 10 Disconnect the harnesses behind the OEM head unit 11 The disconnected harnesses from the previous step These will be used later to connect to the main harness...

Page 116: ...ck in place 14 For vehicles with heated seats or the power inverter the bracket for the module needs to be removed Remove the 4 10mm screws to remove the bracket Then remove the 2 8mm screws lower and...

Page 117: ...JL 20200825v1 11 29 19 Unclip 7 clips and remove the center media stack 17 Loosen the clips around the top panel visor area 18 Remove panel above drivers door going to the B pillar Factory Unit Disass...

Page 118: ...on page 17 3 Mount GPS antenna near driver side B pillar as illustrated on page 17 and run the cable to the knee panel 4 Route radio cables including Radio Main Sirius XM FM and Aux in main harness a...

Page 119: ...ashers This will mean you will not use two of the M5X8LMM screws from the previous page These two screws are slightly longer and can make it through both brackets 9 Use the factory speed clips from th...

Page 120: ...odule will look like for the Gladiator JT 14 Use 4 OEM bolts to secure the X409 source unit tuner bracket to the vehicle If the vehicle is equipped with the power inverter it will mount behind the 2nd...

Page 121: ...t the camera interface module to the violet or red factory camera plug and put it in right side of radio cavity Dip switch 1 will need to be moved down for the Gladiator JT 21 Run chime speaker harnes...

Page 122: ...e vehicle using the OEM screws from the OEM radio 26 Attach the display unit to the display bracket using the 4 M5X8LMM supplied screws 28 Plug in the bezel and and reinstall all the factory panels 25...

Page 123: ...M Camera Module X409 WRA JL Source Unit iDatalink Maestro Module SAT Radio Tuner Sold Separately Harness Route GPS Antenna Installation IMPORTANT Follow the GPS antenna installation procedure shown be...

Page 124: ...ENNA SiriusXM Antenna Power Harness Remote Harness Key Harness X409 External Microphone Bluetooth Mic Input AUX Input To optional SiriusXM tuner sold seperately X409D Display SiriusXm connect GPS Ante...

Page 125: ...BSV1 WJL FACTORY CAMERA BSV INTERFACE LVDS IN USB Flash DIP1 UP Wrangler Down Gladiator DIP 2 3 4 5 6 7 8 All up DIP7 Down Firmware Update VIDEO OUT Power CAN IN Can1 Can2 Rear Camera Violet or Red A...

Page 126: ...ehicles without factory SiriusXM use the antenna that is included with the SXV300 SiriusXM Tuner SiriusXm connect CAN I F GPS USB EXT KEY W REMOTE POWER SXM DAB PRE OUT HDMI IN ANTENNA HDMI OUT Remote...

Page 127: ...needs to be a 2A source This will require a separate USB power source to be installed in the vehicle DO NOT use the USB included in the kit to power your device HDMI Input iPhone Lightning To HDMI ad...

Page 128: ...ner Green White CAMERA IDATALINK I F AUX INPUT REMO Blue White REVERSE Orange White P ANT Blue PARKING BRAKE Yellow Blue Green Green Black White White Black Gray Black Gray Violet Black Violet ACC Red...

Page 129: ...Radio I O Orange White 22AWG Green White 22AWG Yellow Blue 22AWG Blue White 22AWG 1 2 3 Yellow 18AWG Red 20AWG Black 18AWG Maestro Power 1 4 3 2 iDatalink Blue 22AWG White 22AWG Black 22AWG Red 22AWG...

Page 130: ...7 Down Firmware Update VIDEO OUT Power CAN IN Can1 Can2 AV1_L AV2_R AV3_Front NC NC GND Foot Brake Keypad TRIG_LEFT TRIG_RIGHT ACC_OUT REV_OUT TRAILER AHD_5V AHD_5V GND NC Manual_ACC TRIG_RIGHT TRIG_F...

Page 131: ...Reset Button Interface Harness 4 pin White Power Harness 3 pin White 8ch Output Harness 24 pin White Interface Cable 4 pin included with ADS module USB port Firmware updates only ACC Red GND Black Fus...

Page 132: ...ne Seek Down Track None Next Preset Preset Folder Preset Folder Voice Voice Or Siri None Off Hook Answer Call None On Hook Hang Up Reject Call None Volume Up Volume None Volume Down Volume Attenuation...

Page 133: ...RCE or RECALL LAST STATE 6 TYPE can be set for either LATCHING or MOMENTARY LATCHING means that when the switch is selected it will stay on until the switch is pressed again MOMENTARY will only keep t...

Page 134: ...1 iPhone not working with HDMI Not using Apple HDMI to Lightning adapter Purchase the HDMI to Lightning adapter directly from Apple Not all 3rd party adapters work the same Didn t plug USB power into...

Page 135: ...so ensure that no 3rd party interface module s interfere with the Reverse Signal The head unit uses the Reverse Signal to achieve optimal positioning performance 12 iPhone or Android phone is not reco...

Page 136: ...GUIDE GUIDE DE REFERENCE RAPIDE GU1A DE REFERENCIA R APIDA Please register your product at www alpine usa com registration to protect your purchase Enregistrez vous sur www alpine usa com registratio...

Page 137: ...60 degrees from vertical Although this product is rated IP53 it is not impervious to dust or water damage in all situations Dust and water resistance is not permanent resistance may decrease as a resu...

Page 138: ...4 Map Functions 15 Navigation Menu 16 Setting a Destination 17 Specifications 18 IMPORTANT Please record the serial number ofyour unit in the space provided below and keep it as a permanent record SER...

Page 139: ...IN CARS WITH A 12VOLT NEGATIVE GROUND Check with your dealer ifyou are not sure Failure to do so may result in fire etc KEEP SMALL OBJECTS SUCH AS SCREWS OUT OF THE REACH OF CHILDREN Swallowing them...

Page 140: ...Be sure to use only the specified accessory parts Use ofother than designated parts may damage this unit internally or may not securely install the unit in place This may cause parts to become loose r...

Page 141: ...cognition mode Recallsthe navigation map screen or A V UP DOWN button Press again to switch to Navigation menu screen Press and hold this button for at least 2 seconds to Press to adjust the volume ch...

Page 142: ...Screen You can switch the Audio Sources screen to a dedicated screen by touching the icon on one ofthe three edges of the screen You can set the BASS ENGINE SQ Tone Adjustment or Rear Seat Entertainme...

Page 143: ...it screen used for registering items or changing names You cannot edit any items on the Edit Menu screen while driving Close the Favorite screen Favorite registration item Indicates the location of th...

Page 144: ...in the Owner s Manual for more information Owner s manual Apple CarPlay Optional Apple CarPlay Operation Optional Apple CarPlay is a smarter safer way to use your iPhone in the car Apple CarPlay takes...

Page 145: ..._______ PTY Search button Touch when you use the PTY list screen RBDS FM mode only Album Art HD Radio FM mode only Displays the Primary Image of the song currently being received or the Station Logo...

Page 146: ...Search mode screen Close button Touch to close the Quick Search mode Restarts the current file _______ skip to previous file if pushed within 1 second Touch for 1 second or more to rewind file Pause a...

Page 147: ...ext song Creates a New Station from the currently received track information 10 EN T T Bookmark Artist Track Pandora information display Playing time Thumbs Down feedback Displays the search screen Cr...

Page 148: ...beginning on programmed l l preset stations Only when SiriusXM Tuner SXV200 o r________ J later is connected Touch to scan through all the songs you missed from your current band of preset channels On...

Page 149: ...een _________ DisplaysTop Menu screen Displays Menu control screen i l Switches AudioTracks Switches Subtitles ____________________ ______ Repeat Playback DVD Setup screen l Switching Display Modes 1...

Page 150: ...een 2 Quick Search button Touch to use th Quick Search mode Current song no Total song no Information display Playing time Full Search mode button Touch when you use the Full Search mode screen Pause...

Page 151: ...th Sets for use as both an Audio device and Hands Free Device 6 When the device registration is complete a message appears and the device returns to normal mode You can register up to 5 Bluetooth comp...

Page 152: ...the Owner s Manual Next street Next turn preview Speed limit warning Data fields Lane Information Warning road sign r t ont Dr Street name 2D 2D North p 3D ioM a1 Traffic E i zoom Bf 1r Addltlonal Inf...

Page 153: ...rting point New Rout Select your destination by entering an address or its coordinate or by selecting a Place a Saved Location or a Saved Route You can also look up your recent destinations from the H...

Page 154: ...Touch City or ZIP code 4 Enter the town name or postcode Touch to display the candidate list S Enter the desired street name w H y 0 p s D f __ H J K L z C V ll N M i Touch to display the candidate li...

Page 155: ...der software bit rate HDMI SECTION Input Format Output Format GPSSECTION GPS Reception frequency GPS Reception sensitivity 18 EN 480PNGA 480p 1 575 42 1 MHz 136dBmax Owner s manual Bluetooth SECTION B...

Page 156: ...r E E V N r co 6 E E Note on using HDMI Connection Cables When using HDMI connection cables secure the cables to the HDMITerminals with the supplied HDMI Bracket 1 Slide the HDMI Bracket into the gro...

Page 157: ...Made for siPhone I iPod Works with Apple CarPlay Hi Jffll HIGH DEFINITION MULTIMEDIA INTERFACE lfEr3 0Bluetooth androldauto H Radioe 0 H g lb nd ActistExpedence Siriusxm READY pandora 20 EN...

Page 158: ...and the HD HD Radio and ARC logos are registered trademarks or trademarks of iBiquity Digital Corporation in the United States and or other countries Sirius XM and all related marks and logos are trad...

Page 159: ...d by the warranty and if the product was shipped to an Authorized Alpine Service Center or Alpine Alpine will pay the return shipping charges You should provide a detailed description ofthe problem s...

Page 160: ...lacer par un produit neufou revise le tout sans frais pour vous Si les reparations sont couvertes par la garantie et si le produit a ete envoye aun centre de service Alpine ou a Alpine le paiement des...

Page 161: ...is desirable that it should be installed and operated keeping the radiator at least 20 cm or USA Canada more away from person s body Le present appareil est conforme aux CNR d lndustrie Canada applica...

Page 162: ...INE ELECTRONICS DE ESPANA S A Portal de Gamarra 36 Pabell6n 32 01013 Vitoria Alava APDO 133 Spain Phone 945 283588 Take a moment to protect your purchase by registering your product now at www alpine...

Page 163: ...User Manual Alpine Navigation System Navigation software for the Alpine Navigation System English January 2019 Ver 3 0...

Page 164: ...nnel view 18 2 3 9 Freeway services 20 2 3 10 3D object types 20 2 3 11 Traffic events 21 2 4 Navigation menu 21 3 Using the navigation 24 3 1 Selecting a destination 24 3 1 1 Using Freeform Search 24...

Page 165: ...ation 56 3 8 Off Road Mode 57 3 8 1 Switching to Off Road Mode 57 3 8 2 Off Road Mode screen 57 3 8 3 Off Road menu 58 3 8 4 Import Export Recorded Tracks 59 3 8 5 Selecting the destination in Off Roa...

Page 166: ...1 4 3 1 Route preferences 72 4 3 1 1 Vehicle profile 73 4 3 1 2 Route Planning Method types 74 4 3 1 3 Road types 74 4 3 2 Sound 77 4 3 3 Warnings 78 4 3 4 Navigation View 79 4 3 5 Regional 81 4 3 6 T...

Page 167: ...ok at the display only when it is safe to do so If you are the driver of the vehicle we recommend that you plan and review your route before you start your journey Plan the route before your departure...

Page 168: ...ne naviextras com to find map updates and extra content for your navigation system Use the Toolbox application with your product connected and download the new map data To update your navigation softw...

Page 169: ...speaker used for voice guidance messages Later you can change it in Regional settings page 75 Tap to continue 5 If needed modify the time format and unit settings Later you can change them in Regional...

Page 170: ...ctionality and use of buttons sliders and other screen controls in Alpine Navigation System 2 2 1 Using the buttons and other controls To operate Alpine Navigation System tap the buttons on the touch...

Page 171: ...e that can be used to type a name that is available on the map The other keys are grayed out Action Function Switching to another keyboard layout for example from an English keyboard to a Greek keyboa...

Page 172: ...board screens to quickly delete several characters Tap and hold the following buttons in long lists to scroll pages continuously Dragging Drag the screen in the following cases To move the handle on a...

Page 173: ...the button to modify it continuously and smoothly You can also pinch or expand the map to zoom in or out Tilting up and down Change the vertical view angle of the map in 3D mode Tap once to modify th...

Page 174: ...12...

Page 175: ...not simply the computerized versions of traditional paper maps Similarly to paper road maps the 2D mode of digital maps shows you streets and roads Elevation is also illustrated in color The navigatio...

Page 176: ...u have not selected a route destination you can see nearby house numbers 7 2D 2D North up 3D views You can switch between the 3D perspective 2D Heading up and 2D North up map view modes In Heading up...

Page 177: ...e navigation hardkey button you can open the Navigation menu where you can reach other parts of Alpine Navigation System If you are approaching a freeway exit or a complex intersection and the needed...

Page 178: ...of the route before reaching the final destination Destination end point It is the final destination of the route Route color The route always stands out with its color on the map both in daytime and...

Page 179: ...icons are intuitive The following table lists some of the frequently shown route events Icon Function Turn left Turn right Turn back Bear right Turn sharp left Keep left Continue straight in the inte...

Page 180: ...e is no planned route During navigation only the signpost that points to the lane s to be taken is highlighted all the others are darker If you want to hide the currently displayed signposts tap any o...

Page 181: ...of the tunnel displayed in a separate window helps you orient yourself The remaining distance in the tunnel is also displayed After leaving the tunnel the original map view returns Tunnel view can be...

Page 182: ...u can change the icons in See page 79 2 3 10 3D object types Alpine Navigation System supports the following 3D object types Type Description 3D terrain Alpine Navigation System displays 3D hills and...

Page 183: ...d when traffic events are not received It is displayed when traffic events are received but they do not affect the planned route It shows the type of the next traffic event with the expected delay It...

Page 184: ...route the following menu options are also available Button Function Add an intermediate destination to your route See route alternatives to avoid parts of the route or to avoid a specific road from yo...

Page 185: ...23 Tap the Back button to return to the previous screen You can also press and hold this button to quickly return to the Navigation view from any other screen...

Page 186: ...view and modify the route or use navigation related features with the help of the touch screen 3 1 Selecting a destination You can choose your destination by selecting one of the following options Us...

Page 187: ...o see the whole list of the matching results 4 With the proper search area displayed start entering the name address or category of the destination you are looking for 5 Tap to switch to the result sc...

Page 188: ...eets connected by the sign You do not need to use spaces before and after the separator character For example you can find the intersection of Collins Street and Douglas Avenue by entering strings lik...

Page 189: ...fault the Alpine Navigation System proposes the country where you are or in case there is no valid GPS position the country of the last known position If needed tap b Start entering the first few lett...

Page 190: ...et on the keyboard To enter letters tap d Tap the selected address to finish the address search 3 The route is calculated and the map appears showing the entire route where you can check route informa...

Page 191: ...To navigate to the midpoint of a street without entering the house number perform the following steps 1 Press the navigation hardkey button to access the Navigation menu 2 Go to and select the street...

Page 192: ...etters or tap to open the list of results Select the crossing street from the list 3 1 2 5 Using the ZIP code to select a destination You can also select any kind of destination by entering the ZIP co...

Page 193: ...the menu Using the same screen you can find a Place by selecting one of the following options Finding frequently searched types of Places with the Quick search categories see page 32 Searching for a P...

Page 194: ...the route If a planned route exists parking lots are searched around the destination If there is no planned route destination is not selected the search is carried out around the current position If t...

Page 195: ...and 3 Select the area around which you would like to search for the Place by tapping By default the search area is around the current position or if it is not available around the last known position...

Page 196: ...n browse the subcategories for example Hotel or Motel to find your destination 6 You can turn the Category View off at any level to list all Places around the selected location or along the route 7 op...

Page 197: ...arch for the Place By default the search area is around the current position or if it is not available around the last known position In this case the result list is ordered by the distance from this...

Page 198: ...the name of the Place or browse in the categories 2 After entering a few letters tap to open the list of Places or Place categories with names containing the entered character sequence 3 Browse the li...

Page 199: ...r repair and roadside assistance services Medical and emergency services Police stations Gas stations 3 Tap any of the quick search buttons to get an instant list of those types of Places 4 optional T...

Page 200: ...re set categories Home and Work 4 Tap the location that you want to set as your destination If necessary browse the list to see more results 5 optional If needed tap to enable the editing option so th...

Page 201: ...all the History items tap The list of recent destinations appears The list begins with the three most likely destinations that are selected based on your previous routes Smart History The rest of the...

Page 202: ...e and longitude values in any of the following formats decimal degrees degrees and decimal minutes or degrees minutes and decimal seconds Tap optional If necessary tap then and enter the coordinate in...

Page 203: ...appears there 3 optional If needed tap to list the Places near the selected point or to save this location Tip If you already have a planned route tap and to add the selected location to your route 4...

Page 204: ...elect the destination 5 The New Route to screen appears where you can select the destination of the route the same way as described in the previous sections 6 If needed you can add further intermediat...

Page 205: ...he navigation hardkey button to access the Navigation menu 2 In the Navigation menu tap 3 The planned route is displayed in its full length on the map with the following additional information The tot...

Page 206: ...of week if suitable data can be found on the device In addition real time traffic information can help you avoid current traffic events like temporary road closures or traffic jams caused by an accid...

Page 207: ...ls and to display the affected road segment in its full length on the map To display real time traffic information on the map perform the following steps 1 On the Navigation view tap the traffic icon...

Page 208: ...time of day to see the desired period 3 4 Editing the route When navigation has already started there are several ways to modify the planned route You have the following options Setting a new startin...

Page 209: ...an the current GPS position 1 Press the navigation hardkey button to access the Navigation menu 2 In the Navigation menu tap 3 The first line from the bottom is the start of the route normally the cur...

Page 210: ...new destination as described in the above sections the route to the previous destination is deleted and a new route is calculated To add a new intermediate destination to the planned route perform on...

Page 211: ...s or the route Tap the name of the intermediate destination to move it up or down in the list to save the location or to delete it from the list If you have a route with at least one intermediate dest...

Page 212: ...te You have the following two options to delete the navigated route If you already have a planned route and you select a new destination as described in the above sections the route to the previous de...

Page 213: ...r and go to the route confirmation screen 2 Tap 3 You can see the basic details of route alternatives Tap any of them to see it on the map 4 To view more suggestions tap and scroll down for other alte...

Page 214: ...the basic details of a few route alternatives Tap any of them to see it on the map If there are suitable alternatives calculated with the route planning method that is selected in Route preferences pa...

Page 215: ...on 2 When the map appears with the route tap 3 Tap 4 optional Using the keyboard you can change the name offered for the Saved Location 5 Tap to save the location To add your home and work address to...

Page 216: ...on on the keyboard then tap In Saved Locations Home and Work cannot be renamed To change your home or Note work location tap or and confirm the address change 5 Tap Adding a location to the list of Sa...

Page 217: ...feature is legal in the country where you intend to use it 1 Return to the Navigation view and select the Alert Point The red cursor appears there 2 Tap 3 Scroll down the list and tap 4 Select the ty...

Page 218: ...tarting point of the route and leads you through the whole planned route using a realistic speed optional You have the following controls during the simulation the control buttons disappear after a fe...

Page 219: ...on Most of the procedures described for On Road navigation also apply to Off Road navigation However there are some features not available in the Off Road navigation mode For example You cannot open t...

Page 220: ...ap The backtrack recording will be drawn as red line The track arrow Map UI Track compass can be used to follow the previous track Stop Backtrack To stop the backtrack press the NAV button then Backtr...

Page 221: ...rted The track files must be stored in a folder named tracks on an USB storage device All tracked rides can be accessed from the tracked ride option The nav system shows the overview of the tracked ri...

Page 222: ...tracked ride will be set as start point and you will be guided along the track to the start of the recording Initially the track follow arrow will guide you to the closest point in the recorded data S...

Page 223: ...with the following Microsoft Windows operating system Windows XP Service Pack 2 or later Internet connection USB port An empty USB storage device with a capacity of at least 2 GB To update your naviga...

Page 224: ...dditional extras at your convenience For instructions on using the Toolbox see the Toolbox How to Guides at alpine naviextras com shop portal support d Once the download is complete remove the USB sto...

Page 225: ...it sounds really natural but the range of instructions that can be given this way is limited Location specific information such as street names cannot be announced TTS technology provides a machine g...

Page 226: ...vehicle type and the road types used or avoided when calculating the route For detailed information on all the preferences see Route preferences settings page 72 Real time traffic events are also take...

Page 227: ...ical traffic If statistical traffic information is stored with the map data Alpine Navigation System can take them into account when planning a route In normal cases these statistics help you avoid us...

Page 228: ...think is worth saving at the cost of a detour Instruct Alpine Navigation System to have you confirm the new planned route before it takes effect Note If there are traffic events on the planned route...

Page 229: ...possible alternative route window appears and shows the length and duration of the detour You can ignore this message and keep the original route by tapping or you can check the suggested route by tap...

Page 230: ...ing a detour The Reason for detour window appears and shows available gas stations restaurants or other Places around the current position Also if there are avoidable parts of the original route ahead...

Page 231: ...lected country for example speed limits maximum blood alcohol level By tapping and holding it you can access additional information about the current trip on a dashboard screen Shows a world map with...

Page 232: ...I screen Address details when available of the current position Latitude and Longitude coordinate of the current position in WGS84 format The nearest town Next crossing road street Previous crossing...

Page 233: ...d altitude and distance By tapping on the Trip Data Details screen you can view the trip on the map export track logs and check the elevation and speed profiles 4 3 Setup menu You can configure the na...

Page 234: ...during the initial set up process See page 6 Create or use your own user profile for navigating to be able to use your own settings Delete all saved data and reset all settings to their factory defaul...

Page 235: ...one way streets are taken into account when planning a route Roads are used only if access for taxis is allowed Private roads resident only roads and walkways are excluded from routes Maneuver restri...

Page 236: ...tem take for example the freeway instead of a series of smaller roads or streets Gives a short route to minimize the travel distance It can be optimal for slow vehicles Searching for a short route reg...

Page 237: ...roads Alpine Navigation System plans the best toll free route Alpine Navigation System includes ferries in a planned route by default However a map does not necessarily contain information about the a...

Page 238: ...76...

Page 239: ...maneuver after each turn or it is enough to receive the information when the turn is near Set the verbosity of the voice instructions that is how much they tell and how often they speak Minimal the vo...

Page 240: ...different within and outside towns Tap it to receive a warning when approaching a road safety camera or other Alert Points like school zones or railroad crossings You must make sure that using this f...

Page 241: ...the distance from the hazard to receive the warning at 4 3 4 Navigation View These settings allow you to fine tune the appearance of the Navigation view You can also adjust how the software helps you...

Page 242: ...a to keep as few of them on the map as possible Tap the name of the Place category to show hide it or to open the list of its subcategories You can modify the following additional settings on the Navi...

Page 243: ...Navigation System offers different route alternatives when you leave the planned route and suddenly exit the freeway See page 68 4 3 5 Regional You can modify the following settings Button Description...

Page 244: ...ial conditions or events Enable or disable historical traffic data and traffic patterns This locally stored information can be very useful in normal circumstances but for example on public vacations i...

Page 245: ...by using one of the user profiles You can create a new profile by tapping enter a name and select a car model If you select a new profile the application restarts so that the new settings can take ef...

Page 246: ...selling the Device together with the Navigation Product under its own name and or branding hereinafter Licensor This Agreement sets out the conditions and limitations of use of the Navigation Product...

Page 247: ...censor if you materially breach them or take any action in derogation of the rights of Licensor any suppliers holding rights in the Navigation Product and or their suppliers Licensor may terminate thi...

Page 248: ...o the extent allowed by this Agreement or applicable law 7 1 2 to resell sublicense lease rent or lend it or to transfer it to a third person for any reason without transferring the Device on which it...

Page 249: ...LCULABLE OR IF YOU ACQUIRED THE NAVIGATION PRODUCT FOR NO CHARGE THE DAMAGE EXCLUSIONS AND LIMITATIONS IN THIS AGREEMENT APPLY EVEN IF REPAIR REPLACEMENT OR A REFUND FOR THE NAVIGATION PRODUCT DOES NO...

Page 250: ...y User any time from within the corresponding menu within the Navigation Product The collected data is always anonymous not associated in any way with any personal information of the User or with the...

Page 251: ...ated in real time and may not accurately reflect the real life situation or events 11 5 The User hereby acknowledges that the Connected Services may only be used at the risk of the User and for the be...

Page 252: ...look and feel of the Service including but not limited to displayed logos terms and notices or iv use the Service or information derived therefrom in connection with any unlawful offensive obscene por...

Page 253: ...rt be reproduced or transmitted in any form either electronically or mechanically including photocopying and recording without the express written consent of Alpine Electronics Inc 2015 Alpine Electro...

Page 254: ...ny issues you may have TECHNICAL SUPPORT We are here to help with any questions you have about your Alpine Restyle product For any questions about using your Alpine Restyle System and installation sup...

Page 255: ...om registration Vous serez tenu informe des nouveaux produits des mises ajour logicielles le cas echeant des promotions speciales et des informations concernant Alpine L enregistrement de votre produi...

Page 256: ...rstand the Limited Warranty please see the Limited Warranty which is printed in the owner s manual and also may be found at alpine usa com support We encourage you to register this product on Alpine s...

Page 257: ...ty and if the product was shipped to an Authorized Alpine Service Center or Alpine Alpine will pay the return shipping charges You should provide a detailed description of the problem s for which serv...

Page 258: ...t couvertes par la garantie et si le produit a ete envoye aun centre de service Alpin e ou a Alpine le paiement des frais de reexpedition du produit incombe Alpine 0 Vous devez donner une description...

Page 259: ......

Page 260: ...Ill...

Reviews: