background image

20

-EN

When adjusting Camera, you can store the settings made for “Adjusting 
Brightness, Color, and Contrast”.

Setting item: Preset1 / Preset2

1 After completing “Adjusting Brightness, Color, and 

Contrast” (page 19), touch and hold 

[Preset1]

 or 

[Preset2]

 to save the settings. 

2 Touch 

[Preset1]

 or 

[Preset2]

 to call the saved settings. 

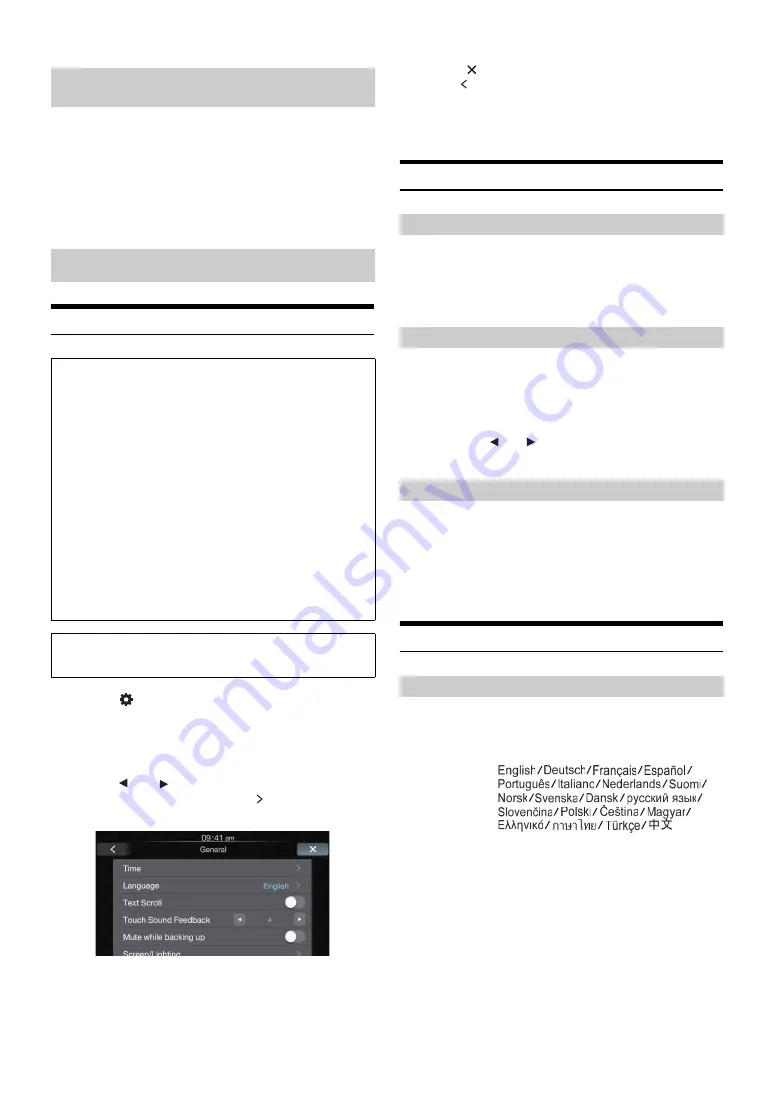
General Setup Operation

1

Touch 

[

]

 on the Home screen.

The Setup main screen is displayed.

2

Touch 

[General]

.

The General Setup screen appears.

3

Touch 

[

]

 or 

[

]

 etc., of the desired item to change 

its setting. For items that have “ ,” touch the item to 
display the screen for the next hierarchy.

Setting items: Time / Language / Text Scroll / Touch Sound 

Feedback / Mute while backing up / Screen / 
Lighting / About / Demo mode

Depending on the item, repeat step 3.

Depending on the setting, displayed items may differ.

4

Touch 

[

]

 to return to the main application screen.

Touch 

[ ]

 to return to the previous screen.

Immediately after changing the settings of General Setup (While the 
system is writing data automatically) do not turn the ignition key to 
OFF. Otherwise, the settings may not be changed.

Time Setting

You can select the clock display type, 12-hour or 24-hour, depending on 
your preference.

Setting item: Clock Mode
Setting contents: 12h (Initial setting) / 24h

Setting item: Clock Adjust
Additional items: Hour / Minute 
Setting contents: 1-12 or 0-23 / 0-59

Touch and hold 

[

]

 or 

[

]

 to run through a change sequence 

automatically. 

Setting item: Daylight Saving
Setting contents: ON / OFF (Initial setting)

Language Setting

The Setup menu, feedback information, etc. for this unit can be changed 
to appear in the selected language.

Setting item: Language
Setting contents:

Touch 

[OK]

 to confirm the language and display the screen in the 

specified language.

Saving and calling the adjusted picture 
quality

General Setup

To display the General Setup Menu screen:

Your vehicle must be parked with the ignition key in the ACC or 
ON position. To do this, follow the procedures below.

1 Bring your vehicle to a complete stop at a safe 

location. Engage the parking brake.

2 Release the parking brake. (For safety, release the 

parking brake while depressing the foot brake pedal).

3 Engage the parking brake again.

For automatic transmission vehicles, place the transmission lever 
in the Park position.

Now, the locking system for the General mode operation has 
been released. Engaging the parking brake can reactivate the 
General Setup Menu, as long as the car’s ignition has not been 
turned off. It is not necessary to repeat the above procedure 
(1 through 3) of “To display the General mode screen.”
Each time the ignition is turned OFF, perform the procedure of “To 
display the General mode screen.”

The following steps 1 to 4 are common operations to each 
“Setting item” of General Setup. Refer to each section for details.

Setting the Clock Display

Setting the Time

Hour:

Adjust the hour.

Minute:

Adjust the minute.

Setting the Daylight Saving Time

ON:

Turn Daylight Saving Time mode ON. The time 
advances by one hour for areas observing Daylight 
Saving Time.

OFF:

Return to the ordinary time.

Setting the Menu Language

Summary of Contents for iLX-107

Page 1: ...will be informed of product and software updates if applicable special promotions news about Alpine Merci d avoir achet ce produit Alpine Nous vous invitons consacrer un moment la protection de votre...

Page 2: ...5 Princes Highway Hallam Victoria 3803 Australia Phone 03 8787 1200 ALPINE ELECTRONICS GmbH Wilhelm Wagenfeld Str 1 3 80807 M nchen Germany Phone 089 32 42 640 ALPINE ELECTRONICS OF U K LTD Alpine Hou...

Page 3: ...ional 13 Camera Operation Optional Rear Camera Operation 14 Displaying the rear view video while the car is in reverse 14 Display the Rear View Video Manually 14 Guide Display On Off Setting 14 Adjust...

Page 4: ...g 22 Setting the Camera Input 22 Setting the Camera Signal Input 22 Adjusting the Rear Camera Guide 23 Camera Interrupt Setting Power OFF Mode Rear Camera Only 23 Auxiliary AUX Setting 23 Setting the...

Page 5: ...ailure to do so may result in fire etc KEEP SMALL OBJECTS SUCH AS SCREWS OUT OF THE REACH OF CHILDREN Swallowing them may result in serious injury If swallowed consult a physician immediately USE THE...

Page 6: ...N before using the iLX 107 For connecting the SPST switch refer to the Connection Diagram of SPST Switch sold separately page 33 If the power ignition lead is unswitched it must be disconnected from t...

Page 7: ...s to those applications designed to work with Apple CarPlay The Apple CarPlay icon will indicate whether the appropriate iPhone is connected Available source differs depending on the connected device...

Page 8: ...panel Be sure to touch the onscreen button lightly with the pad of your finger to protect the display If you touch a button and there is no reaction remove your finger from the display once and try ag...

Page 9: ...ake before attempting these operations Adjusting the Volume Adjust the volume by touching or Volume increases continuously by touching and holding Volume 0 35 Muting the Sound Touch and hold for at le...

Page 10: ...connecting to the head unit Alpine TuneIt App is downloadable from Apple s App Store For details consult your Alpine dealer The application program and related specifications and data may be deleted o...

Page 11: ...ns in the selected band in order of frequency from low to high After selecting the desired band touch and hold A Memo for at least 2 seconds The tuner automatically seeks and stores 6 strong stations...

Page 12: ...g to USB Cable Supplied with iPhone to iLX 107 If an iPhone has been connected to this unit via Wi Fi you should switch connection on Apple CarPlay Device list screen By Wi Fi Make sure to turn on Wi...

Page 13: ...to the visual screen in the Auxiliary AUX mode for 5 seconds after an operation has been performed Touch the display panel to display the operation screen again Calls up the Audio Setup screen See Aud...

Page 14: ...uide Off switch changes to Guide On 3 Touch Guide On to turn on the guide 1 Touch the screen when the image from the camera is displayed The operation screen is displayed on the screen After a 5 secon...

Page 15: ...actual fact the position A and C are the same distance and B is farther away than positions A and C The car width extension mark represents the distance to the road surface The distance to an object...

Page 16: ...r proceed to step 4 Setting items Balance Fader Bass Treble Subwoofer Subwoofer Level Subwoofer Phase Bass Engine SQ Bass type Bass level Application Volume Media Xpander EQ Presets Defeat Depending o...

Page 17: ...r Level Setting contents 0 to 15 Initial setting 0 If the Subwoofer setting is OFF the setting cannot be set The function is disabled when Bass Engine SQ is set to ON The subwoofer output phase is tog...

Page 18: ...for Phone Calls Ringtones Alerts Siri 1 to 11 Initial setting 5 Setting contents for Notifications Guidance 1 to 7 Initial setting 4 Setting the MX Media Xpander The FM radio Factory Audio Apple CarP...

Page 19: ...15 to 15 Initial setting 0 You can adjust the Color between MIN 15 and MAX 15 When it reaches the minimum or maximum point the display shows MIN or MAX respectively Setting item Contrast Setting cont...

Page 20: ...Setting contents ON OFF Initial setting Language Setting The Setup menu feedback information etc for this unit can be changed to appear in the selected language Setting item Language Setting contents...

Page 21: ...r MAX respectively You can set the image file for the opening screen Copy your desired image file from a Flash Memory device Setting item Opening Customization Setting contents Default Initial setting...

Page 22: ...cation Setup Operation page 22 With an optional camera connected its video is output to the monitor When the camera is connected set this item Setting item Position Setting contents Off Initial settin...

Page 23: ...g contents ON Initial setting OFF Auxiliary AUX Setting Auxiliary AUX is selected on the Application setup menu in step 3 Refer to Application Setup Operation page 22 Setting item AUX In Setting conte...

Page 24: ...an turn on or off the Siri Microphone Effect Setting item Microphone EC NR Setting contents ON Initial setting OFF You can select which speaker in the car will output the audio from the phone Setting...

Page 25: ...s may differ depending on which mode the unit is in during Voice Information You can use the DOWN UP button to control the volume of Voice Information Access to iDataLink Mode You can check the car s...

Page 26: ...ing Sensor screen may not be displayed Vehicles that do not have the obstacle detection sensor cannot use this function is displayed only when the Front camera or Rear camera is interlocked Parking Se...

Page 27: ...hen you touch the icon on the External Accessory screen When changing the name Touch the icon name then input characters into Edit Name Keypad You can also select a basic name from the Template of the...

Page 28: ...Unable to receive stations No antenna or open connection in the antenna cable Make sure the antenna is properly connected replace the antenna or cable if necessary Unable to tune stations in the seek...

Page 29: ...o 4 Ohms CHASSIS SIZE Due to continuous product improvement specifications and design are subject to change without notice The LCD panel is manufactured using an extremely high precision manufacturing...

Page 30: ...INSTALL THEM SECURELY Be sure to use only the specified accessory parts Use of other than designated parts may damage this unit internally or may not securely install the unit in place This may cause...

Page 31: ...e is located where the driver s voice can be easily picked up for example on the sun visor When you speak into the microphone you should not have to change your driving posture This may cause a distra...

Page 32: ...32 EN Fix the cables carefully Do not damage them by tucking them into movable parts such as a seat rail or by locating them against sharp or pointed edges Fix the Cables etc...

Page 33: ...ition and the battery may be discharged iLX 107 Red Yellow SPST SW Optional FUSE 5A Optional FUSE 20A Optional Battery ACC BATTERY To prevent external noise from entering the audio system Locate the u...

Page 34: ...REVERSE Orange White P ANT Blue PARKING BRAKE Yellow Blue Green Green Black White White Black Gray Black Gray Violet Black Violet ACC Red BATT Yellow GND Black Vehicle Antenna GPS Antenna Included To...

Page 35: ...Parking Brake Lead Yellow Blue Connect this lead to the power supply side of parking brake switch to transmit the parking brake status signals to the unit Switched Power Lead Ignition Red Connect this...

Page 36: ...a long time Heat and humidity may damage the iPhone and you may not be able to play it again USB Connector Lightning to USB Cable Included with iPhone iPhone Sold separately USB Extension Cable Inclu...

Page 37: ...e 4 pole mini AV plug to 3 RCA Sold Separately Usable 4 pole mini AV plug Wiring convention of this system is as follows Configuration commercially available 4 pole mini AV plugs is not standardized 3...

Page 38: ...tors RED is right and WHITE is left 3 Subwoofer RCA Connectors 4 RCA Extension Cable Sold separately Power Supply Connector Amplifier 4 ch Sold separately Input Input Front speakers Rear speakers REMO...

Page 39: ...ut Connector When a rear camera is used make sure REVERSE cable is connected correctly 2 RCA Extension Cable sold separately To Video Output terminal Camera with RCA video output sold separately HCE C...

Page 40: ...anty and if the product was shipped to an Authorized Alpine Service Center or Alpine Alpine will pay the return shipping charges You should provide a detailed description of the problem s for which se...

Page 41: ...io exempts de licence L exploitation est autoris e aux deux conditions suivantes 1 l appareil ne doit pas produire de brouillage 2 l utilisateur de l appareil doit accepter tout brouillage radio lectr...

Reviews: