Alpine CDE-133EBT Owner'S Manual Download Page 18

16

-EN

Setting

You can flexibly customize the unit to suit your own preferences and 

usage. From the SETUP menu, GENERAL Setting, DISPLAY Setting, 

etc., can be modified.

1

Press and hold 

AUDIO

SETUP

 for at least 2 seconds to 

activate the SETUP mode.

2

Turn the 

Rotary encoder

 to select the desired item, and 

then press 



ENTER

.

(e.g. Select GENERAL )

AUDIO

*1


 GENERAL 

 DISPLAY 

 iPod 

 BLUETOOTH

*2

GENERAL:

CLOCK ADJ

*3


 AUX SETUP 

 AUX NAME

*4

 PLAY MODE 

DEMO

DISPLAY:

DIMMER 

 SCROLLTYPE

iPod:

iPod LIST

*1

Refer to “Audio Setup” on page 11.

*2

Refer to “BLUETOOTH SETUP” on page 18.

*3

Refer to “Setting Time” on page 7.

*4

Displayed only when AUX SETUP is set to ON.

3

Turn the 

Rotary encoder

 to select a setting item, and then 

press 



ENTER

.

(e.g. Select AUX SETUP)

4

Turn the 

Rotary encoder

 to change the setting, and then 

press 



ENTER

.

(e.g. Select AUX ON or AUX OFF.)

5

Press and hold 

AUDIO

SETUP

 for at least 2 seconds to 

return to normal mode.

Notes

• Press 

 to return to the previous mode.

• Pressing and holding 

 for at least 2 seconds will return to normal 

mode.

• If no operation is performed for 60 seconds, the unit will return to 

normal mode automatically.

GENERAL is selected on the setup main menu in step 2.

Setting the AUX SETUP Mode

You can input the audio of an external device, (such as a Portable audio 

player) to the AUX connector of this unit.

Setting item: 

AUX SETUP

Setting contents:

AUX OFF / AUX ON (Initial setting)

AUX OFF:

When set to OFF, AUX source cannot be selected.

AUX ON

*

:

Set to ON when a portable device is connected. If 

SOURCE



 is 

pressed and AUX is selected, the sound of the portable device is 

input to the unit.

*

You can change the AUX NAME display when AUX SETUP is 

set to ON. Press 



ENTER

 when AUX SETUP is set to ON, 

and select AUX NAME by turning the 

Rotary encoder

, then 

press 



ENTER

. After that, turn the 

Rotary encoder

 to 

select the desired AUX NAME.

Note

• When the PORTABLE is set, PMD is displayed on the unit.

Playing MP3/WMA Data (PLAY MODE)

This unit can play back CDs containing both CD and MP3/WMA data 

(created in Enhanced CD (CD Extra) format). However, in some 

situations, playback of an enhanced CD may be difficult. In this case, 

you can select playback of a single session only, containing the CD data. 

When a disc contains both CD and MP3/WMA data, playback starts 

from the CD data portion of the disc.

Setting item: 

PLAY MODE

Setting contents:

CD-DA / CDDA/MP3 (Initial setting)

CD-DA:

Only the CD data in Session 1 can be played back.

CDDA/MP3:

CD data, MP3/WMA files in mixed mode, and multi-session discs 

can be played back.

Note

• Perform this setting before inserting a disc. If a disc has already been 

inserted, remove it first.

Demonstration

This unit has a demonstration feature for the display.

Setting item: 

DEMO

Setting contents:

DEMO OFF (Initial setting) / DEMO ON

Note

• To quit Demo mode, set to DEMO OFF.
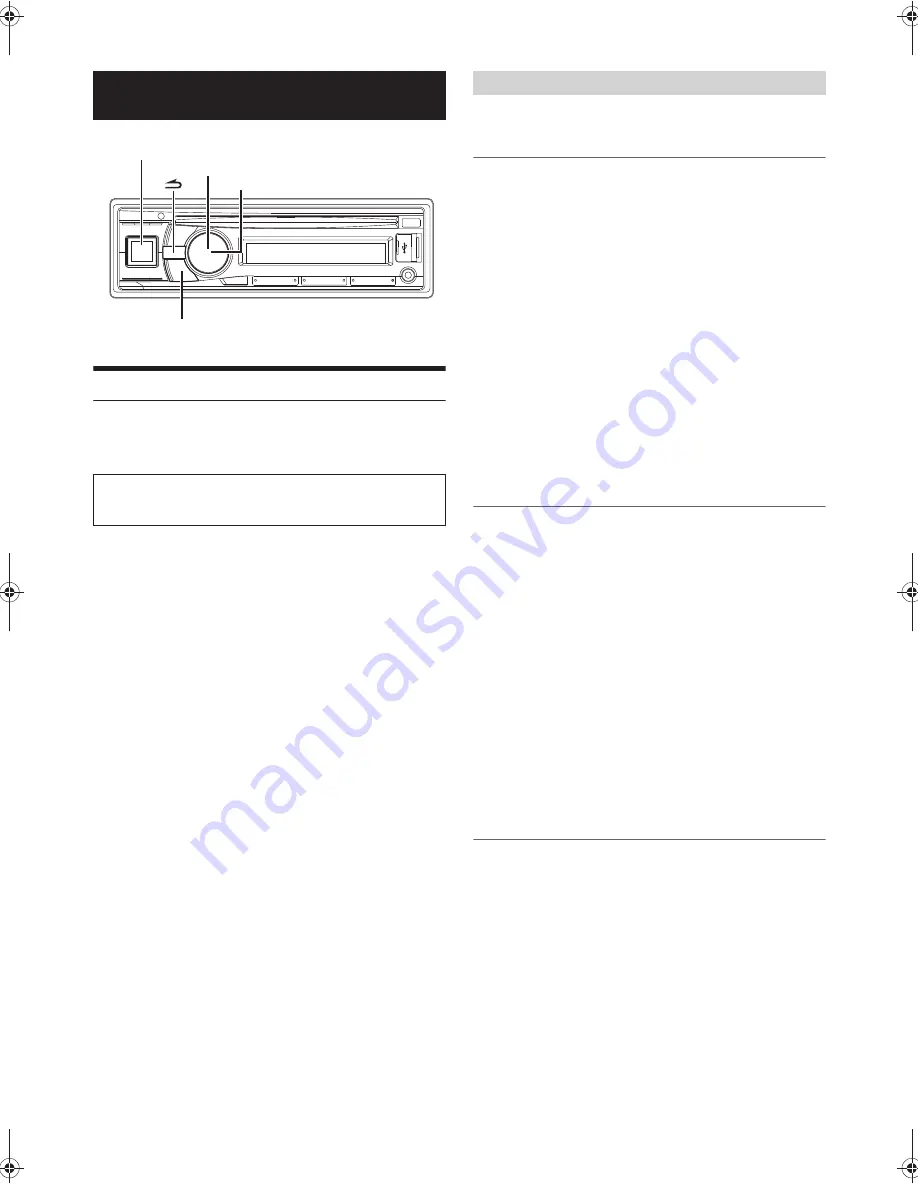
SETUP

Use steps 1 to 5 to select one of the SETUP modes to modify. 
See the applicable section below for details about the 
selected SETUP item.

SOURCE/

AUDIO/SETUP

Rotary encoder

ENTER

General Setting

Summary of Contents for CDE-133EBT

Page 1: ...rmany Phone 089 32 42 640 ALPINE ELECTRONICS OF U K LTD Alpine House Fletchamstead Highway Coventry CV4 9TW U K Phone 0870 33 33 763 ALPINE ELECTRONICS FRANCE S A R L RCS PONTOISE B 338 101 280 98 Rue...

Page 2: ......

Page 3: ...eble Control 12 Setting the Source Volume Level 13 Adjusting the High Pass Filter 13 Turning Subwoofer ON OFF 13 Adjusting the Low Pass Filter 13 Setting the Subwoofer Phase 13 Setting the Subwoofer S...

Page 4: ...l waiting function 22 Preset a number in the Phone Book Shortcut dial 22 Dialing the preset number 23 Adjusting the volume when receiving a Call 23 Muting the microphone input quickly Voice Mute 23 Ca...

Page 5: ...ther injury DO NOTPLACE HANDS FINGERS OR FOREIGN OBJECTS IN INSERTION SLOTS OR GAPS Doing so may result in personal injury or damage to the product CAUTION This symbol means important instructions Fai...

Page 6: ...sound quality However most of them will influence the thickness and or diametre of the disc Using such accessories can cause the disc to be out of standard specifications and may create operational p...

Page 7: ...ection cannot be played back USB Memory may take time to start playback If there is a particular file other than audio in the USB Memory it may take considerable time before the file is played back or...

Page 8: ...s The front panel may become hot in normal usage especially the connector terminals on the back of the front panel This is not a malfunction To protect the front panel place it in the supplied carryin...

Page 9: ...adio band is displayed F1 FM1 F2 FM2 AM F1 FM1 3 Press TUNE A ME to select the tuning mode DX SEEK Distance mode SEEK Local mode off Manual mode DX SEEK Note The initial mode is Distance mode Distance...

Page 10: ...eceive the selected frequency Note Press in the search mode to cancel Or the search mode will be cancelled if no operation is performed for 10 seconds Playback 1 Insert a disc with the label side faci...

Page 11: ...concerning MP3 WMA Folder and file names may be searched and displayed during playback 1 During MP3 WMA playback press ENTER to activate the search mode The indicator lights up 2 Turn the Rotary enco...

Page 12: ...ot Folders and the maximum number of folders is 255 Playback may not be performed if a disc exceeds the limitations described above Media supported The media that this device can play back are CD ROMs...

Page 13: ...and 3BAND EQ s setting value are linkage 3 The FACTORY EQ s setting value and 3BAND EQ s setting value are linkage In step 3 three sound adjustment items Bass Mid and Treble can be selected in 3BAND...

Page 14: ...em and then press ENTER WIDTH Q CENTER FRQ LEVEL 2 Turn the Rotary encoder to select the desired setting value and then press ENTER 3 Press to return to the previous step Setting the Mid Bandwidth WID...

Page 15: ...160 Hz All frequencies lower than the selected cutoff are output The subwoofer output phase is toggled SUBWOOFER NORMAL 0 or SUBWOOFER REVERSE 180 To adjust the level turn the Rotary encoder Setting...

Page 16: ...played as ROOT 3 If there is no Text Disc Name or Track Name DISC TEXT TRACK TEXT is displayed Text compatible CDs contain text information such as the disc name and track name Such text information i...

Page 17: ...ontrol on page 25 4 The setting items are the same as iPod setting in SETUP mode For details refer to iPod iPhone Setting on page 17 5 AUX NAME can be selected in this mode For details refer to Settin...

Page 18: ...When set to OFF AUX source cannot be selected AUX ON Set to ON when a portable device is connected If SOURCE is pressed and AUX is selected the sound of the portable device is input to the unit You c...

Page 19: ...istances This enables a hands free call or data transmission between BLUETOOTH compatible devices BLUETOOTH transmission is available in the unlicensed 2 4 GHz spectrum if the distance between devices...

Page 20: ...ivated Note The BLUETOOTH setup mode can also be activated by pressing and holding for at least 2 seconds 3 Turn the Rotary encoder to select the desired items and then press ENTER BLUETOOTH BT IN 1 P...

Page 21: ...NECTED is displayed and then the unit returns to normal mode Depending on the mobile phone it may be necessary to input a passcode In this case CODE 0000 is displayed Input the passcode 0000 in the BL...

Page 22: ...a call is received it is answered automatically after about 5 seconds Note If the received call setting on the mobile phone is on the call will be answered automatically even though this setting is s...

Page 23: ...directly after connection the list may not be brought up to date 4 Turn the Rotary encoder to select a name or a telephone number from the list Note You can use Phone book alphabet search function to...

Page 24: ...Rotary encoder to select the third letter e g C and then press ENTER The names stored in phone book which begin with MIC are searched 5 Turn the Rotary encoder to select the desired name e g Michael J...

Page 25: ...e and the speakers in the car While calling press BAND to switch the call sound between the unit and mobile phone Notes Depending on the mobile phone this operation may not be performed The operation...

Page 26: ...USB Memory mode and then remove the USB Memory Device If USB Memory is removed in the USB Memory mode data may be damaged When removing USB Memory pull it out straight If sound is not output or USB Me...

Page 27: ...arlier versions cannot be guaranteed iPhone 4 Ver 4 3 iPhone 3GS Ver 4 3 iPhone 3G Ver 4 2 1 iPhone Ver 3 1 3 For clarity in identifying your model of iPod please see Apple s own document Identifying...

Page 28: ...desired Playlist search mode and ENTER is pressed you can search for all songs in the iPod iPhone Also if you press and hold ENTER for at least 2 seconds all songs in the iPod iPhone are played back D...

Page 29: ...y are played just once until all songs have been played 1 Press 5 The songs are played back in random sequence 1 2 off 1 Shuffle Albums 2 Shuffle Songs 2 To cancel M I X play select off with the above...

Page 30: ...rtion not possible A CD is already in the CD player Eject the CD and remove it The CD is being improperly inserted Make sure the CD is being inserted following instructions in the CD Player Operation...

Page 31: ...is not connected Make sure the iPod iPhone is correctly connected refer to Connections on page 33 Make sure the cable is not bent excessively There are no songs in the iPod iPhone Download songs to th...

Page 32: ...kHz Wave length 795 nm Laser power CLASS I USB requirements USB 1 1 2 0 Max Power Consumption 1 000 mA USB Class Mass Storage File System FAT 12 16 32 MP3 Decoding MPEG AUDIO Layer 3 Number of Channel...

Page 33: ...s product to have the work done USE SPECIFIED ACCESSORY PARTS AND INSTALL THEM SECURELY Be sure to use only the specified accessory parts Use of other than designated parts may damage this unit intern...

Page 34: ...ard until it clicks This ensures that the unit is properly locked and will not accidentally come out from the dashboard Install the detachable front panel 1 Remove the detachable front panel 2 Insert...

Page 35: ...EMOTE TURN ON AUDIO INTERRUPT IN IGNITION POWER ANT Microphone Blue To power antenna Blue White Pink Black Not used Orange To the instrument cluster illumination lead Red Ignition Key Yellow Black Bat...

Page 36: ...eaker Output Lead Violet Left Rear Speaker Output Lead Green Left Rear Speaker Output Lead Green Black Left Front Speaker Output Lead White Black Left Front Speaker Output Lead White Fuse Holder 10A P...

Page 37: ...About the Rules of Bluetooth Electromagnetic Radiation Regulation Thailand This telecommunication equipment conforms to NTC technical requirement...

Page 38: ......

Page 39: ......

Page 40: ......

Reviews: