background image


___________________________________________________________________ 

Alpha ESS Co., Ltd. 

Page 23 of 40


Your Smart Energy 

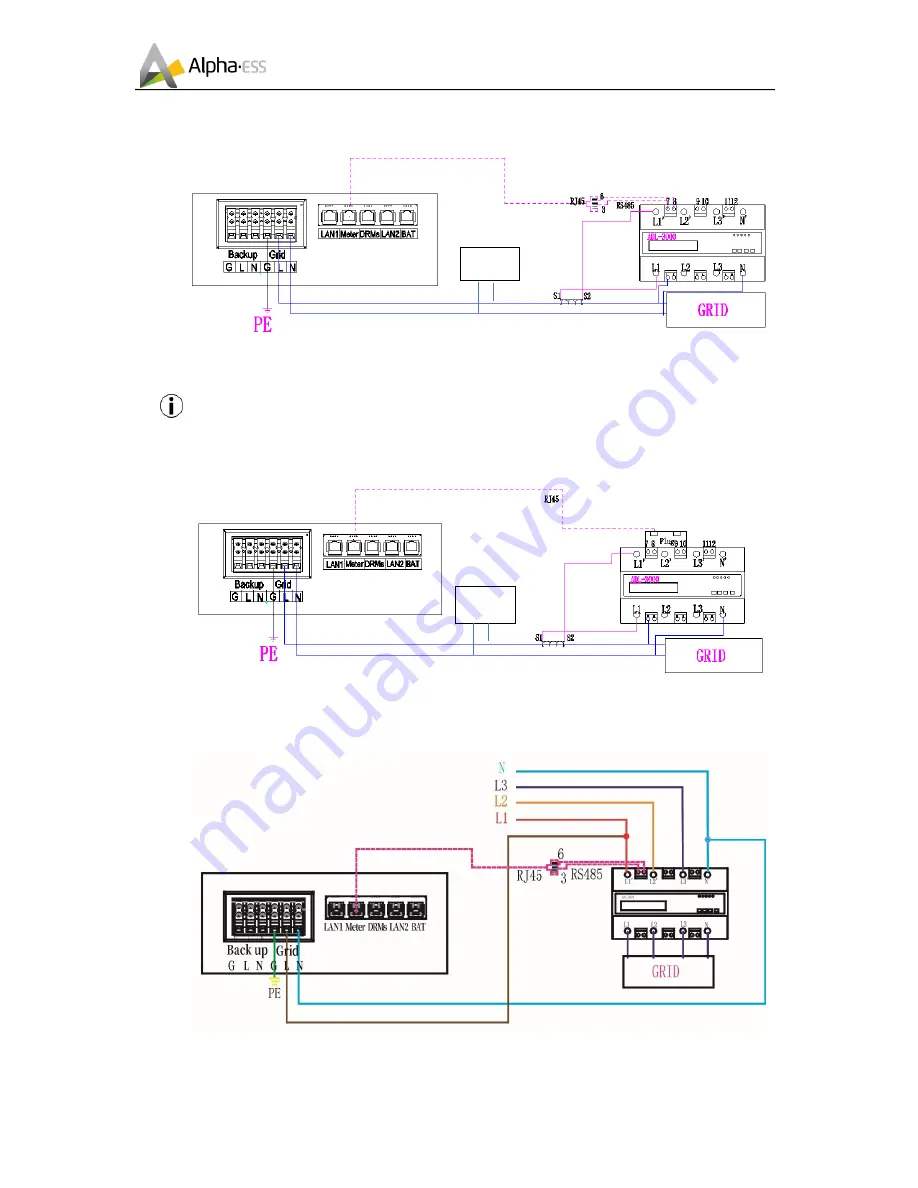
ADL-3000 single-phase connect (with CT, without meter plug), if applicable: 


Figure 33 ADL-3000 single-phase Connect (with CT, without Meter plug) 

NOTE: Meter 7, 8 connect the RJ45 3, 6, then RJ45 connect the cable box/super 

cable box. 

ADL-3000 single-phase connect (with CT, meter plug), if applicable: 


Figure 34 ADL-3000 single-phase Connect (with CT, with Meter plug) 

ADL-3000 three-phase connect (without CT, without meter plug), if applicable: 


Figure 35 ADL-3000 three-phase Connect (without CT, without Meter plug) 

LOAD 

LOAD 

Summary of Contents for Storion-SMILE5

Page 1: ...V1 71 Installation Manual Energy Storage System ESS Storion SMILE5 ...

Page 2: ... ess de Add Paul Ehrlich Straße 1a 63225 Langen China Alpha ESS Co Ltd Tel 86 0 513 806 868 91 E mail info alpha ess com Web www alpha ess com Add JiuHua Road 888 High Tech Industrial Development Zone 226300 Nantong City Jiangsu Province Australia Alpha ESS Australia Pty Ltd Tel 61 1300 968 933 E mail australia alpha ess com Web www alpha ess com au Add Suite 2 Level 1 530 Botany Road Alexandria N...

Page 3: ...erved Please keep the manual properly and operate in strict accordance with all safety and operating instructions in this manual Please do not operate the system without read ing through the manual Version Information Version Date Content V1 6 20180202 Some notes are added Update RJ45 connecting diagram V1 71 20180514 Package parts list is modified Power definition is modified ADL3000 3 phase conn...

Page 4: ...ation 9 Installation 10 2 1 Installation Site and Environment 10 2 2 Installation 11 2 3 Power Meter 22 2 3 1 Meter ADL 3000 If Applicable 22 2 3 2 Meter SM60A If Applicable 25 2 3 3 Backup Box If Applicable 26 System Operation 27 3 1 Switch on 27 3 2 Switch off 28 EMS Introduction and Set up 29 4 1 Function Description 29 4 2 Introduction 30 4 2 1 Main 30 4 2 2 Status 30 4 2 3 History 31 4 2 4 Se...

Page 5: ...array battery and electric shock When exposed to sunlight the PV array generates dangerous DC voltage which will be present in the DC conductors and the live components of the inverter Touching the DC conductors or the live components can lead to lethal electric shocks If you disconnect the DC connectors from the system under load an electric arc may occur leading to electric shock and burns Do no...

Page 6: ...do not install or operate the system Do not move the system when it is already connected with battery modules Secure the system to prevent tipping with restraining straps in your vehicle The transportation of AlphaESS Storion SMILE5 must be made by the manufacturer or an instructed personal These instructions shall be recorded and repeated A certified ABC fire extinguisher with minimum capacity of...

Page 7: ...SS delivers a total system separately on site to client this consists of SMILE5 INV 8x M8 60 2x M4 4x M6 1x Mounting Panel 1x Mounting Bracket 10x M6 Gasket 2x MC4 8x RJ45 Connectors 1x Meter 1x SM 60A or 1x ADL 3000 1x Installation Manual 1x User Manual SMILE5 BAT 6x M8 60 6x M5 10 6x M4 10 2x Mounting Panel 6x M6 Gasket 2x Power Cable 1 black 1 red 1x User Manual Battery Communication Cable ...

Page 8: ...___ Alpha ESS Co Ltd Page 7 of 40 Your Smart Energy 1 4 System Appearance Figure 2 Storion SMILE5 Delivery Scope Object Description 1 Hybrid Inverter with Cable Box 2 Display Screen 3 Cable Box Part of Inverter 4 SMILE5 BAT Battery 1 5 SMILE5 BAT Battery 2 1 2 3 4 5 ...

Page 9: ...ter with Cable Box Front View Figure 4 Inverter with Cable Box Rear View Figure 5 Cable Box Part Front View Item Description Item Description BAT 1 Battery Switch PV PV Switch GRID GRID Switch Back up Backup Switch INV Inverter Debug Communication BAT 2 Battery Debug Communication USB USB Debug Communication Figure 6 Cable Box Part Rear View 1 2 ...

Page 10: ...rs and erasing of series number or seals by non AlphaESS technician System design and installation are not in compliance with standards and regulations Failure to comply with the local safety regulations VDE for DE SAA for AU Transport damage including painting scratch caused by rubbing inside packaging during shipping A claim should be made directly to shipping or insurance company in this case a...

Page 11: ...oor can be opened easily There is sufficient space for carrying out maintenance work Figure 7 Limit Distance of Installation to Neighboring Objects 2 1 Installation Site and Environment The following sites are not allowed for installation Sites where the freezing point is reached Sites with humidity and condensation over 85 Sites which are salty and where humid air can penetrate Flooded areas Eart...

Page 12: ...stallation wall load must be more than 180 kg 2 2 Installation Figure 8 Unpacking the inverter and battery Step 1 Remove the battery and inverter from the packaging box Figure 9 Battery with Lid off Front View Figure 10 Battery with Lid off Side View Step 2 Open battery housing case and remove communication wiring baffle at the left side Communication wiring baffle ...

Page 13: ... Battery Top Cover Step 3 Remove the top cover of the battery Figure 12 Battery power cable installation diagram Step 4 Close the battery front cover and connect the power cable at the top NOTE if there is an indoor sign on the top cover the battery can only be installed indoor Positive Connector Anti explosion Valve Battery Cover Negative Connector ...

Page 14: ... Figure 14 Battery Installation Drill Holes Step 6 Keep the battery against the wall drill holes on the wall with an impact drill NOTE please make sure a layer of protection must be placed over the battery while drilling it could be paper wood board or packaging bubble as Figure 14 shows The ground upon which the battery will be placed on must be less than 3 degree to the horizontal level M5 10 Sc...

Page 15: ...14 of 40 Your Smart Energy Figure 15 Battery Installation Mounting on the Wall Step 7 Remove the debris baffle and secure the battery to the wall with screws Figure 16 Battery Installation Second Battery Installation Step 8 Follow Step6 and Step7 to install the second battery M6 Gasket M8 60 ...

Page 16: ...rter Mounting Panel Installation Step 9 Install the inverter mounting panel and mounting bracket with M4 nuts as shown above Figure 18 Inverter Installation Inverter Mounting Panel Step 10 Drill holes on the wall with impact drill first then install and position inverter mounting panel Battery installation is now completed M6 Nuts ...

Page 17: ...r Smart Energy Figure 19 Cable Box Wiring Diagram Step 11 Remove the cable box front cover it can be removed by hand without tools Remove the screw to take off the back cover Set the front and back covers of cable box aside Figure 20 Communication and Power Cable Access Network Cable Access Power Cable ...

Page 18: ...ed with RJ45 plug Figure 21 Network Cable Connection Diagram Step 13 Lock waterproof connector plug in the RJ45 plugs on LAN1 and Me ter s ends inside cable box and then plug in RJ45 and cable on the other side of LAN1 and Meter s ends outside of cable box leave some length as the other side might need to be connect to router or meter At the same time connect RJ45 into BAT end inside of cable box ...

Page 19: ...2 and connect an RJ45 connector see Figure 22 Figure 23 Network Cable Type B NOTE The communication cable is in type B see Figure 23 Leave the power cables and communication cables hang on the outside Leave the device aside Figure 24 Inverter Installation on the Wall Step 15 Hang the inverter onto the mounting panels adjust the entire system and ensure that the battery and the inverter have been s...

Page 20: ...tep14 to the battery Use the communication cable from parts list to connect the two batteries at the side After all above connections done then lock all communication baffles If you want to add more the batteries the new batteries have to been connected first Figure 26 Wiring the Battry Power Cable Step 17 Connect the batteries from Step4 to the terminals Make sure that red connects to red and bla...

Page 21: ...g the Power Cable of the Cable Box Step 18 Connect the power cable from Step4 to the terminals of cable box Make sure that red connects to red and black connects to black Figure 28 PV Wiring Step 19 Close the battery covers and connect the PV MC4 connectors as shown in the diagram both sides At the same time connect all the AC meter ...

Page 22: ... RCD unit must be installed A 100mA RCD device is recommended Figure 29 DIP Operation Step 20 Open battery housing case and remove DIP baffle set the DIP switch 2 to on mode at the bottom of the module Then close the DIP baffle and battery housing case NOTE only the farthest battery from inverter need to set DIP If you want to add more batteries please install the extra ones by the side as shown b...

Page 23: ...ackup box can be chosen ADL 3000 three single phase meter with or without CT SM60A single phase meter Backup Box three single phase meter Contain off grid switching and load management 2 3 1 Meter ADL 3000 If Applicable ADL 3000 single phase connect without CT without meter plug if applicable Figure 31 ADL 3000 single phase Connect with CT without Meter Plug NOTE Meter 7 8 connect the RJ45 3 6 the...

Page 24: ...ingle phase Connect with CT without Meter plug NOTE Meter 7 8 connect the RJ45 3 6 then RJ45 connect the cable box super cable box ADL 3000 single phase connect with CT meter plug if applicable Figure 34 ADL 3000 single phase Connect with CT with Meter plug ADL 3000 three phase connect without CT without meter plug if applicable Figure 35 ADL 3000 three phase Connect without CT without Meter plug ...

Page 25: ...ble box super cable box ADL 3000 three phase connect without CT with meter plug if applicable Figure 36 ADL 3000 three phase Connect without CT with Meter plug ADL 3000 three phase connect with CT without meter plug if applicable Figure 37 ADL 3000 three phase Connect with CT without Meter plug NOTE Meter 7 8 connect the RJ45 3 6 then RJ45 connect the cable box super cable box ...

Page 26: ...00 three phase Connect with CT with Meter plug NOTE CT connect connect S1 to L1 S2 to L1 For AC Hybrid system there are two meter needed Option 1 with Meter Plug Figure 39 Two Meter Connect with Meter Plug Option 2 without Meter Plug Figure 40 Two Meter Connect without Meter Plug 2 3 2 Meter SM60A If Applicable SM60A connect with meter plug if applicable Figure 41 SM60A connect with meter plug LOA...

Page 27: ...ug Option 2 without Meter Plug Figure 44 Two Meter Connect without Meter Plug 2 3 3 Backup Box If Applicable Backup Box Connect to SMILE5 single phase grid in house GRID_N GRID_L3 GRID_L2 GRID_L1 Storion S5 ECO ES5 SMILE5 PV INV BACK AC N L L N PV PV Bat meter LOAD3 LOAD2 LOAD1 GRID N DSP_BackupBox BAK_N AC_N LOAD_N BAK_L3 AC_L3 LOAD_L3 BAK_L2 AC_L2 LOAD_L2 BAK_L1 AC_L1 LOAD_L1 PV INV_L1 PV INV_L2...

Page 28: ... any damage Step 1 Open cable box outer shell Step 2 Unlock then open Cable box inner cover Cable box locker can be opened without tools Step 3 Turn on the PV switch on the cable box Step 4 Turn on the GR switch Step 5 If backup load is applied con nect it to Backup ports and turn on the Backup switch if not then keep the Backup switch off NOTE the Backup switch is only used when a backup load is ...

Page 29: ...er and outer shell of Cable box 3 2 Switch off Step 1 Open Cable box following the steps in 4 1 Step 1 2 Step 2 Press button 1 on all the batteries till the lights off Step 3 Turn off the Battery switch Step 4 Turn off the GRID switch Step 5 If backup load is applied turn off the Backup switch Step 6 Turn off the PV switch on the cable box Step 7 Close the inner cover and outer shell of Cable box ...

Page 30: ...en The inverter is in normal state B Blue The battery is in charging or discharging C Yellow The inverter is in communication D Red The inverter is in fault E Button Function Down Button Move cursor to downside or decrease value F Return Button Escape from current interface or function G ENT Button Confirm the selection H Up button Move cursor to upside or increase value I LCD Screen Display the i...

Page 31: ... of the equipment including Standby Figure 48 Main Menu In the Main interface press ENT key to enter the Menu main interface Through the up and down key select the sub menu press the ENT key to enter the select sub menu press Return key to return to the previous layer 4 2 2 Status Figure 49 Status Menu Status menu contains five sub menus Solar Battery Grid UPS and Comm display the relevant informa...

Page 32: ...nformation of battery side voltage U current I power P residual capacity of Battery SOC the internal environmental temperature Temp Figure 53 UPS Interface UPS interface displays the real time information in this mode voltage U current I power P frequency F Figure 54 Communication Interface Communication interface displays the real time communication situation of BMS Net MeterGrid and MeterDC 4 2 ...

Page 33: ...INV Gen interface displays today s or total electricity quantity generated from SMILE5 INV Figure 58 Bat Gen Interface Bat Gen interface displays today s or total electricity quantity discharged from the battery Figure 59 PV Gen Interface PV Gen interface displays today s or total electricity quantity generated from the PV panels Figure 60 Grid Charge Interface Grid Charge interface displays today...

Page 34: ... pieces of the latest fault records of device including the name of the fault and time of error 4 2 4 Setting Figure 63 Password Interface Step 1 Click setting and enter the password The installation s password is four digits password 1111 after four digits password is correctly input you can enter into the main Setting interface administrator permissions Figure 64 Setting Menu Step 2 Click Functi...

Page 35: ...OC Calibration function set No Figure 69 Battery Ready Interface Step 7 Check the Battery Ready function set No If you only use the inverter without battery please set it Yes Figure 70 Grid Setting Interface Step 8 Click the Grid Function to set up relevant parameters about the grid Figure 71 Max Feed in rate Setting Interface Step 9 Set the Max Feed in rate value Figure 72 System Mode Setting Int...

Page 36: ...7 Safety Setting Interface Step 15 Click Safety in the setting menu Set safety standard AS4777 for Australia ARN4105 for Germany CEI0_21 for Italy G83_2 for Great Britain Figure 78 Date Time Setting Interface Step 16 Click System in the setting menu Click Date Time and set up the date and time Figure 79 Ethernet interface Step17 Click Ethernet to set the IP address DHCP mode means that setup IP ad...

Page 37: ...ESS Co Ltd Page 36 of 40 Your Smart Energy Automatic display one parameter MAC Address display MAC Address Figure 80 Date Time Setting Interface Step 18 Click Language to set language Figure 81 Date Time Setting Interface Step 19 Make sure all the following number is correct ...

Page 38: ...ta before the registration would not be retained on the webserver So please use the following steps Open the portal www alphaess com Please fill in Username Password and click Login if you have registered If not please register following these steps Figure 82 Monitoring Login Interface Figure 74 Register Interface In this form all blanks marked with an asterisk must be filled out you can choose En...

Page 39: ...S Co Ltd Page 38 of 40 Your Smart Energy 5 2 Registering License Figure 74 Menu for Installer Click Install new system to register the license No Figure 74 System Registering Interface Input S N Check Code License No Date Name and Contact No to complete the registering process ...

Page 40: ...ingle Phase Display LCD Communication Ethernet Operating Temperature Range 10 C To 50 C Humidity 15 85 Protection Level IP65 Dimensions W x D x H 600 x 600 x 1100 mm Weight 220 kg With two Batteries Inverter Model SMILE5 INV Nominal Output Power 5000 W 4600 W DE Grid Output Voltage Range 180 270 Vac Grid Frequency 50 60 Hz Max Input PV Power 6600 W Max Input PV Voltage 580 Vdc Max Input PV Current...

Reviews: