Chapter 3: Installing the Router and Powering on the Router
22
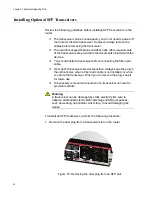
Figure 5. Turning the router upside down
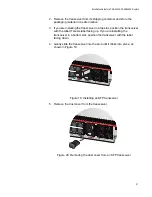
2. If rubber feet are attached to the base of the router, remove them by
prising off with a flat-head screwdriver, as shown in Figure 6, then turn
the router back over.
Note
The rubber feet is an adhesive backed polyurethane product. Using
a screwdriver to pry the rubber feet kit off the metalwork may destroy
the adhesive in the removal process.
Figure 6. Removing the rubber feet
3. Turn the router over.
CLASS 1
LASER PRODUCT
CONSOLE
SD
SD
FAU
L T
PWR
FNC1
FNC2
RESET
1
2
3
4
5
6
7
8
1
2
BYP
AS
S
1
2
1
2
USB
HA
FDX
HDX
COL
READY
FAU
L T
READY
FAU
L T
MASTER
STANDBY
ETH
ETH
AR3050S
1000 LINK
ACT
100 LINK
ACT
AR3050S
CLASS 1
LASER PRODUCT
CONSOLE
SD
SD
FAU
L T
PWR
FNC1
FNC2
RESET
1
2
3
4
5
6
7
8
1
2
BYP
AS
S
1
2
1
2
USB
HA
FDX
HDX
COL
READY
FAU
L T
READY
FAU
L T
MASTER
STANDBY
ETH
ETH
AR3050S
1000 LINK
ACT
100 LINK
ACT
AR3050S
Summary of Contents for AT-AR3050S
Page 8: ...Figures 8 ...
Page 10: ...Tables 10 ...
Page 14: ...Preface 12 ...
Page 50: ...Chapter 2 Beginning the Installation 16 ...
Page 76: ...Chapter 5 Troubleshooting 40 ...

