background image

English - 3

3. Add a good-quality SAE 30 API SF in small quanti-

ties at a time, allowing it to settle. Repeatedly add

oil  and  check  the  level  until  it  reaches  the  dip

stick

 9

. The engine may require up to 0.6 litres of

oil.

4. Refit and tighten the oil filler dip stick

9

.


Petrol

Petrol  deteriorates  over  time.  Engine  starting

may be difficult if you use petrol kept for more

than 30 days. Always run the fuel tank dry when

storing over 30 days.

1. Remove the petrol filler cap

5

, add unleaded petrol

to the tank, leaving approximately 6 mm of tank

space for fuel expansion.

2. Replace the petrol filler cap


5

.

3. Wipe up any spilt petrol from the engine before

starting the mower.


Grassbox

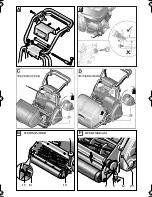
Attach/remove the grassbox as shown.

Height of cut adjustment


Westminster

Your mower has an adjustable height of cut between

2,8 – 18 mm.
The height of cut adjusted as follows:
1. Slacken bolts


10

 on both sides of the mower.

2. Turn the height of cut knob


8

 to achieve the re-

quired height of cut.

3. Tighten bolts


10

.


 Buckingham models

Your mower has an adjustable height of cut between

5 – 35 mm with markings spaced between as an aid

to adjustment.

Adjusting the Cutting Height

Tilt  the  mower  back  and  pull  plunger

 11

,  allowing

the stand

 12

 to extend fully.

1. Carefully release the plunger

 11

 ensuring it is fully

home and rest the mower on the stand

 12

.

2. Slacken bolts

 13

 on both sides of the mower.

3. Turn the height of cut knob


8

 to achieve the re-

quired height of cut and tighten bolts

 13

.

4. Tilt the mower back and pull plunger


11

 fully.

5. Raise the mower stand

 12

 and carefully release the

plunger


11

.

Note:

 For all models you may need to re-adjust the

comb after changing height of cut (see “Comb Adjust-

ment” below).

Comb Adjustment

Your mower has an adjustable comb fitted which can

be brought into use on the lower heights of cut.
The comb is adjusted as follows:


Westminster models

1. Slacken nuts


14

.

2. Turn screws

 15

 until the comb tines just touch the

ground.

Note:

 Take care not to set the comb tines too deep.

3. While holding screw


15

 tighten nuts


14

 to lock the

comb in place.


 Buckingham models

1. Slacken nut


16

 and screws

 17

 until the comb tines

just touch the ground.

Note:

 Take care not to set the comb tines too deep.

2. While holding nut


16

 tighten screws


17

 to lock the

comb in place.

Starting and Stopping
Starting from Cold

Recoil Start Models:
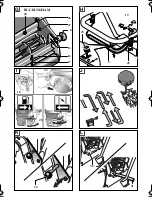
1. Move the engine cut-off switch


18

 to ON. 

2. Move the throttle lever


19

 to position 

3. Turn the petrol tap

 20

 on. 

4. Move the choke lever


21

 to “On”.

5. Pull  the  recoil  cord  handle


22

.  Allow  the  recoil

handle to return slowly after each pull.

Starting from Hot

Follow “Starting from Cold” ignore steps 4 only.
If the engine does not start or will not continue to run

follow the “Starting from Cold” procedure with choke

lever between the “On” and “Off” postion.

Stopping

1. Move  the  throttle  lever

 19

  to  position  Stop-

ping. 

2. Move the engine cut-off switch


18

 to OFF. 

C D

C D

E

F G

Using Your mower

E

F G

I

H

I

H

I

F016J10009A Page 15 

Summary of Contents for BUCKINGHAM 20H

Page 1: ...BUCKINGHAM 20H BUCKINGHAM 24H BUCKINGHAM 30H WESTMINSTER 20H Deutsch English Français Español Português Italiano Nederlands Dansk Svenska Norsk Suomi Türkçe OPERATING INSTRUCTIONS ...

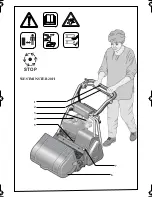
Page 2: ...WESTMINSTER 20H 1 2 3 5 6 7 4 STOP ...

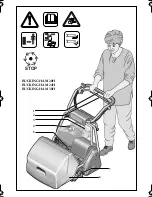
Page 3: ...BUCKINGHAM 20H BUCKINGHAM 24H BUCKINGHAM 30H 1 2 3 4 7 6 STOP 5 ...

Page 4: ...A 6 15 14 10 8 E F 11 12 29 8 WESTMINSTER BUCKINGHAM 9 B 5 ...

Page 5: ...BUCKINGHAM 28 G 26 27 8 13 16 17 P 19 25 23 2 H I 22 21 18 20 J K 24 L 31 30 ...

Page 6: ...nging direction on slopes Do not mow excessively steep slopes Use extreme caution when stepping back or pulling the lawn mower towards you Never cut grass by pulling the mower to wards you Stop the blades if the lawnmower has to be tilted for transporta tion when crossing surfaces other than grass and when transport ing the lawnmower to and from the area to be mowed Do not tilt the lawnmower when ...

Page 7: ...er is not supplied with oil in the en gine however it is possible that there is a small quantity in the engine It is essential to fill with oil before starting the engine to avoid damage to your engine It is important to use the recom mended oil to avoid damage to your engine 1 With the mower standing on level ground un screw and remove the oil filler dip stick 9 2 Wipe the oil filler dip stick 9 ...

Page 8: ... 3 Turn the height of cut knob 8 to achieve the re quired height of cut and tighten bolts 13 4 Tilt the mower back and pull plunger 11 fully 5 Raise the mower stand 12 and carefully release the plunger 11 Note For all models you may need to re adjust the comb after changing height of cut see Comb Adjust ment below Comb Adjustment Your mower has an adjustable comb fitted which can be brought into u...

Page 9: ...un evenness in the soilsurface which can build up if you always mow in the same direction Stop and remove spark plug cap Note To ensure long and reliable service carry out the following maintenance regularly Regularly check for obvious defects such as loose dislodged or damaged blades loose fixings and worn or damaged components Check that covers and guards are undamaged and correctly fitted Carry...

Page 10: ...ntenance and Adjustments See engine manual for details autosteer seat pack Buckingham 20 F016 800104 autosteer seat pack Buckingham 24 F016 800105 autosteer seat pack Buckingham 30 F016 800106 side wheel kit Buckingham 20 F016 L80928 side wheel kit Buckingham 24 F016 L80929 side wheel kit Buckingham 30 F016 L80930 wheel and stand kit 1 litre of SAE 30 API SF Oil Regular maintenace at the recommend...

Page 11: ...ct See engine maintenance manual Add oil Engine stops No petrol Engine speed too low for conditions Cutting cylinder obstructed Engine does not stop Refill tank Move throttle Turn off engine and clear obstruction Throttle cable not correctly adjusted Stop engine by removing spark plug lead and refer to the engine maintenance manual Cutting cylinder does not rotate n TURFMECH Approved a t c a t n o...

Page 12: ...the product through the fitting of parts not made or approved by Your statutory rights are not affected by this guarantee Your product has been manufactured under an envi ronmental management system using where possible the most environmentally responsible material and processes and with the potential for recycling at the end of its life When the time comes to dispose of this product please consid...

Page 13: ...Year 5 or 250 hrs 5 ère année au max 250 heures 5e jaar uiter lijk 250 uur 5 año a más tardar después de 250 horas Datum Date Date Datum Fecha Jahr 6 spätestens 300 Stunden Year 6 or 300 hrs 6 ère année au max 300 heures 6e jaar uiter lijk 300 uur 6 año a más tardar después de 300 horas Datum Date Date Datum Fecha Jahr 7 spätestens 350 Stunden Year 7 or 350 hrs 7 ère année au max 350 heures 7e jaa...

Page 14: ...otlar Händler in Ihrer Nähe Your nearest dealer Votre concessionnaire le plus proche Su distribuidor más cercano Seu revendedor mais próximo Il rivenditore più vicino Uw dichtstbijzijnde vertegenwoordiger Din nærmeste forhandler Din närmaste återförsäljare Din nærmeste forhandler Lähimmältä jälleenmyyjältä Πλησιέστερο αντιπρόσωπο Size en yakın bayiyi ...

Reviews: