


2
www.observint.com
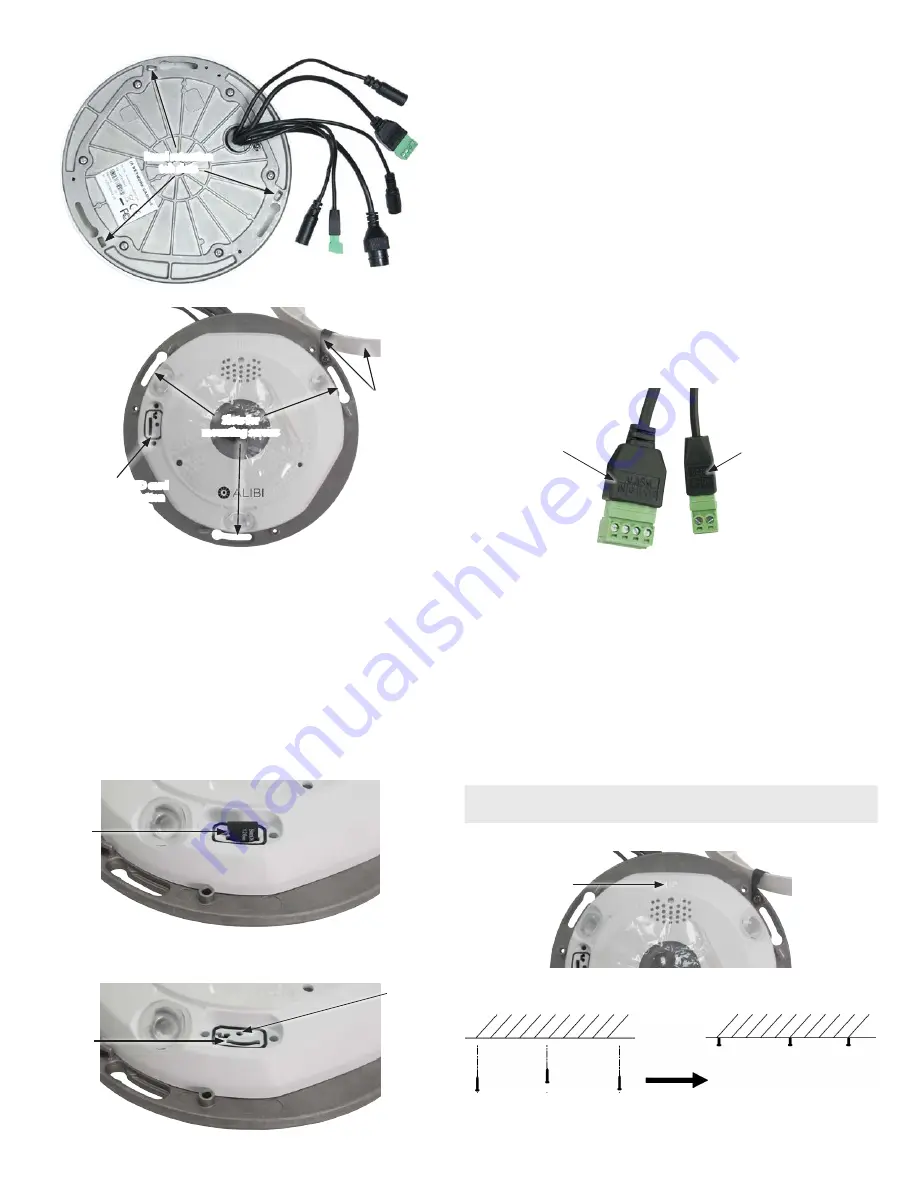
Bezel retention
tab slots
Slots for
mounting screws
Access to MicroSD card
slot and Reset button
(cover removed)
Bezel tether
and bezel
Camera face with bezel removed
Insert MicroSD card into the camera
A MicroSD card installed in the provides local storage for video recordings, capture files, and log data.
NOTE
: If the camera is not managed by an NVR or other video management system (VMS) and doesn’t
have a MicroSD card installed, video recordings, capture files, and log data are not saved.
1.
Remove the bezel.
2.
Use the security L-wrench to remove the oval cover that conceals the MicroSD card slot and the
Reset button.
3.
Insert a MicroSD card into the card slot as shown in the photo below. The label on the card should
face out.
MicroSD card
shown in slot
4.
Push the MicroSD card into the slot as far as possible, and then release it. It should click into place
when fully inserted.
MicroSD card
installed
Camera Reset
button
To remove the MicroSD card, push the card all the way in to release it from the connector, then lift it
out of the slot.
5.
Reinstall the oval shaped cover that conceals the MicroSD card and the Reset button.
Step 3. Mount the camera
Use the following procedure to flush-mount the camera onto a ceiling or wall. The procedure is identical for
all three, except for a parameter difference in the camera setup menu, and the orientation of the camera for
wall installations, and. Pictures shown here are for a ceiling installation.
1.
Route extension cables from the camera mounting location to the devices it will connect to. Do
not connect them to these devices at this time. The camera provides the following drop cables to
connect to other devices:
—
Power with screw-down terminals for 12 Vdc powering.
NOTE
: The camera can also be
powered through the LAN (PoE).
—
Ethernet with RJ-45 connector. A protective jacket for the RJ-45 connector is provided with
the camera.
—
Alarm IN/OUT with screw-down terminals. Terminal identification is provided on the
connector.
Alarm terminal
identifiers
RS485 terminal
identifiers (D+, D-)
—
RS485 drop cable with screw-down terminals. Terminal identification is provided on the
connector.
—
Audio IN
—
Audio OUT
2.
Prepare the camera for installation. See “Step 2. Prepare the camera for installation” on page 1.
3.
Obtain the appropriate fasteners for securing the camera to the mounting surface. The fasteners
should support at least three times the weight of the camera. The screws and wall inserts provided
with the camera are adequate for many surfaces.
4.
Use the Drill Template provided to mark and drill the holes in the ceiling for the fasteners (mounting
screws). Also drill a hole for the drop cables. For wall mount installation, orient the template so that
the arrow points up (perpendicular to the plane of your surveillance target).
NOTE
For
wall mount
installation, the camera must be oriented so the “
UP
” label on the face of the
camera is at the top.
“UP” label
5.
Install screws into the screw hole until the screw head is at least ¼” over the surface.
© 2014 Observint Technologies. All rights reserved.


