background image

Page 5 of 10

EPH-N00-06020

1-26-00

3

 - ALL DOORS

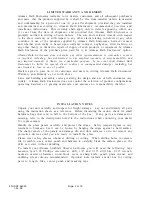
Place the two wall jambs [B] into the ends of

the curb [A].  Masking tape may be used to hold
the curb in place during this operation.  Plumb
both jambs and mark the hole locations on the
walls.  Remove all parts and drill the walls for
mounting hardware.

For tile or marble walls, drill six 3/16" diameter
holes and insert the plastic wall anchors [C].
Attachments to fiberglass or acrylic units can be
made in two ways.  If a reinforcement is built into
the wall of the unit, drill six 1/8" holes to install
mounting screws directly into the reinforcement.
If walls are not reinforced, drill six 3/16" holes and
install plastic wall anchors or toggle bolts (toggle
bolts not supplied by Alumax).

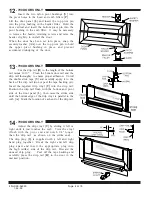
5

 - ALL DOORS

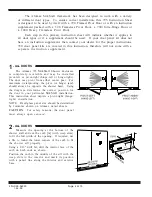
Place the setting blocks [E] in the curb [A] as

shown to support the two fixed glass panels [F].
The setting blocks should be positioned
approximately 3" from each corner of the glass
panel.  Remove any protective strips from the first
glass panel and set it into place on the setting
blocks and approximately 1/2" into the wall jamb
[].  A strip of masking tape 1/2" from each
vertical edge of the glass will aid alignment.  Repeat
for the second panel.

NOTE:  Obscure glass panels should be installed
with the rough surface of the glass to the exterior
of the unit.  Deco or etched glass panels should
have the patterned surface to the inside.

Press a 180° post [G] into the curb and position it
to overlap the first glass panel by 1/2".  Use
masking tape to hold the post in position
temporarily.  Repeat for the second post and panel.

NOTE:  To facilitate out of plumb walls, the 1/2"
glass bite may be varied from 1/4" to 3/4".

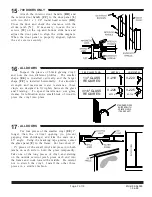
4

 - ALL DOORS

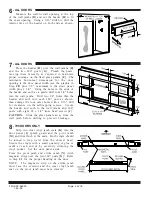
Wipe the shower walls and sill, curb [A] and

wall jambs [B] with a clean, dry cloth to remove
any dust or debris.  Apply a 1/4" bead of caulk
along the inside of both of the pencil lines marked
in Step #2.  Carefully replace the curb in the exact
position marked.  Caulk the inside of the curb
ends where they meet the wall.

Replace both wall jambs and attach to the walls
with six #8 x 1 1/2" truss head screws [D].

Summary of Contents for Alumax Bath Enclosures STIKSTALL 795 Series

Page 1: ...INSTALLATION INSTRUCTIONS 795 SERIES STIKSTALLTM SHOWER ENCLOSURE Copyright Alumax Bath Enclosures 1997 All rights reserved EPH N00 06020 1 26 00...

Page 2: ...alers agree to pass on to its customers and users in writing Alumax Bath Enclosures Warranty and Remedy as set forth above Laws and building and safety codes governing the design and use of bath enclo...

Page 3: ...t Jamb N 1 Strike Jamb Magnetic P 2 Snap in Fillers R 1 Drip Rail S 1 Drip Plug T 1 Tapered Drip Vinyl V 1 Roll Double Stick Tape W 2 10 x 7 16 Sq Head Set Screws X 1 Nylon Spacer Y 2 Nylon Pivot Bush...

Page 4: ...ed to be used by itself with a 790 Framed Pivot Door or with an instruction supplement packed with a 390 Frameless Pivot Door a 790i Intre Hinge Door or a 1090 Heavy Frameless Pivot Door Each step in...

Page 5: ...ve any protective strips from the first glass panel and set it into place on the setting blocks and approximately 1 2 into the wall jamb B A strip of masking tape 1 2 from each vertical edge of the gl...

Page 6: ...the strike jamb must face the exterior and the clear vinyl jamb seal on the pivot jamb must face inward 7 ALL DOORS Press the header H over the wall jambs B and the two 180 posts G Plumb the posts mo...

Page 7: ...self tapping screws Attach the pivot jamb permanently with three 8 x 1 4 truss head screws J Slide the header filler P tight against the pivot jamb Push the strike jamb N tight against the fillers to...

Page 8: ...he double stick tape V and carefully apply it to the back of the drip rail do not peel the tape backing yet Insert the tapered drip vinyl T into the drip rail Position the drip rail flush with the bot...

Page 9: ...el L with two 6 32 x 1 1 4 round head screws DD Close the door and check the clearance with the strike jamb N If necessary loosen the set screws W on the top and bottom slide bars and adjust the door...

Page 10: ...the two bottom vinyls in the same way The Care and Cleaning of your new Alumax Bath Enclosure The simplest and preferred method of cleaning your unit is by washing it with clean water and drying with...

Reviews: