44
If selected, the software will reset the lock’s clock each time data is
transferred.
The AL-DTM goes into a
Power Saving Mode
after 10 minutes of no activity.
The AL-DTM will remove all power after the time specified in this field.
Although all AL-DTM data will be lost after a power down, this will only affect
Send Program to Lock
,
not
Receive Log
or
Receive Program
configurations.
Possible selections are:
Forever
,
1 Day
,
7 Days
or
40 Days
.
Press drop-down menu to select and display DTM Configuration.
Identification of each door with a specific number. The LockID is used to
identify the lock to the DTM, ensuring that the correct programming is
matched to the correct lock. No longer entered through AL-59. See also
Glossary entry "LockID").
Displays the name used when the lock was first entered in the DL-
Windows Account.
Displays the Master User Code of the lock that was initially programmed in
the
Global Users
screen. This Master Code must match the Master Code
programmed in the lock.
Note:
This field is for display only.
(Display only)
Select which of the following functions the DTM will perform when
communicating with the lock:
Receive Program from Lock
Send Program to Lock
Receive Log
If checked, DL-Windows will configure the DTM for the operation
programmed or transfer data for the locks selected. To enable, double-click
in the
Select
column for the Door Number desired, and a
9
will appear.
Click to send all lock configurations to the DTM.
The
DTM Support
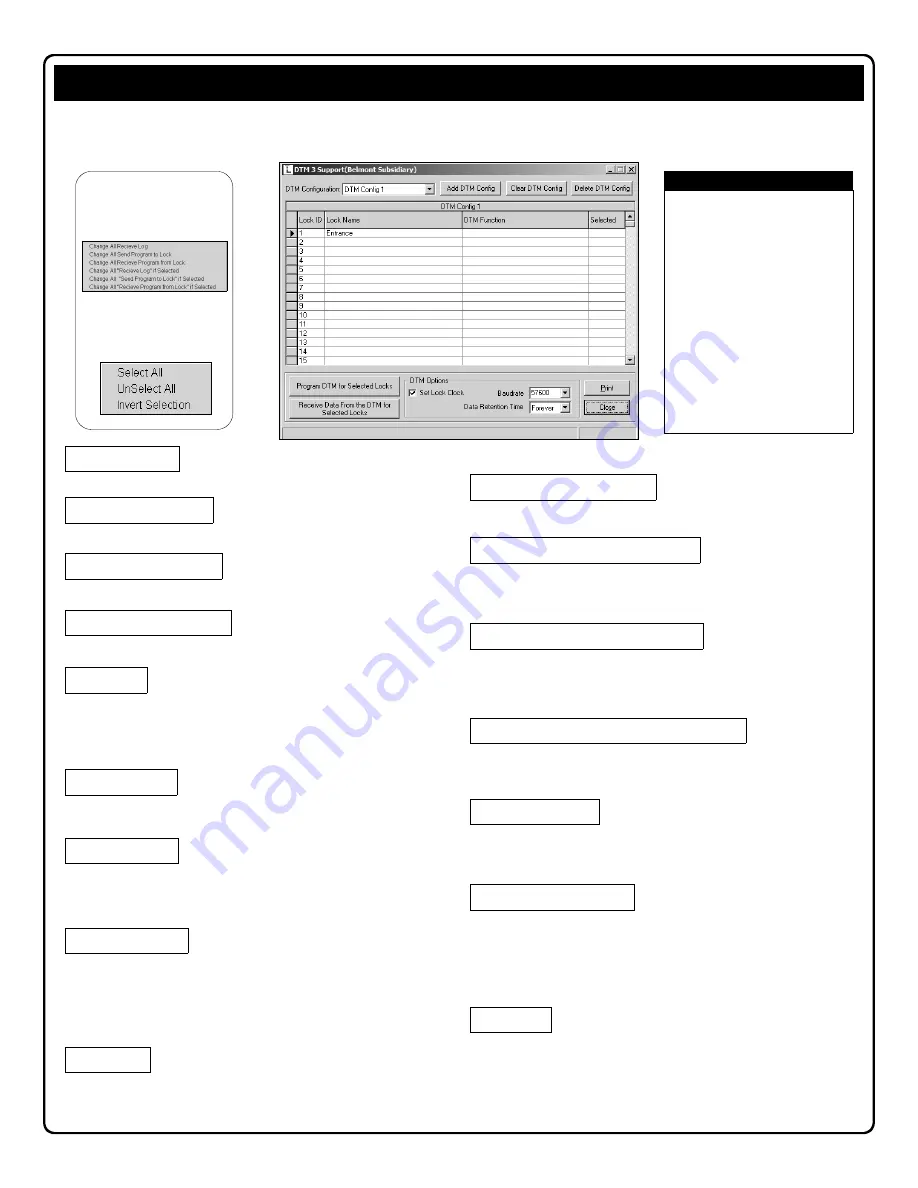
screen is used to configure an AL-DTM to transfer data to or from multiple locks.
Click to send only those selected lock configurations to the DTM. (A check
(
9
) appears in the
Selected
column for all selected lock configurations).
Use this button after the AL-DTM had valid data loaded from the lock.
Data will be received from all locks that have been selected in the
DTM
Support
screen.
The DTM Support screen will receive data from only those locks that
have been selected (A check appears in the
Selected
column).
9
Quick Tips:
RIGHT click on the
DTM
Function
column, and select
desired action:
RIGHT click on the
Selected
column, select desired action.
Click to add additional DTM configurations.
For every new lock that is added, the
DTM screen will automatically use the
next available Door Number in the
selected DTM Configuration. For
example, in the screen image at left,
the next lock that will be added (for
"DTM Config 1") will be Door Number
2.
In addition, if you select
Clear DTM
Config
while in "DTM Config 1", all
locks will automatically be reloaded to
their default door number. If you have
existing DTM configurations and locks
assigned to these locations, the
system WILL NOT OVERWRITE
them, unless you select "DTM Clear
All". All other configurations are left
alone and not handled in this manner.
Note:
Click to delete the selected DTM configurations.
Click to clear the selected DTM configurations.
The Baudrate specifies the rate at which bits are transmitted from (or to) the AL-
DTM. Selections are in bits per second. DL-Windows can be configured to
communicate at baudrates between 9600 and 57600 bits per second. The
Baudrate selection field is only used with the AL-DTM and can be lowered in case
of communication trouble.
Note:
Some USB Adapters do not support all baud
rates.
DTM Config
Add DTM Config
Clear DTM Config
Delete DTM Config
LockID
Lock Name
Master Code
DTM Function
Selected
Baudrate
Send All Locks To DTM
Send Selected Locks To DTM
Transfer All Locks From DTM
Transfer Selected Locks From DTM
Set Lock Clock
Data Retention Time
"DTM 3 Support" Screen - Program Field Definitions


