


68
HARMONY_D USERS INSTALLATION AND SERVICE MANUAL
53
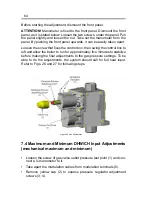
Figure 27 Burner Plates, Igniters and Flame Sensors
Before taking the hood apart, cover the burner openings for not splitting any dirt from
the hood.
Pull off the electrical connections from the spade terminals on the fan motor.
Disconnect the flexible air pressure sensing pipes from the fan venturi.
Remove the fixing screw to release the fan from the flue hood.
Withdraw the fan downward with a forward twisting action to disengage the fan
discharge from the flue connection on the boiler top.
Inspect the impeller and clean off any dust with a soft brush, or by blowing.
Remove the air pressure switch by undoing the two screws fixing the switch to the
boiler top.
Undo the fixing screw to remove the right and left air deflector parts of flue hood.
Remove the flue collector hood by undoing the four fixing screws holding the hood to
the rear wall of the boiler inner casing. Withdraw the hood forward clear of the
combustion chamber.
Cover the burner blades to collect any debris and clean the heat exchanger with a soft
brush or vacuum cleaner. DO NOT use a wire brush.
Reassemble the flue hood taking care that the rear lip of the hood is correctly located
under the top lip formed on the top of the rear combustion chamber wall.
Replace the air deflector, fan and air pressure switch in reverse order.
Check the air pressure switch sensing pipes for damage and replace as required taking
care to preserve the correct connection. (The pipe coming from outside air should be
plugged to the switch P1 inlet; the pipe coming from fan should be plugged to the
switch P2 inlet. )
Remove the screw on the frontal face of the pump to access the pump shaft and rotate
the shaft with a screwdriver to check for any blockage. Clean any dirt and replace the
screw.
Replace the combustion room front panel,
in hermetic models
hermetic room front
panel, and front casing panel in reverse order. Do not forget to screw the two front
panel-retaining catches at the top RH and LH sides of the boiler.
Check the operation of the pressure relief valve as described in “Commissioning”
section.
Check that the system is at the original (cold) design pressure. If necessary, re-
pressurize the system.
Check the airside pressure of the expansion vessel and pump air to increase it up to 1,2
bar.
• Before taking the hood apart, cover the burner openings for not split
-
ting any dirt from the hood.
• Pull off the electrical connections from the spade terminals on the fan
motor.
• Disconnect the flexible air pressure sensing pipes from the fan ven
-
turi.
• Remove the fixing screw to release the fan from the flue hood.
• Withdraw the fan downward with a forward twisting action to disenga
-
ge the fan discharge from the flue connection on the boiler top.
• Inspect the impeller and clean off any dust with a soft brush, or by
blowing.
• Remove the air pressure switch by undoing the two screws fixing the
switch to the boiler top.
• Undo the fixing screw to remove the right and left air deflector parts
of flue hood.
• Remove the flue collector hood by undoing the four fixing screws
holding the hood to the rear wall of the boiler inner casing. Withdraw
the hood forward clear of the combustion chamber.
• Cover the burner blades to collect any debris and clean the heat exc
-
hanger with a soft brush or vacuum cleaner. DO NOT use a wire
brush.