background image

GB-5

9) Important instructions for your personal safety
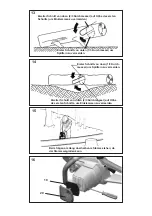
a)  General safety instructions

1.  Children and young persons under 18 may not 

operate electrical chain saws, with the exception of 
apprentices older than 16 under the supervision of a 
trained adult.

2.  The chain saw may only be used by persons who 

have suffi cient experience.

3.  Always keep these Operating Instructions together 

with the chain saw.

4.   Only lend or give this chain saw to persons who are 

familiar with its use. Also give them these Operating 
Instructions.

b)  Instructions on using the chain saw safely

5.  Attention! Read the Operating Instructions care-fully 

and have yourself instructed in the use of a chain saw 
before you use it for the fi rst time.

6.  Always store your electric tools in a safe place. Elec-

tric tools not being used should be stored in a dry, 
inaccessible or locked place, outside the reach of 
children.

7.  Check the extension cable regularly and replace it if it 

gets worn or damaged. 

8.  Check the power cable for damage or cracks every 

time before you use it. Damaged cables must be 
replaced.

9.  Always hold the chain saw with both hands while 

working with it.

10. The chain saw must be disconnected from the power 

supply before you tighten the chain, exchange the 
chain or carry out any other work on the saw. - 
Withdraw the plug!

11. During work breaks put the machine down in such a 

manner that nobody is at risk.

12. When switching on the chain saw, ensure that it is 

supported well and hold it fi rmly. The chain and bar 
must be free.

13. Withdraw the plug immediately if the power cable is 

damaged or cut.

14. The chain saw may only be connected to socket 

outlets with earthing contact and tested electrical 
installations. We recommend the use of a residual-
current-operated circuit-breaker. The fuse must have 
a value of 16 A and mustn’t be used by other consu-
mers while working with the chain saw. 

15. The cable must be winded off completely when you 

use a cable drum.

16. Ensure that the power cable has no kinks and is not 

damaged.

17. The chain saw may only be used in a completely 

assembled state. No protective devices may be 
missing.

18. Switch the chain saw off immediately if you notice any 

changes in the machine.

19. Always have a fi rst-aid kit fulfi lling DIN 13164 at hand 

in case of accidents.

20. If the chain saw comes into contact with earth, stones, 

nails or other foreign objects, withdraw the plug 
immediately and check the chain as well as the bar.

21. Ensure that no chain oil penetrates into the earth or 

sewage. Always place the chain saw on something 

that will absorb any oil dripping from the bar or chain.

22. Avoid to use the trimmer in poor weather conditions, 

especially if there is a risk of a thunderstorm.

c)  Warning to the danger of recoil (“kickback”)

23. If possible, use a stand.
24. Always keep an eye on the bar tip.
25. Only place a running saw on the object to be cut. 

Never start the machine while the chain rests on 
something.

26. So called piercing cuts with the bar tip may only be 

carried out by trained personnel.

d)  Instructions on safe working techniques

27. Working on ladders, scaffoldings or trees is forbidden.
28. Ensure that the wood cannot twist while it is being 

cut.

29. Watch out for splintering wood. While you are sawing 

you may be injured by fl ying wood chips.

30. Do not use the chain saw to lever or move the wood.
31. Only cut with the lower section of the saw. The saw 

will be repulsed towards you if you try and cut with the 
upper section of the saw.

32. Ensure that the wood is free of stones, nails or other 

foreign objects.

33. We recommend that fi rst-time  users are instructed 

practically as to the correct use of the chain saw and the 
required  personal safety equipment by an experienced 
operator; the cutting of round wood or logs  should  be 
trained on a log stand or similar rack-type device fi rst.

34. Keep the running chain saw from touching the ground 

or wire fences.  

3. Starting up

3.1. Filling the oil tank 

(Fig. 1-2)

The chain saw must never be operated without suffi cient 
oil on the chain as this could cause damage to the chain, 
blade or motor. No claims for guarantee can be accepted 
if damage occurs when the device is being operated 
without chain oil. 

Only  use high quality branded chain saw oil, avail-

able from specialist dealers. 
We  recommend chain  saw oil, please enquire 

with your specialist supplier.

Do not use old oil. This will damage the chainsaw and will 
also lead to loss of the guarantee.

•  Before fi lling the oil tank, pull out the mains plug
•  Open the twist cap .
•  Fill approx. 300 ml oil into the tank using a funnel and 

screw on the tank cap  tightly once more.

•  The oil level can be seen in the inspection window (Fig. 

2). If you plan not to use the machine for a longer pe-
riod, you should remo ve the chain oil from the oil tank.

• The oil tank should also be emptied before the chain-

saw is transported or dispatched.

•  Check correct functioning of the chainsaw before com-

mencing work. Switch on the saw with cutting fi ttings 
assembled and hold over a bright background at a safe 
distance (Be careful not to come in contact with the 
ground !). An track of oil will show you that the chain is 
suffi ciently lubricated.

Summary of Contents for solo 621

Page 1: ...469599_a I 01 2015 Elektro Kettens ge Original Betriebsanleitung 621...

Page 2: ...D 2 621...

Page 3: ...ment 17 Chain catch bolt 18 Cable holder 19 Filter cover 20 Filter FR 1 Ecran t moin pour niveau d huile 2 Poign e avant 3 Couvercle du r servoir d huile 4 Prot ge main avant 5 Guide 6 Cha ne de la sc...

Page 4: ...s espada 6 Cadena de sierra 7 Tornillo de muletilla 8 Tapa de pi n 9 Interruptor 10 Guardamanos posterior 11 Mango posterior 12 Cable de red con conector 13 Protecci n de cuchillas espada 14 Mango de...

Page 5: ...on 2 Warning 3 Read operation instructions before use 4 Do not subject this electric power tool to rain 5 Remove plug immediately if the power flex is damaged or cut 6 Attention kick back 7 Hold tool...

Page 6: ...3 A B 16 7 8 1 2 1 4 3 mm 5 18 A B 6 15 9 1 7 2 4 8 17...

Page 7: ...en Boden s gen 12 GB A Felling direction B Danger area C Escape area GR A B C ES A Direcci n de ca da B Zona de peligro C Zona de hu da NL A Velrichting B Gevarenzone C Vluchtgebied DE A F llrichtung...

Page 8: ...messer auf H he des ersten Schnitts um Einklemmen zu vermeiden 14 Erster Schnitt von oben 1 3 Durch messer um Splittern zu vermeiden Zweiter Schnitt von unten 2 3 Durchmesser auf H he des ersten Schni...

Page 9: ...llen 3 2 Montage von Schwert und Kette 3 3 Anschluss der Kettens ge 3 4 Einschalten 4 Sicherheitsvorrichtungen an Ihrer Kettens ge DE 7 4 1 Kettenbremse 4 2 Auslaufbremse 4 3 Kettenfangbolzen 5 Erl ut...

Page 10: ...gesetzes Modell 621 Nennspannung 230 V Nennfrequenz 50 Hz Absicherung tr ge 16 A Nennleistung 2500 W Nennstrom 11 3 A Schwertl nge 400 mm Schnittl nge 380 mm Kette 91PX 057X Treibgliedst rke 1 3 mm Ke...

Page 11: ...romschutzschalters ver mindert das Risiko eines elektrischen Schlages 3 Sicherheit von Personen a Seien Sie aufmerksam achten Sie darauf was Sie tun und gehen Sie mit V ernunft an die Arbeit mit einem...

Page 12: ...der Kettens ge in umgekehrter Arbeitshaltung erh ht das Risiko von Verletzungen und darf nicht ange wendet werden Halten Sie das Elektrowerkzeug an den isolier ten Grifff chen da die S gekette in Ber...

Page 13: ...onen die mit dem Gebrauch vertraut sind Bitte bergeben Sie dazu jeweils auch diese Gebrauchsanweisung b Hinweise zum sicheren Betrieb der Kettens ge 5 Achtung Vor erstmaligem Gebrauch der Ketten s ge...

Page 14: ...Vorsicht keine Bodenber h rung Zeigt sich eine lspur arbeitet die Ketten schmierung einwandfrei Legen Sie nach Gebrauch die Kettens ge waage recht auf eine saugf hige Unterlage ab Es k nnen durch die...

Page 15: ...n der Schwertspitze mit Holz oder einem festen Gegenstand wird der Antrieb der S gekette durch Ausl sen des Handschutz 4 sofort gestoppt der Motor l uft dabei weiter Der Bremsvor gang wird ausgel st i...

Page 16: ...er Unterseite her s gen dann den Rest von oben auf H he des Unterschnitts Wenn der Baumstamm an beiden Enden aufliegt wie in Bild 14 gezeigt zuerst 1 3 des Stammdurchmessers von der Oberseite her s ge...

Page 17: ...ese nur durch eine vom Hersteller benannte Reparatur werkstatt oder Fachwerkstatt ausgetauscht werden da hierf r Spezialwerkzeug erfor derlich ist 8 Reparaturdienst Reparaturen an Elektrowerkzeugen d...

Page 18: ...Starting up GB 5 3 1 Filling the oil tank 3 2 Assembling the blade and chain 3 3 Connecting the chainsaw 3 4 Switching on 4 Safety devices on your chain brake GB 6 4 1 Chain brake 4 2 Rundown brake 4...

Page 19: ...odel 621 Rated Voltage 230 V Nominal Frequency 50 Hz Fuse time lag 16 A Rated Output 2500 W Rated Current 11 3 A Guide Bar 400 mm Cutting length 380 mm Chain 91PX 057X Drive link width 1 3 mm Chain pi...

Page 20: ...uipment and al ways wear eye protection safety goggles Wearing personal protection equipment as a dust mask nonslip safety shoes safety helmet or ear protectors depending on the type and application o...

Page 21: ...rol Apply particular caution when cutting brush and young trees The thin material may get caught in the chain and hit you or throw you off balance Carry the switched off chain saw using the front hand...

Page 22: ...enetrates into the earth or sewage Always place the chain saw on something that will absorb any oil dripping from the bar or chain 22 Avoid to use the trimmer in poor weather conditions especially if...

Page 23: ...ystem impedance Z max at the point of con nection house service connection of max 0 4 Ohm The user must ensure that the device is only operated on an electricity supply system meeting these require me...

Page 24: ...g is removing the branches from a fallen tree When limbing leave larger lower limbs to support the log off the ground Remove the small limbs in one cut as il lustrated in Figure 11 Branches under tens...

Page 25: ...e power supply lead of this device shows any defects the lead must be replaced by an authorized repair shop only or a specialised workshop as this work requires special tools 8 Repair Service Repairs...

Page 26: ...e 3 4 Mise en service 4 Dispositifs de s curit de votre tron onneuse FR 7 4 1 Frein de cha ne 4 2 Frein de ralentissement 4 3 Goupille de s curit de la cha ne 5 Exposition des bonnes pratiques lors de...

Page 27: ...Hz Fusible action retard e 16 A Puissance nominale 2500 W Courant nominale 11 3 A Guide Cha ne 400 mm Longueur de coupe 380 mm Cha ne 91PX 057X Puissance de l l ment moteur 1 3 mm Pas de cha ne 3 8 V...

Page 28: ...l lectrique dans un environnement humide est in vitable utilisez un disjoncteur diff rentiel contre les courants de d faut L utilisation d un disjoncteur diff rentiel contre les courants de d faut r d...

Page 29: ...enez toujours la scie cha ne de la main droite pos e sur la poign e arri re et la main gauche sur la poign e avant Le positionnement inverse des mains sur les poign es de la scie cha ne augmente le ri...

Page 30: ...Ne pr tez ou ne faites cadeau de la tron onneuse qu des personnes qui sont familiaris es avec son utilisation Veuillez leur remettre galement ces ins tructions de service b Indications pour l exploita...

Page 31: ...cela signifie que le graissage de la cha ne fonctionne parfaitement Apr s utilisation d posez la scie l horizontale sur un textile absorbant En raison de la r partition de l huile quelques gouttes d h...

Page 32: ...e revers de la main plac sur la poign e avant 2 appuie sur le prot gemain 4 Le fonctionnement correct du frein de cha ne doit tre v rifi avant chaque utilisation de la scie Attention Lorsque vous acti...

Page 33: ...3 restants du diam tre par le bas contre l entaille sup rieure Lors de la d coupe dans une pente il faut toujours se tenir au dessus du tronc comme le montre le dessin no 15 Pour avoir un contr le to...

Page 34: ...cialis 9 Recyclage et protection de l environne ment Au cas o votre appareil devenait un jour inutilisable ou si vous n en aviez plus l usage ne jetez en aucun cas l appareil avec les d chets m nagers...

Page 35: ...cadena 3 3 Conexi n de la sierra de cadena 3 4 Puesta en marcha 4 Dispositivos de seguridad en el freno de la cadena ES 7 4 1 Freno de la cadena 4 2 Freno de inercia 4 3 Perno de retenci n de la caden...

Page 36: ...Tensi n nominal 230 V Frecuencia nominal 50 Hz Protecci n por fusibles de acci n lenta 16 A Potencia nominal 2500 W Corriente 11 3 A Largo de espada 400 mm Longitud de corte 380 mm Tipo de cadena 91P...

Page 37: ...un ambiente h medo utilice un interruptor protector contra corriente de falla El uso de un interruptor protector contra corriente de falla disminuye el riesgo de sufrir una descarga el ctrica 3 Seguri...

Page 38: ...r en marcha la sierra ase g rese de que no haya ning n objeto que est en contacto con la cadena Al trabajar con una sierra de cadena cualquier momento de distracci n puede hacer que la cadena de la si...

Page 39: ...ntes para su seguridad per sonal a Advertencias generales de peligro 1 Uso prohibido de sierras de cadena el ctricas para ni os y j venes menores de 18 a os Excepci n J venes aprendices mayores de 16...

Page 40: ...utilizarse por cierto tiempo volver a sacar el aceite del tanque Tambi n ha de vaciarse el tanque de aceite antes de transportar o enviar la sierra de cadena Antes de comenzar a trabajar con la sierr...

Page 41: ...locidad Al depositar la sierra procurar que no entre en contacto la cadena con piedras u objetos met licos 4 Dispositivos de seguridad en el freno de la cadena 4 1 Freno de la cadena dib 7 La presente...

Page 42: ...nifor me en toda su longitud como se muestra en la Figura 12 cortamos desde arriba Si el tronco del rbol ca do est tumbado en el suelo solo por un lado como se muestra en la Figura 13 cortamos primero...

Page 43: ...ena a un taller especializado Atenci n Otros trabajos de mantenimiento y reparaci n no indicados en estas instrucciones de manejo solamente deber n efectuarse por personas autorizadas o por taller esp...

Page 44: ...nto della sega a catena 3 4 Inserimento 4 Dispositivi di sicurezza nel freno della catena IT 7 4 1 Freno della catena 4 2 Freno d arresto graduale 4 3 Perno di presa della catena 5 Spiegazioni per il...

Page 45: ...sulla sicurezza degli dei prodotti Modello 621 Tensione delle rete 230V Frequenza nominale 50 Hz Protezione nerte 16 A Potenza nominale 2500 W Corrente nominale 11 3 A Lunghezza barra 400 mm Lunghezza...

Page 46: ...quello che si fa nel lavorare con un utensile elettrico Non utilizzare mai utensili elettrici quando si stanchi o sotto l effetto di sostanze stupefacenti alcool o farmaci Un mo mento di disattenzion...

Page 47: ...a scossa elettrica Indossare occhiali protettivi e protezione per l udito Si consiglia di utilizzare ulteriori disposi tivi di protezione per capo mani gambe e piedi L uso di indumenti protettivi adeg...

Page 48: ...amen to per assicurasi che non vi siano danni o fessure Ogni linea danneggiata deve essere sostituita 9 Durante il maneggio della sega a catena questa deve essere tenuta con ambedue le mani 10 Per la...

Page 49: ...dei guanti di protezione Per il montaggio di barra e catena su questa motose ga non occorrono attrezzi Appoggiare la motosega su di una base piana Svitare la vite ad aletta 7 in senso antiorario Smon...

Page 50: ...atura e farlo scattare in posizione non deve essere premuto alcun interruttore Accertarsi prima della messa in servizio della sega a catena che il dispositivo di protezione delle mani 4 sia sempre sca...

Page 51: ...riore Durante il taglio in pendenza restiamo sempre in posi zione superiore rispetto al fusto come indicato nell im magine nr 15 Per poter avere il pieno controllo della sega anche nel momento dell ab...

Page 52: ...arazione su degli utensili elettrici deve essere effettuata solamente da uno specialista 9 Smaltimento e protezione dell ambiente Una volta divenuto inutilizzabile o non pi necessario l attrezzo non p...

Page 53: ...6 3 1 Olietank vullen 3 2 Montage van zwaard en ketting 3 3 Aansluiting van de kettingzaag 3 4 Inschakelen 4 Veiligheidsvoorzieningen aan uw kettingre NL 7 4 1 Kettingrem 4 2 Uitlooprem 4 3 Kettingvan...

Page 54: ...ligheid stelt Model 621 Nominale spanning 230 V Nominale frequentie 50 Hz Beveiliging langzaam 16 A Nom opnamevermogen 2500 W Nom stroom 11 3 A Zwaardlengte 400 mm Snijdlengte 380 mm Ketting 91PX 057X...

Page 55: ...mindert het risico van het krijgen van een elek trische schok 3 Veiligheid van personen a Wees alert let goed op wat u doet en gebruik uw gezond verstand bij het werken met elektrisch gereedschap Gebr...

Page 56: ...Het con tact van de zaagketting met een spanningvoerende leiding kan metalen machineonderdelen onder span ning zetten en een elektrische schok veroorzaken Draag beschermende kleding zoals een veilig...

Page 57: ...p veilig op Electrisch gereedschap dat niet gebruikt wordt moet op een droge hooggelegen of afgesloten plaats buiten het bereik van kinderen worden opgeslagen 7 Controleer verlengsnoeren regelmatig en...

Page 58: ...ondselkap 8 Leg de zaagketting op het zwaard en let op de looprichting van de ketting De snijtanden moeten aan de bovenkant van het zwaard naar voren wijzen zie afb 4 Leg het vrijstaand einde van de z...

Page 59: ...wordt uitgeschakeld De functie van de uitlooprem wordt met het loslaten van de aan uit schakelaar in werking gezet Deze uitlooprem verhindert letselrisico door een nalopende ketting 4 3 Kettingvangbo...

Page 60: ...tting resp verharsing dient de ketting gedemonteerd en gereinigd te worden leg de ketting daartoe enkele uren in een bak met kettingreiniger Ketting daarna met schoon water afspoelen Indien de ketting...

Page 61: ...er heeft als volgt garantie De garantieperiode bedraagt 24 maanden en begint bij de overdracht welke door een originele koopbon bewe zen moet kunnen worden Bij commerci le toepassing alsook bij verhuu...

Page 62: ...bastecer o tanque de leo 3 2 Montagem da l mina e da corrente 3 3 Conex o da serra de corrente 3 4 Accionamento 4 Dispositivos de seguran a no trav o da corrente PT 7 4 1 Trav o da corrente 4 2 Trav o...

Page 63: ...sivel de ac o lenta 16 A Pot ncia nominal 2500 W Corrente nominal 11 3 A L mina 400 mm Comprimento de corte 380 mm Tipo para a corrente 91PX 057X Espessura de elo de accionamento 1 3 mm Passo de cadei...

Page 64: ...a serve para reduzir o risco de choque el ctrico 3 Seguran a das pessoas a Esteja atente cocentre toda a aten o ao seu trabalho utilize a ferramenta el ctrica com o m ximo de cautela As ferramentas e...

Page 65: ...a um choque el ctrico Utilizar culos de protec o e protec o auditi va recomendado equipamento de protec o para cabe a m os pernas e p s Vestimenta de protec o adequada reduz o perigo de ferimentos dev...

Page 66: ...o caso de este ter ficado danificado Mantenha os seus punhos secos e isentos de leos e gorduras 8 Antes de cada utiliza o controle o cabo el ctrico relativo a danifica es e cortes Cabos danificados de...

Page 67: ...sentido anti hor rio Remova a tampa do pinh o 8 Deite a corrente da serra sobre a l mina e observe a direc o de movimenta o da corrente Os dentes de corte sobre o lado superior da l mina devem indicar...

Page 68: ...rra em movimento Para al m disso puxar o protector manual para tr s na direc o do man pulo 4 2 Trav o de in rcia Esta serra de corrente est equipada com um trav o de in rcia mec nico conforme as mais...

Page 69: ...do motor disp e de um filtro 19 para a protec o do interior do aparelho contra a sujidade O filtro foi concebido de tal forma que sob condi es normais para limpar o mesmo suficiente escov lo a partir...

Page 70: ...met lico e levados para a reciclagem Informa es sobre isso poder receber na sua administra o comunal ou municipal 10 Termos de garantia Para esta ferramenta electrica n s damos indepen dentemente das...

Page 71: ...4 5 6 7 8 Cr simej upode xeij gia thn proswpik saj asf leia 3 GR 6 3 1 3 2 3 3 3 4 4 GR 7 4 1 4 2 4 3 5 GR 8 a b c d e 6 GR 8 7 o GR 9 H mhcan den pa rnei mpr j H alus da den doule ei H alus da den l...

Page 72: ...thn topoqes a crhshmopoi shj thj mh canhj isc ontej desmeutiko j rouj gia thn pr lhyh atuchm twn pr pei na prosecqo n oi anagnwrism noi eidiko kai tecniko roi asfale aj ergas aj pwj kai oi kan nej pr...

Page 73: ...GR 3 2 1 1 a b c 2 a b c d e f 3 a b c d e f g 4 a...

Page 74: ...GR 4 b c d e f g 5 a 6...

Page 75: ...parabr sketai kan na llo tomo 11 Gia to t ntwma thj alus daj kaq j kai gia thn allag thj alus daj thn exoudet rwsh problhm twn pr pei na bg lete thn pr za 12 Thn ra dialeim twn topoqete ste thn mhcan...

Page 76: ...se k nhsh Pot mhn b zete empr j thn mhcan tan h alus da akoump ei kapou 26 To leg meno trup nisma dhl to noigma miaj tr paj me thn koruf thj mp raj epitr petai na g netai m no ap mpeiro proswpik d Upo...

Page 77: ...GR 7 3 mm 4 7 7 3 mm 4 3 3 5 30mA Z 0 4 Ohm H07 RN F DIN VDE 0282 1 5 mm2 18 A 3 4 6 15 9 15 9 4 4 1 7 4 2 4 4 4 2 ON OFF 4 3 8...

Page 78: ...5 9 15 a 9 b 1 3 10 c 50 mm 10 d 11 e 12 13 1 3 14 1 3 2 3 15 6 o o o o Met thn cr sh kaqar zete to hlektrik alu sopr ono apo prion dia kai ap l dia 19 GR 8...

Page 79: ...mo j Se per ptwsh fqor j miaj alus daj aut pr pei na allacqe am swj To el cisto m koj twn donti n thj alus daj pr pei na e nai 4mm El gxte to per blhma kai to hlektrik kal dio met thn cr sh gia tuc n...

Page 80: ......

Reviews: