background image

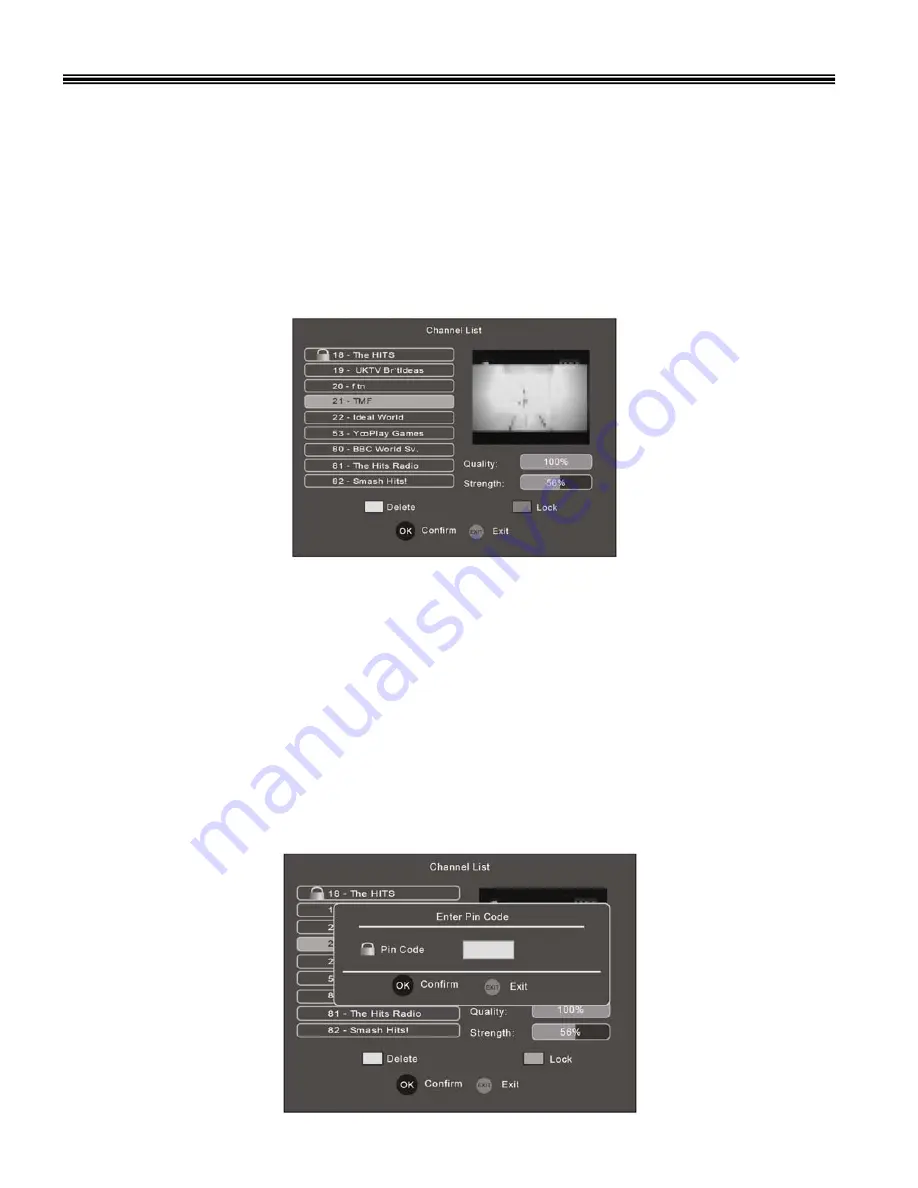
Delete a Channel. (Fig 16)

Enter the Channel list as described above.
Press the 

/

buttons to highlight a channel

Press the “YELLOW”


button to delete the channel. (Note to undelete, you must perform a complete (Auto 

Scan) or (Manual Scan) to re insert that channel.

Lock / Unlock a channel

.

Enter the Channel list as described above.
Press the 

/

buttons to highlight a channel

Press the “BLUE”


button. You will be requested to enter your Pin Code and press “OK”

A “LOCK”


symbol will be then displayed next to that channel.

If that channel is selected, a LOCK symbol will be shown and a request to enter your Pin number.
Repeat the above to UNLOCK
Press “EXIT”


to exit the Channel List.

16

Channel List (Fig 15).

The Channel List shows a list of all the channels found during the channel search.  From the list you can 
watch or listen (TV/Radio) to the selected channel. You may also


delete unwanted channels or set a 

password to view them.
Press the “MENU”


button to enter the Main Menu.

Use the 

/

buttons to highlight “CHANNEL LIST”.

Press “OK”


to enter the Channel List menu.

Press the 

/

buttons to highlight a channel

Press the “OK”


button to “preview”


the channel (see box in the right of screen).

Press “EXIT”


to quit the Channel List menu and view the selected channel on full screen.

Fig 15

Fig 16

Summary of Contents for AMTDT3509-250

Page 1: ...Please read this User Manual carefully to ensure proper use of this product and keep safe for future use Customer Help Line 08452937698 Website www ekey co uk ...

Page 2: ...tem information 14 Change Pin Code 14 DTR setting 15 Time Shift Duration 15 Format Hard drive 15 HDD information 15 Auto discard setting 15 OSD setting 15 Timers 15 Channel list 16 Favourite list 17 Basic operation 18 Channel Schedule EPG 18 Time Line EPG 19 Changing channels 19 Volume control 19 Digital Teletext 20 Subtitles 20 Display programme information 20 TV format 20 Pause current programme...

Page 3: ... animals Keep the packaging safe for future use You will find the following items Infra red Remote control batteries NOT supplied Scart lead Instruction manual RF Loop through lead Digital Upgrade Starting in 2008 and ending in 2012 television services will go completely digital TV region by TV region To continue using this PVR during and following the digital switchover you will need to reset you...

Page 4: ...ts useful life To prevent possible harm to the environment or human health from uncontrolled waste disposal please keep separate from other household waste and recycle it responsibly to promote the sustainable reuse of material resources Household users should contact either the retailer where you purchased the product or their local government office for details of where and how you can take this...

Page 5: ...t or near heat sources such as radiators or fires Moisture Do not place the PVR in wet or damp conditions such as steamy kitchens basements or other damp places Do not allow water or other fluids to enter the PVR Do not touch the Mains plug or adaptor with wet hands Should moisture enter the PVR disconnect from the supply and call the customer help line Cleaning Disconnect the PVR from the mains s...

Page 6: ...ed Green Yellow Blue Used in Text mode and other menu options 30 GOTO Selects playback time in playback mode 1 Standby Switches PVR to standby and operation 3 Rec List Displays list of recorded programmes 5 Stop Stops playback or recording 7 Fast Forward Sets fast forward speed 9 Fast Rewind Sets fast rewind speed 11 Menu Displays menu list 13 Up Moves around menu screen 15 Vol Reduces volume leve...

Page 7: ...ton at a time The working range is approx 7 metres and 30 degrees Do not place any objects in the signal path Bright sunlight or fluorescent lights may decrease the operating sensitivity Battery Disposal Do not break open or throw on a fire exhausted batteries If batteries leak remove immediately clean out any residue with warm soapy water do NOT allow water to enter the main body of the Remote Co...

Page 8: ... Rear view 1 RF In RF Loop through PVR and Tuner PVR TV RF In socket connects to your external aerial The PVR TV RF Loop through socket will allow connection to another tuner or your TV See connections diagram for details 2 VCR SCART Allows connection from a DVD or other video system 3 TV SCART Connects to your TV 4 Coaxial Allows connection of Hi Quality PCM audio to a suitable external Hi Fi sys...

Page 9: ...8 Connecting to a TV and Video RF Loop Through Lead supplied SCART LEAD 1 x Lead supplied RF Tuner lead Not supplied DVD or VCR ...

Page 10: ...9 Connecting to a Television Composite Video Yellow Video Input White Red or S Video Video S Video Audio Input R L ...

Page 11: ...10 Connecting to a Surround Sound system ...

Page 12: ... or RIGHT cursor button to select the screen size of the TV 16 9 or 4 3 Press OK to continue installation Fig 2 menu will be displayed Use the cursor buttons to select CONFIRM and press OK Press the cursor buttons to select the screen size of the TV 16 9 or 4 3 Press OK to continue installation Fig 2 menu will be displayed Use the cursor buttons to select CONFIRM and press OK A Scan Progress displ...

Page 13: ...ssed no channels will be stored Fig 6 Fig 4 Fig 5 Manual channel search Press the MENU button to display the Main menu Fig 4 Press the cursor buttons to select Channel Search Press OK to enter the sub menu Fig 5 Highlight Search Type and use the buttons to select Manual Scan Fig 6 Press the button to select Channel Number and enter the required channel number using the Numeric buttons Press OK to ...

Page 14: ... System Setting A V Setting This menu allows the user to set the TV aspect ratio Screen shape Video output and OSD transparency To select A V Setting use buttons Press OK to enter the sub menu Fig 8 Fig 8 Fig 7 TV Shape options 4 3 16 9 Video Output RGB CVBS OSD Transparency 0 100 Press the buttons to select the required item and press the buttons to select the required setting Press the MENU butt...

Page 15: ...NFO and press OK The sub menu Fig 10 will be displayed Press EXIT to return to normal viewing or MENU to go one step backwards Change Pin Code This menu allows the user to change the Pin Code of the PVR Use the buttons select CHANGE PIN CODE and press OK The sub menu Fig 11 will be displayed Using the numeric buttons enter the Old Pin code Factory default number 6666 Use the buttons to select New ...

Page 16: ...he HDD is full erase the existing recordings as to their type the choices are Oldest Shortest Biggest Select Excluded to remove un viewed recordings otherwise chose Included OSD Setting You may set the OSD time On You can set 5 10 15 and 20 seconds After the set time the OSD will turn Off Timers Follow the steps below to activate the Timer menu Press the MENU button to display the Main menu Fig 4 ...

Page 17: ...ed a LOCK symbol will be shown and a request to enter your Pin number Repeat the above to UNLOCK Press EXIT to exit the Channel List 16 Channel List Fig 15 The Channel List shows a list of all the channels found during the channel search From the list you can watch or listen TV Radio to the selected channel You may also delete unwanted channels or set a password to view them Press the MENU button ...

Page 18: ...ns to highlight the required channel and press OK to enter that channel into the list Press EXIT to quit 17 Fig 17 Removing Channels from the Favourite List Press the MENU button to enter the Main Menu Use the buttons to highlight FAVOURITE LIST Press the OK button to enter the Favourite List menu Fig 17 Press the RED button to select the desired Favourite List Use the buttons to highlight the req...

Page 19: ...e RECORD button To un select the Record mode press the RECORD button again To set the Content Filter press the BLUE button Press the EXIT button or the EPG button to quit Time Line EPG Fig 20 Timeline EPG is another mode that is convenient for the user to view the EPG There is a Timeline displayed to mark the current time This makes it easier to see information about several services at the same t...

Page 20: ...gramme in the window on the right side Press EXIT to quit the EPG and view the programme full screen Selection by on screen Channel list Fig 21 Press the MENU button on the remote control Use the buttons to select CHANNEL LIST and press OK Use the buttons to move up and down the list Press OK to select the required channel Press EXIT to quit and view the selected channel 19 Fig 21 Recall You may s...

Page 21: ...C Sport If a station is carrying MHEG5 data you will be informed to press the RED button to select that option After MHEG5 has started there will be some operational hints on the TV screen to enhance its operation Subtitles Press the SUBTITLE button to switch the Subtitles feature On and Off Displaying Programme Information You can see the current status and information by pressing the INFO button...

Page 22: ... programmes may be set at any one time to record Changing the viewed channel while recording You may use the P P to change the watched channel whilst recording another You cannot change the Recorded channel once it has started You must stop the recording to change channels The RECORD button Pressing the RECORD button once will start a recording using the PVR tuner you can use the P P buttons to ch...

Page 23: ...imit of Time Shift in the DTR Setting Time Shift Duration Menu The REC List Button Fig 25 Press this button to see the list of recordings stored on the HDD To replay any item on the list use the buttons to select the item and then press OK You may playback from the start of the recording or where you left it last time You may Delete recordings or LOCK recordings unsuitable for others to view In th...

Page 24: ...te and replace the mounting screws Before connecting the leads ensure the HDD is configured correctly Check the jumper connection is set to MASTER Fig 27 Re connect the ribbon lead and power plug and carefully re insert the HDD into the PVR Replace the screws and you are ready to reconnect the PVR to its other apparatus and mains power Formatting Before you can record to the HDD it must be Formatt...

Page 25: ... suitable Picture breaks up or freezes Cannot receive certain stations Poor aerial signal Check aerial connections and condition of aerial In Fringe area Consult your local dealer or see website www dtg org uk Indoor aerial Indoor aerials are not suitable for digital reception No Audio PVR Muted Press MUTE button on remote control External amplifier if used not connected or turned on Check connect...

Page 26: ...Audio output S Video 1 S Video output V C Remote Control Infra Red Batteries 2 x AAA cells not supplied Pin Code 6666 Factory default Memory Capacity AMTDT3509 250 250 Giga Bytes AMTDT3509 320 320 Giga bytes Physical Dimensions Net weight 2 17 Kg s Size 320 x 265 x 42 mm 25 Technical Specifications Mains plug Replacement IMPORTANT For your safety If the mains plug needs replacing proceed as follow...

Reviews: