


en
gl
is
h
11
2
cdj-mp32
cdj-mp32
cdj-mp32
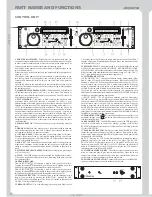
PART NAMES AND FUNCTIONS
1. SHUTTLE/JOG WHEEL
2. LIQUID CRYSTAL DISPLAY (LCD)
3. PITCH SLIDER
4. LOOP IN BUTTON
5. OPEN/CLOSE
6. +10 TRACK SKIP
7. SGL/CTN
8. PITCH PERCENTAGE SELECTOR
9. TIME
10. TRACK BUTTONS
11. LOOP OUT BUTTON
12. RELAY BUTTON
13. PITCH BUTTON -
14. PITCH BEND BUTTONS
15. SEARCH BUTTONS
16. RELOOP BUTTON
17. PLAY/PAUSE BUTTON
18.
19. CONTROL START SOCKET
20. CONTROL CONNECTOR
- Playback-mode: Via the Shuttle-wheel, you
can quickly scan forwards and backwards. Turn the Shuttle-wheel to the right
in order to scan forwards and turn it to the left in order to scan backwards. The
further you turn the Shuttle wheel the higher the scanning-speed.
Pause-mode: In the pause-mode, the current frame is repeated as soon as you
turn the Shuttle-wheel.
Playback-mode: Via the Jog-wheel, you can temporarily adjust the playback-
speed by +/- 16 %.
Pause-mode: In the pause-mode, the current frame is repeated as soon as you
turn the Jog-wheel. Via the Jog-wheel, you can slowly search within a title
forwards and backwards. In this way, you can easily find a Cue-point for
example.
Turn the Jog-wheel to the right in order to search forwards and turn it to the
left in order to search backwards. The faster you turn the Jog -wheel the higher
the searching-speed.
- This high quality LCD Indicates
all the functions (play, pause, cue, etc..,), as they occur. This display is
viewable at several comfortable angles as described on. The LCD icons will
be described in the next section.
- This slider is used to adjust the playback pitch
percentage when the PITCH function is activated. The slider is a set
adjustment and will remain set until the pitch slider is moved or the PITCH
function has been turned off. The maximum pitch range of the slider is +/-
16%. This adjustment can be made with or without a CD in the drive. The
pitch adjustment will remain even if a disc has been removed, and will reflect
on any other disc loaded into the unit. That is to say, if you set a +2% pitch on
one disc, remove that disc and insert another, that disc will also have a +2%
pitch. The amount of pitch being applied will be displayed in the LCD. Use
this slider to match the BPM’s of this unit to that of another music source. By
changing the pitch of one disc with respect to the other in this way, the beats
can be matched.
- This function allows you to set the starting point of a
loop.
(Disc Tray Open/Close) - This button is used to open and
close the disc transport tray door. NOTE: When a disc is loaded, the tray will
not open unless the unit is in pause or cue mode.
- This button allows you to skip ahead by 10 tracks.
Example: if you are at Track #1, pressing this button will skip you to Track
#11, press the button again, it will skip to Track #21. If there are not that many
tracks, it will go back to Track #1.
- This button allows the unit's play mode to change between
Single and Continuous. In single mode the unit will play a single track and
return to cue mode. In continuous mode the unit continues to play track by
track.
- Choose from pitch percentages
of 4%, 8%, and 16%.
- The TIME button is used to changed the displayed time values.
Time can be displayed as elapsed track time, remaining track time, and total
disc remaining time.
TRACK BUTTON
- This button is used to select your desired track.
Tapping this button will forward skip to the next track, holding down this
button will rapidly forward skip through the tracks on your CD.
TRACK BUTTON
- This button is used to select your desired track.
Tapping this button will skip backward to the previous track, holding down
this button will rapidly skip backward through the tracks on your CD.
- This button is used to set the ending point of a
loop. A loop is started by pressing the IN BUTTON , pressing the OUT
BUTTON set the loop ending point. The loop will continue to play until the
OUT BUTTON is pressed once again.
- Use a std. Mini plug (stereo) to plug in Side1 to Side
2. Set both sides of the CD player to single mode on the control. When Disc 1
ends the CD player will automatically change to Disc 2 and when Disc 2 ends
it will return to Disc 1,etc.
This button is used to turn the pitch function on and
off. The pitch functions of the PITCH SLIDER , PITCH BEND BUTTONS
and JOG WHEEL will not function without this function being activated. The
pitch slider and pitch bend buttons have a maximum range of +/-16%. The "+"
and "-" pitch bend buttons have a maximum range of 16%.
(-) PITCH BEND - The (-) pitch bend function creates a momentary “Slow
Down” in the CD’s pitch speed (Beats per minute - BPM) when the PITCH
function is activated. This functions allows the beats between two CD’s or
any other music source to match. This is a momentary function. When the
button is depressed the pitch speed will automatically return to PITCH
SLIDER'S selected pitch. Holding down this button will give a maximum of -
16% pitch. Be sure to remember that this function is a momentary pitch
adjustment, for a more precise adjustment use the PITCH SLIDER'S to match
the BPM’s with another playing music source.
(+) PITCH BEND - The (+) pitch bend function creates a momentary
“BUMP” in the CD’s pitch speed (Beats per minute - BPM) when the PITCH
function is activated. This functions allows the beats between two CD’s or
any other music source to match. This is a momentary function. When the
button is depressed the pitch speed will automatically return to PITCH
SLIDER'S selected pitch. Holding down this button will give a maximum of
+16% pitch. Be sure to remember that this function is a momentary pitch
adjustment, for a more precise adjustment use the PITCH SLIDER'S to match
the BPM’s with another playing music source.
-
This search button allows you to quickly scan
backwards through a track.
This search button allows you to quickly scan
forwards through a track.
- If a LOOP has been made, but the CD Player is not
actively in LOOP mode (a loop is not playing), pressing the RELOOP
BUTTON will instantly reactivate the LOOP mode. To exit the loop, press the
LOOP OUT BUTTON.
- Each press of the PLAY/PAUSE BUTTON
causes the operation to change from play to pause or from pause to play.
While in play mode the green play LED will glow, and while in pause mode
the green play LED will flash.
CUE - Pressing the CUE button during playback immediately pauses
playback and returns the track to the last set cue point. The red CUE
BUTTON LED will glow when the unit is in cue mode The LED will also
flash every time a new CUE POINT is set. The CUE button can also be held
down to momentarily play the CD. When you release the CUE button it
instantly returns to the last set CUE POINT.
- These sockets are to connect to a mixer
using a 3.5mm jack plug to give remote start capability. When the switch
contacts are shorted the respective unit will play, and similarly when the
switch contacts are open the player will be in pause mode.
- Connect this connector to the REMOTE
connector on the main unit using the included control cord.
CONTROL UNIT
en
gl
is
h
MEASURES DRAW/ DIBUJO MEDIDAS


