


1-2
10
Connections
Tips
Depending on your TV and other equipment you wish
to connect, there are various ways you could connect
the player. Use only one of the connections
described below.
Please refer to the manuals of your TV, VCR, Stereo
System or other devices as necessary to make the
best connections.
For better sound reproduction, connect the player’s
AUDIO OUT jacks to the audio in jacks of your
amplifier, receiver, stereo or audio/video equipment.
See “Connecting to Optional Equipment” on page 11.
– Make sure the DVD Player is connected directly to the
TV. Tune the TV to the correct video input channel.
– Do not connect the DVD Player’s AUDIO OUT jack to
the phono in jack (record deck) of your audio system.
– Do not connect your DVD Player via your VCR. The
DVD image could be distorted by the copy protection
system.
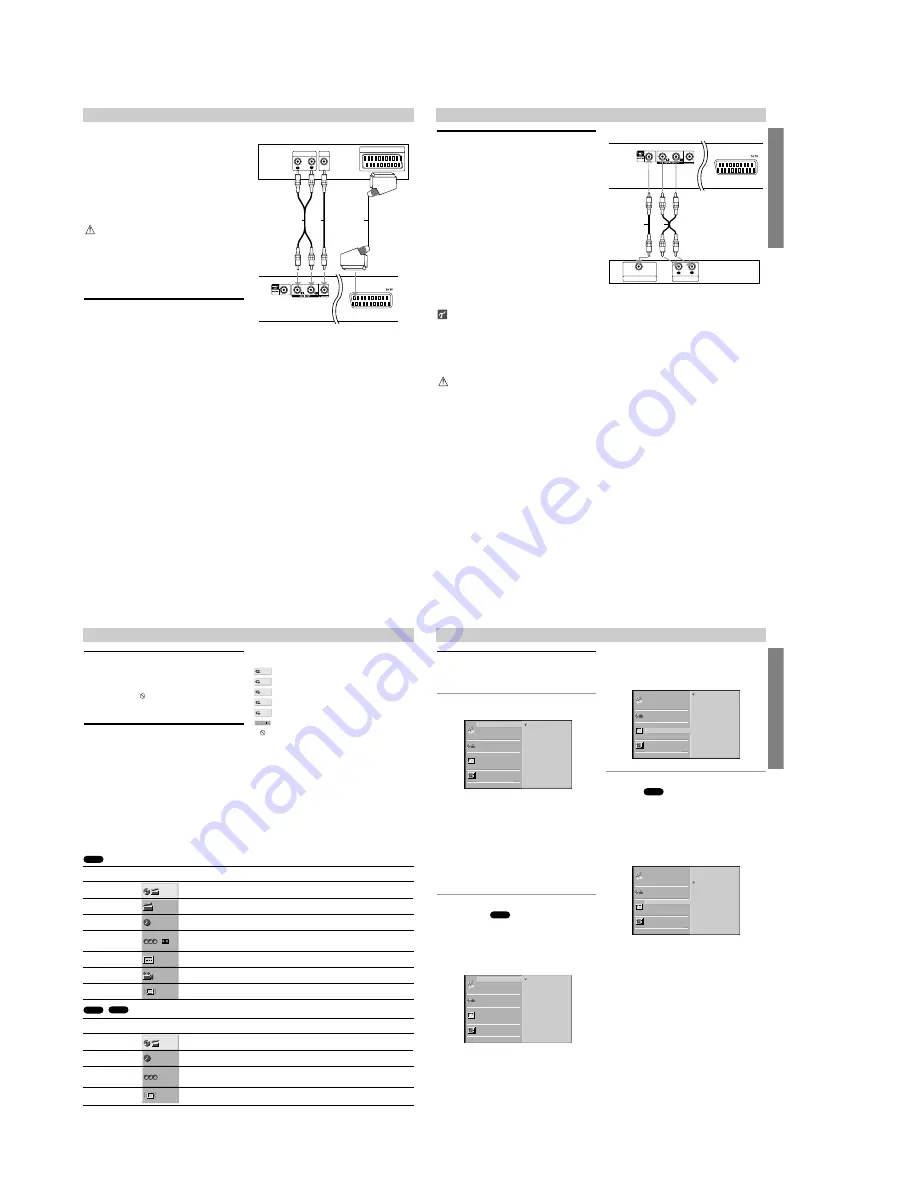
Connecting to a TV
Make one of the following connections, depending on
the capabilities of your existing equipment.
Video connection
1
Connect the VIDEO OUT jack on the DVD Player to
the video in jack on the TV using the video cable (V).
2
Connect the Left and Right AUDIO OUT jacks of
the DVD Player to the audio left/right in jacks on the
TV (A) using the audio cables.
SCART connection
Connect the TO TV scart jack on the DVD Player to the
corresponding in jacks on the TV using the scart cable
(T).
R
L
AUDIO INPUT
VIDEO
INPUT
SCART INPUT
Rear of TV
Rear of DVD player
A
V
T
PREP
ARA
TION
11
Connections (Continued)
Connecting to Optional Equipment
Connecting to an amplifier equipped with two
channel analog stereo or Dolby Pro Logic ll/
Pro Logic
Connect the Left and Right AUDIO OUT jacks on the
DVD Player to the audio left and right in jacks on your
amplifier, receiver, or stereo system, using the audio
cables (A).
Connecting to an amplifier equipped with two
channel digital stereo (PCM) or to an Audio/
Video receiver equipped with a multi-channel
decoder (Dolby Digital™, MPEG 2, or DTS)
1
Connect one of the DVD Player’s DIGITAL AUDIO
OUT jacks (COAXIAL X) to the corresponding in
jack on your amplifier. Use an optional digital
(coaxial X) audio cable.
2
You will need to activate the player’s digital output.
(See “Digital Audio Output” on page 14).
Digital Multi-channel sound
A digital multi-channel connection provides the best
sound quality. For this you need a multi-channel
Audio/Video receiver that supports one or more of the
audio formats supported by your DVD Player (MPEG 2,
Dolby Digital and DTS). Check the receiver manual and
the logos on the front of the receiver.
Due to the DTS Licensing agreement, the digital output
will be in DTS digital out when DTS audio stream is
selected.
Notes
– If the audio format of the digital output does not match
the capabilities of your receiver, the receiver will
produce a strong, distorted sound or no sound at all.
– Six Channel Digital Surround Sound via digital con-
nection can only be obtained if your receiver is
equipped with a Digital Multi-channel decoder.
– To see the audio format of the current DVD in the on-
screen display, press AUDIO.
R
L
AUDIO INPUT
DIGITAL INPUT
COAXIAL
Amplifier (Receiver)
Rear of DVD player
A
X
Before Operation
General Explanation
This manual gives basic instructions for operating the
DVD Player. Some DVDs require specific operation or
allow only limited operation during playback. When this
occurs, the symbol
appears on the TV screen, indi-
cating that the operation is not permitted by the DVD
Player or is not available on the disc.
On-Screen Display
General playback status can be displayed on the TV
screen. Some items can be changed on the menu.
On-screen display operation
1
Press DISPLAY during playback.
2
Press
V
/
v
to select an item.
The selected item will be highlighted.
3
Press
B
/
b
to change the setting of an item.
The number buttons can be also be used for setting
numbers (e.g., title number). For some functions,
press ENTER to execute the setting.
Temporary Feedback Field Icons
Repeat Title
Repeat Chapter
Repeat Track (non-PBC Video CDs only)
Repeat All Tracks (non-PBC Video CDs only)
Repeat Off
Resume play from this point
Action prohibited or not available
Notes
Some discs may not provide all of the features on the
on-screen display example shown below.
If no button is pressed for 10 seconds, the on-screen
display disappears.
RESUME
OFF
ALL
TRACK
CHAPT
TITLE
12
Items
Title Number
Chapter Number
Time search
Audio language
and Digital Audio
Output mode
Subtitle language
Angle
Sound
Function
(Press
V
/
v
to select desired item)
Shows the current title number and total number of
titles, and skips to the desired title number.
Shows the current chapter number and total number of
chapters, and skips to the desired chapter number.
Shows the elapsed playing time, and
searches the point by the elapsed time directly.
Shows the current audio soundtrack language,
encoding method, and channel number, and
changes the setting.
Shows the current subtitles language, and
changes the setting.
Shows the current angle number and total number of
angles, and changes the angle number.
Shows the current sound mode, and
changes the setting.
Selection Method
B
/
b
, or
Numbers, ENTER
B
/
b
, or
Numbers, ENTER
Numbers, ENTER
B
/
b
, or
AUDIO
B
/
b
, or
SUBTITLE
B
/
b
, or
ANGLE
B
/
b
, or
SUR
1 /3
1 /12
0:20:09
1 ENG
D
5.1 CH
OFF
1 /1
NORM.
Items
Track Number
Time
Audio Channel
Sound
Function
(Press
V
/
v
to select desired item)
Shows the current track number, total number of tracks
and PBC On mode, and skip to the desired track number.
Shows the elapsed playing time (Display only)
Shows the audio channel, and
changes the audio channel.
Shows the current sound mode, and
changes the setting.
Selection Method
B
/
b
, or
Numbers, ENTER
–
B
/
b
, or
AUDIO
B
/
b
, or
SUR
1 /3
0:20:09
NORM.
STER.
VCD2.0
VCD1.1
DVD
PREP
ARA
TION
13
Before Operation (Continued)
Initial Settings
You can set your own Personal Preferences on the
player.
Initial Settings General Operation
1
Press SET UP.
The setup menu appears.
2
Press
V
/
v
to select the desired item.
The screen will show the current setting for the
selected item, as well as alternate setting(s).
3
While the desired item is selected, press
b
, then
V
/
v
to select the desired setting.
4
Press ENTER to confirm your selection.
Some items require additional steps.
5
Press SET UP, RETURN, or
H
(PLAY) to exit the
setup menu.
Language
Disc Language
Select a language for the disc’s Menu, Audio, and
Subtitle.
Original : The original language set for the disc is selected.
Other : To select another language, press number buttons to
enter the corresponding 4-digit number according to the lan-
guage code list on page 25. If you enter the wrong language
code, press CLEAR.
Menu Language
Select a language for the setup menu. This is the menu
you see when you press SET UP.
Picture
TV Aspect
4:3 Letterbox: Select when a standard 4:3 TV is con-
nected. Displays theatrical images with masking bars
above and below the picture.
4:3 Panscan: Select when a conventional TV set is
connected. The video material formatted in the Pan &
Scan style is played back in that style (Both sides of the
picture are cut off).
16:9 Wide: Select when a 16:9 wide TV is connected.
DVD
DVD
English
Italian
Portuguese
Spanish
French
German
Disc Subtitle
Disc Menu
Rating
Area Code
TV Aspect
Menu Language
Progressive Scan
Digital Audio Output
5.1 Speaker Setup
Others
Disc Audio
4:3
4:3
16:9
Letterbox
Panscan
Wide
Disc Subtitle
Disc Menu
Rating
Area Code
TV Aspect
Menu Language
Progressive Scan
Digital Audio Output
5.1 Speaker Setup
Others
Disc Audio
Original
German
Chinese
Italian
Hungarian
Other — — — —
Polish
English
French
Spanish
Disc Subtitle
Disc Menu
Rating
Area Code
TV Aspect
Menu Language
Progressive Scan
Digital Audio Output
5.1 Speaker Setup
Others
Disc Audio
Original
German
Chinese
Italian
Hungarian
Other — — — —
Polish
English
French
Spanish
Disc Subtitle
Disc Menu
Rating
Area Code
TV Aspect
Menu Language
Progressive Scan
Digital Audio Output
5.1 Speaker Setup
Others
Disc Audio
Summary of Contents for RM-Z401P
Page 4: ...4 MEMO...
Page 12: ...3 4E XD AX36 MEMO...
Page 14: ...XD AX36 4 3 4 4 SCHEMATIC DIAGRAM 2 5 SR14601A 4 2 SCHEMATIC DIAGRAM 2 5...
Page 16: ...XD AX36 4 7 4 8 MAIN 4 4 MAIN PRINTED WIRING BOARD COMPONENT SIDE...
Page 17: ...XD AX36 4 10 4 9 MAIN 4 5 MAIN PRINTED WIRING BOARD CONDUCTOR SIDE...
Page 18: ...XD AX36 4 11 4 12 8 4 6 SCHEMATIC DIAGRAM 4 5 SCHEMATIC DIAGRAM 4 5...
Page 21: ...XD AX36 4 17 4 18 POWER 4 9 POWER PRINTED WIRING BOARD...
Page 30: ...MEMO 5 6E...


