background image

39

38

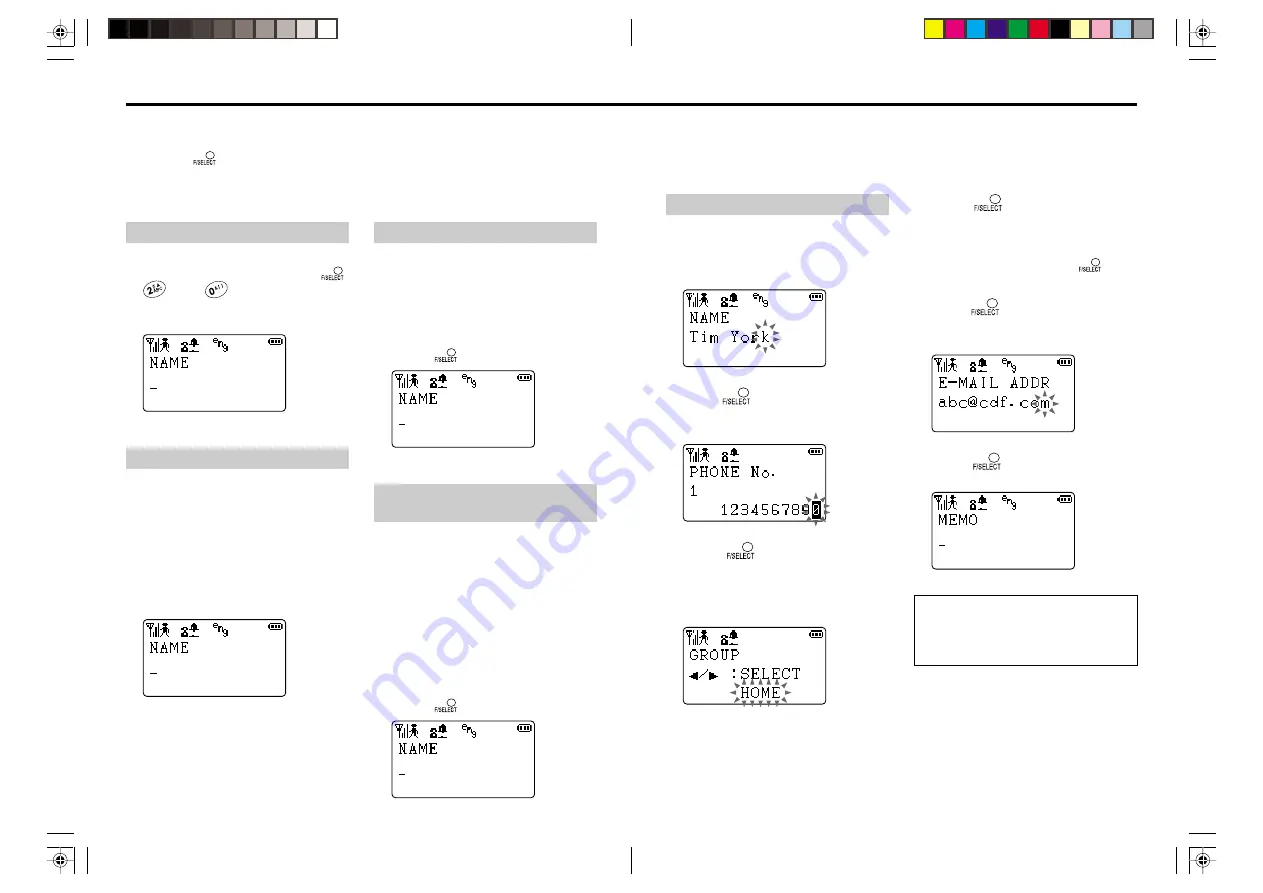
To register in the Phone Book:

1

Key in the name.

See page 32 for how to enter text.
You can enter up to 10 characters.

2

Press 

, and key in the phone

number.

You can enter up to 32 digits.

3

Press 

, and turn the Easy

Shuttle to select a group.

You can select “NONE”, “PCT”, “PDC/
GSM”, “HOME”, “OFFICE”, “FAX”, or
“PAGER”.

4

Press 

, and repeat steps 2

and 3.

You can register up to 3 phone numbers
with the same name.
You can skip this by pressing 

 before

entering the phone number.

5

Press 

, and key in the E-mail

address.

You can enter up to 80 alphabets.

6

Press 

, and key in a memo.

You can enter up to 20 characters.

Hint:
If the voice label is enabled, the display
prompts you to add voice label after step
6. See page 46.

Each of 300 entries can include name, phone number, group, E-mail address, memo, ringer
style, voice label, and Black/White list entry.
If you record a voice label, you have to enable the function first. (For details, see “Using the
voice label” on page 46).

You can register up to 300 names and/or phone numbers in the Phone Book.
You can start registration in 4 ways:
1. Using the 

 button

2. Entering a phone number
3. Displaying a redial number
4. Displaying P-mail DX call history data

To start by the F/SELECT button

In standby mode, press 

,

, and 

 successively.

Your PT-H99 prompts you to enter the
name.

To start by a phone number:

1

In standby mode, key in a phone
number.

You must enter the full number (area
code, local code, and phone number).

2

Turn the Easy Shuttle once.

Your PT-H99 prompts you to enter the
name.

To start by a redial number:

1

In standby mode, turn the Easy
Shuttle upward to display the
redial number you want to
register.

2

Press 

 twice successively.

To start by P-mail DX call history
data:

1

In standby mode, display the P-
mail DX call history data.

See page 112 for how to display the P-
mail DX call history data.

2

Display the number you want to
register.

See page 120. The number can be “To”
or “From”.

3

Press 

 twice.

Registering in the Phone Book

*PT-H99(AH)_03E

01.10.11, 9:13 PM

38-39

Summary of Contents for PT-H99

Page 1: ...oosing Aiwa PT H99 This operating manual contains the information you need to get the most of your new telephone Please read it carefully and save it for future reference 8Z PD3 905 01 000908ATN OX Operating Manual PT H99 AH _00E cover 01 10 11 9 08 PM 2 3 ...

Page 2: ...reset message 97 Setting automatic display 101 Setting the Continue mode 103 Sending an S mail in incoming outgoing message history 104 Deleting the S mail 105 Chapter 8 Using PT H99 as a cordless phone and transceiver Before using PT H99 as a cordless phone 126 Setting a mode for cordless phone 128 Using PT H99 as a cordless phone 129 Using PT H99 as a transceiver 130 Safety Information 4 Introdu...

Page 3: ...everity of problem that could occur through failure to follow the operating instructions DANGER Failure to head these warnings is likely to result in death or serious injury WARNING Failure to head these warnings could result in death or serious injury CAUTION Failure to head those warnings could result in injury or damage to property b Do not open the case Opening the case may result in electric ...

Page 4: ...modify the battery Safety Information Use the AC adaptor correctly To avoid fire or electric shock always use the AC adaptor according to the following guidelines DonotusetheACadaptorwithanydevice other than the phone for which it was designed Do not cover or wrap the AC adaptor with cloth or bedding When unplugging the AC adaptor do not pull on the cord grasp the plug and the AC adaptor instead D...

Page 5: ...sy Shuttle located on the side of the phone to display a desired item then press the F SELECT button to activate it Almost all operations except for text entry can be performed easily with one hand Digital Clear crisp sound secure transmissions Your Aiwa PCT uses digital transmissions that are perfectly suited to multimedia The digital transmission method provides high sound quality and at the sam...

Page 6: ......

Page 7: ...he previous or communication display during communication 5 Allow you to turn on off the power by pressing and holding for one second and longer end a call and cancel an operation to return to the previous or standby display 6 Hold a call and clear input 7 Pick up your voice 8 Before using your phone pull it up 9 Flash when a call comes in and lights up when the battery is on charge 0 Guide you wh...

Page 8: ...et to off this item appears instead of ringing one Vibration 4 Text input mode During text input mode either of following icons appears Thai English Accessory keyboard is in effect Thai Caps locked English Caps locked Characters entered on the accessory keyboard are ready to be sent to your PCT When you select an input type where every pressing a key on the keyboard enters a corresponding characte...

Page 9: ...leave the phone in the charger after it is fully charged Note Insert the phone into the charger so that the front of the phone is facing the front ofthecharger Thebatterywillnotcharge if the phone is inserted backwards Warning It is normal for the AC adaptor to get warm when in use If it becomes extremely hot unplug it from the outlet Locating the charger Place the charger on a flat stable surface...

Page 10: ...you use your PCT for the first time You can also set the time signal so that your PT H99 beeps every hour However PT H99 does not beep when it is powered off or when you are dialing talking or doing a setting operation To set date and time 1 In standby mode press and successively 2 Key in the date and time with the numeric buttons blinks to prompt your input You can also use the Easy Shuttle to mo...

Page 11: ...tandby mode or communication press and successively 2 Press duringstandbymodeor press during communication The normal display returns To display help 1 In standby mode press and successively 2 TurntheEasyShuttletodisplay the information you need 3 Press toreturntothenormal display Hint When the message is too long and does not fit within display area press Xor C to scroll it PT H99 AH _01E 01 10 1...

Page 12: ...aking a call 22 Answering a call 24 Adjusting the volume 25 Holding the call 26 Locking the keys 26 Redialing a previous phone number 27 Setting to vibration mode 28 Selecting the ringer style 29 PT H99 AH _02E 01 10 11 9 13 PM 21 ...

Page 13: ...23 22 ...

Page 14: ...ew seconds You can adjust both the ringer volume and the receiver volume Answering a call 1 Press and hold for one second or longer to power on and enter the standby mode The following display appears For the display in the standby mode see page 14 Topreventfromaccidentalkeyoperation you can lock the keys See page 26 2 When your phone rings press You can talk with the calling party You can also pr...

Page 15: ... you made and answered You can search these phone numbers and dial them If the searched phone number is registered in the phone book the name is displayed 1 In standby mode turn the Easy Shuttle upward once The phone number you dialed last or the phone number of the call you answered last is displayed ...

Page 16: ...ringer style for the private calls to pattern 05 1 In standby mode press and successively The ringer style setting display for the public call with number notification is displayed 2 Turn the Easy Shuttle for the call category you want to set Turn the Easy Shuttle downword twice inthisexample andthefollowingdisplay will appear 3 Press to enter the setting mode 4 Turn the Easy Shuttle to select the...

Page 17: ...ring text 32 Using the accessory keyboard 35 Registering in the Phone Book 38 Searching a phone number 41 Editing and deleting Phone Book data 43 Enabling the Black List White List 45 Using the voice label 46 PT H99 AH _03E 01 10 11 9 13 PM 31 ...

Page 18: ...PT H99 supports Thai and English languages and you can switch to either language Entering text Text input is made by pressing a numeric key pressing the key a number of times to get the target character and repeating these actions Every time you press a numeric key the character changes as follows In Thai input mode ...

Page 19: ...y you need to move the input cursor to the next column 6 Press 8 times 7 Press 8 times Hint If you pressed a wrong key press INT CLR HOLD to delete the character Pressing and holding INT CLR HOLD for one second or longer to delete all the characters when they are definded Example to input Terry on the Phone Book To insert the batteries Before using the accessory keyboard insert two R03 size AAA ba...

Page 20: ...aps lock between on and off While the caps lock is on the language icon displayed looks as follows or Keys on keyboad or or To enable the keyboard 1 In standby mode press and hold for one second or longer to show icon V 2 Press and hold on the keyboard for one second or longer You can enter characters with the keyboad To disable the keyboard 1 In standby mode press and hold for one second or longe...

Page 21: ...st For details see Using the voice label on page 46 You can register up to 300 names and or phone numbers in the Phone Book You can start registration in 4 ways 1 Using the button 2 Entering a phone number 3 Displaying a redial number 4 Displaying P mail DX call history data To start by the F SELECT button In standby mode press and successively Your PT H99 prompts you to enter the name To start by...

Page 22: ...roup number so the target group blinks 3 Press The first data belonging to the selected group is displayed 7 Press and turn the Easy Shuttle to select a ringer style among the 15 patterns Each time you turn it the selected ringer style will sound While registering you can go back to previous step with pressing You can also use to go back to the previous step in steps 7 through 9 8 Press or and tur...

Page 23: ...y Shuttle downward once The first entry in the Phone Book is displayed like the following 2 Turn the Easy Shuttle upward or downward until you get the target data If you have more than one entries for a name each of which has a different phone number registered deleting one oftheseentriescausestoalltheentryfor the name to be deleted If you want to keep any of them use the edit mode 3 Press and tur...

Page 24: ...Phone Book Thereby BLACK LIST Calls from the registered phone numbers are rejected WHITE LIST Only calls from the registered phone numbers are answered The other calls are refused To enable the Black List 1 In standby mode press and successively 2 Turn the Easy Shuttle to select BLACKLIST or WHITELIST This example enables the Black List ...

Page 25: ...is first enable the voice label function then register a phone number in the Phone Book To enable the voice label 1 In standby mode press and successively 2 Turn the Easy Shuttle to select On 3 Press The normal display returns after a few seconds Hints To cancel the voice label select Off in step 2 You can also use the numeric button in step 2 1 On 2 Off You do not need to press F SELECT in step 3...

Page 26: ...ce messages and Auto answer Recording voice memo or communication 50 Enabling the auto answer function 52 Recording an original answer message 54 Setting time to start auto answer message 56 PT H99 AH _04E 01 10 11 9 14 PM 49 ...

Page 27: ...r turn the Easy Shuttle to select NOT DELETE andpress toleave The normal display returns after a few seconds If the other recording remains the display on step 1 returns Recording voice memo or communication When you perform the following steps you can record your voice memo or communication The operation is the same communication is recorded when you do this while you are talking with the other p...

Page 28: ... Enabling the auto answer function When you are at the wrong time you can enable this function so that the answer message is played and record the calling party s message You can also record your own answer message instead of the fixed answer message See page 54 and set the time to play the answer message after an incoming call arriving See page 56 To enable the auto answer function 1 In standby m...

Page 29: ...u can record your own message to answer calls To record original answer message 1 In standby mode press and successively 2 Press and record an answer message within 10 seconds 3 Press or toendrecording Recorded message is played back automatically 4 Press twice to return to the normal display Hints In step 3 you can stop playback with pressing F SELECT If you want to record the message again repea...

Page 30: ...larrivesandPT H99startsringing to when the auto answer message starts to play You can change this time period 1 In standby mode press and successively 2 Key in the time 000 099 seconds you want to set and press The normal display returns after a few seconds PT H99 AH _04E 01 10 11 9 14 PM 56 ...

Page 31: ...ing standby 69 Turning on off the display illumination 70 Making an original melody as the ringer 71 Changing the display to show image and clock 74 One touch dialing 78 Turning on the subaddress dialing 79 Using location report function 80 Using PT H99 for data communication 84 Displaying storing restoring current settings 86 Resetting a function to the factory setting 90 PT H99 AH _05E 01 01 10 ...

Page 32: ...eed to press F SELECT in step 3 The alarm sounds and or vibrates according to the time See page 58 the volume level See page 25 the ringer style See page 29 you set for one minute However PT H99 doesn t alarm you when it is powered off or when you are dialing talking or doing a setting operation Using the alarm To set the everyday alarm 1 Set the clock correctly See page 19 2 In standby mode press...

Page 33: ... time is set for the scheduler and the alarm the setting for the scheduler has priority over the setting for the alarm Instep1 youcanalsousethe1button You do not need to press F SELECTin step 2 In step 5 you can also use the numeric button 1 ALARM ON 3 ALARM OFF You do not need to press F SELECTin step 6 To confirm change a schedule 1 In standby mode or during communication press and successively ...

Page 34: ...Shuttle to select DELETE 5 Press and turn the Easy Shuttle to select DELETE 6 Press to delete the schedule The normal display returns after a few seconds Hints Instep2 youcanalsousethe3button You do not need to press F SELECTin step 3 Instep4 youcanalsousethe3button You do not need to press F SELECTin step 5 In steps 5 and 6 you can also use the numeric button 1 DELETE 3 CANCEL Using the scheduler...

Page 35: ...our PT H99 To set the security lock 1 In standby mode press and successively 2 Key in your security code The security code is a 4 digit number and should be the one you easily remember 3 Press after you key in the new security code 4 Turn the Easy Shuttle to select a security function MAKE A CALL PHONE BOOK or ALL OPERATION In this example the security lock is set for the PHONE BOOK 5 Prees and tu...

Page 36: ...ock 1 In standby mode press and successively 2 Turn the Easy Shuttle to select the security locked function to reset In this example the security lock is reset for the PHONE BOOK 3 Press and turn the Easy Shuttle to select UNLOCK To change a security code 1 In standby mode press and successively 2 Turn the Easy Shuttle to select PIN EDIT 3 Press to enter the security code mode 4 Key in your curren...

Page 37: ... seconds Hint In step 2 you can also use the numeric button 1 On 3 Off You do not need to press F SELECT in step 3 You can turn on or off the operate tone When you turn it off no sound will be made even when you touch a button make an error and end an operation To turn on the operate tone 1 In standby mode or during communication press and successively 2 Turn the Easy Shuttle to select On 3 Press ...

Page 38: ...tion 1 In standby mode or during communication press and successively The current setting blinks 2 Turn the Easy Shuttle to select an illumination setting In this example the display illumination is set to Auto 3 Press The normal display returns after a few seconds Hints In step 2 you can also use the numeric button 1 On 2 Auto 3 Off You do not need to press F SELECTin step 3 Even if the Backlight...

Page 39: ... make up to 5 original melodies on melody numbers 11 to 15 specifying notes and tempo for each To make an original melody 1 In standby mode press and successively 2 Turn the Easy Shuttle to select a melody number 3 Press and turn the Easy Shuttle to select EDIT 4 Press and use or to set the tempo Faster Slower ...

Page 40: ...Press to return to the normal display Hints Pressing INT CLR HOLD deletes the current note and pressing and holding it deletes all the notes you entered On the editing screen you can press to give an audition of melody You can correct your melody after audition To edit your melody follow steps1to3andpressF SELECT then delete the note that you wish to correct by pressing INT CLR HOLD after selectin...

Page 41: ...MP IMAGE When you select TEXT IMAGE and press the display prompts you to inputtext Afterinputtingtext press to enter it 5 Press and turn the Easy Shuttle to select an image Pressing displaystheselectedimage Press again to return to the setting mode 6 Press V No 1 or No 2 or No 3 Hint If you set a bitmap image or text for the standby display it appears after the normal display lasts for 5 seconds w...

Page 42: ...tep 3 Instep4 youcanalsousethe1button You do not need to press F SELECTin step 5 Hints If you set a digital clock for the standby display itappearsafterthenormaldisplay lasts for 5 seconds when you press Whenrecoveringfromdisplayingdigital clock in the standby mode select NORMAL at step 3 Instep2 youcanalsousethe3button You do not need to press F SELECTin step 3 Instep3 youcanalsousethe3button You...

Page 43: ...dialing When you turn on the subaddress dialing you can dial a subaddress together with a phone number In this case the digits after the phone number and asterisk are recognized as a subaddress 1 In standby mode press and successively ...

Page 44: ...d successively 2 Turn the Easy Shuttle to select the location to rename 3 Press and turn the Easy Shuttle to select RENAME 4 Press to enter the edit mode 5 Press to delete a character then enter the name You can move the cursor by turning the Easy Shuttle 6 Press toregisteralocation data ...

Page 45: ... DATA DELETE 5 Press 6 Repeat steps 2 to 5 to delete other data 7 Press toreturntothenormal display Hint In step 3 you can also use the 3 button You do not need to press F SELECT in step 4 V The normal display returns after a few seconds Hint In step 2 you can also use the numeric button 1 On 3 Off You do not need to press F SELECT in step 3 4 Press to connect to the monitored PCT 5 Press to disco...

Page 46: ...ng ThePT H99speakerdoesnotfunction during data communication Do not use the Transceiver mode for data communication If the communication isn t good in the Public and Private mode or Public and Transceiver mode try with the Public mode Using PT H99 for data communication You can connect a personal computer to your PT H99 for digital data communication To do this you need an optional data cable or a...

Page 47: ...me 2 PAGING MODE VIBRATION VIB BELL BELL RINGER TONE Initial settings Initial settings Initial settings BACK LIGHT AUTO ON ON OPERATE TONE OFF ON ON AUTO ANSWER OFF ON OFF SUBADDRESS OFF OFF OFF Displaying storing restoring current settings You can check the current settings of your PT H99 and store those settings so that you can restore to the stored conditions after making changes To check the c...

Page 48: ...ngs 1 In standby mode press and successively 2 Turn the Easy Shuttle to select RENEW STATE 3 Press and turn the Easy Shuttle to select STATE 1 or STATE 2 You cannot select DEFAULT 4 Press 5 Press to store the settings to the selected state The normal display returns after a few seconds Hints In step 2 you can also use the numeric button 2 CONFIRM 3 RENEW STATE You do not need to pressF SELECT in s...

Page 49: ... V S MAIL V P MAIL DX V VOICE DATA V TEXT MEMO V SCHEDULE V LOC DATA V RING SOUND V ALL DATA V FUNC RESET 3 Press 4 Press to reset This example resets the Phone Book The normal display returns after a few seconds Hints Instep4 youcanalsousethe1button NotethatifyouresettheVOICEDATA thevoicelabels voicememo andauto answer message recorded on the memoryaredeletedconsequently The voice label and the a...

Page 50: ...ail 92 Receiving an S mail 95 Returning an S mail to the sender 96 Using preset message 97 Setting automatic display 101 Setting the Continue mode 103 Sending an S mail in incoming outgoing message history 104 Deleting the S mail 105 PT H99 AH _06E 01 10 11 9 16 PM 91 ...

Page 51: ...ail over 20 characters 1 In standby mode press and successively 2 Turn the Easy Shuttle to select SUCCESSION 3 Press and turn the Easy Shuttle to select On 4 Press tosettheSuccession mode The normal display returns after a few seconds 5 Enter text See steps 1 to 4 of To send an S mail on page 92 6 Dialaphonenumber andpress to enter a pause P then key in your PCT number code 7 Press PT H99 beeps ea...

Page 52: ... the Easy Shuttle to display a received mail 5 Press at least one second to return to the normal display Hint In step 2 you can also use the 2 button You do not need to press F SELECT in step 3 Sending an S mail To check the outgoing message history 1 In standby mode press and successively 2 Turn the Easy Shuttle to select CONFIRM MAIL 3 Press and turn the Easy Shuttle to select SENT MAIL 4 Press ...

Page 53: ...e phrases To insert a fixed message while entering a mail 1 While entering an S mail press andturntheEasyShuttleto select FIXED MSG 2 Press and turn the Easy Shuttle to select the fixed message you want to use 3 Press to insert a message into an S mail 4 Continue entering S mail See page 92 to send an S mail Hint In step 2 if you know the message number to select you can also button in the number ...

Page 54: ...eed to press F SELECTin step 3 In step 3 if you know the message numbertoregister youcanalsobutton in the number instead of using the Easy Shuttle Using preset message To delete a preset message 1 In standby mode press and successively 2 Turn the Easy Shuttle to select FIXED MSG 3 Press and turn the Easy Shuttle to select a number to delete 4 Press and turn the Easy Shuttle to select DELETE 5 Pres...

Page 55: ...set the function The normal display returns after a few seconds Hint In step 2 you can also use the 5 button You do not need to press F SELECT in step 3 When an incoming S mail arrives Thefollowingdisplayappearsandtheringer sounds twice Press and hold for one second to return to the normal display 6 Press The normal display returns after a few seconds Hint In step 2 you can also use the 3 button Y...

Page 56: ...Hint In step 2 you can also use the 5 button You do not need to press F SELECT in step 3 Setting automatic display Setting the Continue mode When you set the Continue mode the line is not disconnected after an S mail is sent and you can talk with the other party However the number of characters sent as one S mail is 18 in this mode To set the Continue mode 1 In standby mode press and successively ...

Page 57: ...displayed S mail as it is or after changing the contents and or phone number Each incoming outgoing history holds 100 messages When it is full the newest message is stored with the oldest one deleted You can delete the S mail in the incoming or outgoing history To delete an S mail 1 In standby mode press and successively 2 Turn the Easy Shuttle to select CONFIRM MAIL 3 Press and turn the Easy Shut...

Page 58: ...select DEL ALL SENT or DEL ALL RCV DEL ALL SENT Deleting the outgoing message s DEL ALL RCV Deleting the incoming message s or 3 Press 4 Press or The normal display returns after a few seconds Hint In step 2 you can also use the numeric button 6 DEL ALL SENT 7 DEL ALL RCV You do not need to press F SELECT in step 3 PT H99 AH _06E 01 10 11 9 16 PM 106 ...

Page 59: ... REFUSE 4 Press and turn the Easy Shuttle to select On 5 Press to set the function The normal display returns after a few seconds Hints In step 2 you can also use the 4 button You do not need to press F SELECT in step 3 In step 3 you can also use the 4 button You do not need to press F SELECT in step 4 In step 4 you can also use the numeric button 1 On 3 Off You do not need to press F SELECTin ste...

Page 60: ...as a cordless phone and transceiver Before using PT H99 as a cordless phone 126 Setting a mode for cordless phone 128 Using PT H99 as a cordless phone 129 Using PT H99 as a transceiver 130 PT H99 AH _08E 01 10 11 9 17 PM 125 ...

Page 61: ...ld and 2 Enteracordlessphonenumber and press A cordless phone number should be within 3 digit number Cordless phone number Ifyouenteredanincorrectnumber press to delete it 3 Enter the security code and press The security code is a 4 digit number Security code This security code is different from the one used in security lock Refer to the operating manual of HBU 4 Enter a group number 1 8 and press...

Page 62: ...ng refer to the operating manual of HBU Setting a mode for cordless phone TouseyourPT H99asacordlessphone youhavetochangethemodeto PUB PRIVATE You can use PT H99 as an ordinary PCT and cordless phone To set PUB PRIVATE mode 1 In standby mode press and ...

Page 63: ...o 1 Register your PT H99 in the Home Base Unit HBU See page 126 2 Select the HBU s number because your PT H99 can be registered in 5 HBUs See page 127 3 Set the PT H99 s mode to PUB TRANS or TRANSCEIVER See below PUB TRANS to use PT H99 as an ordinary PCT and transceiver TRANSCEIVER to use PT H99 as a transceiver The following example assumes PCT 1 yours calls PCT 2 receiver To set the transceiver...

Page 64: ...Appendix Troubleshooting 134 PT H99 Specifications 136 PT H99 AH _App 01 10 11 9 18 PM 133 ...

Page 65: ... battery See page 16 Charger terminals are dirty Wipetheterminalswithaclothwetted with a thin solution of mild cleaner then wipe them with a dry cloth AC adaptor is not connected properly Properly connect the AC adaptor Phone is not registered in HBU Register the phone in HBU See page 126 You pressed an incorrect number of HBU Power won t turn on Phone does not ring You entered a phone number but ...

Page 66: ...frequency 1 900 MHz band Transmission power 10 mW average Power source 3 8 V DC proprietary lithium ion battery pack Continuous talk time Approx 5 hours Continuous standby time Approx 500 hours Dimension 42 106 18 5 mm width height depth Weight 76 g including battery pack Accessories Charger Rechargeable battery pack AC adaptor Keyboard Batteries R03 size AAA 2 Design and specifications are subjec...

Reviews: