background image


- 27 -


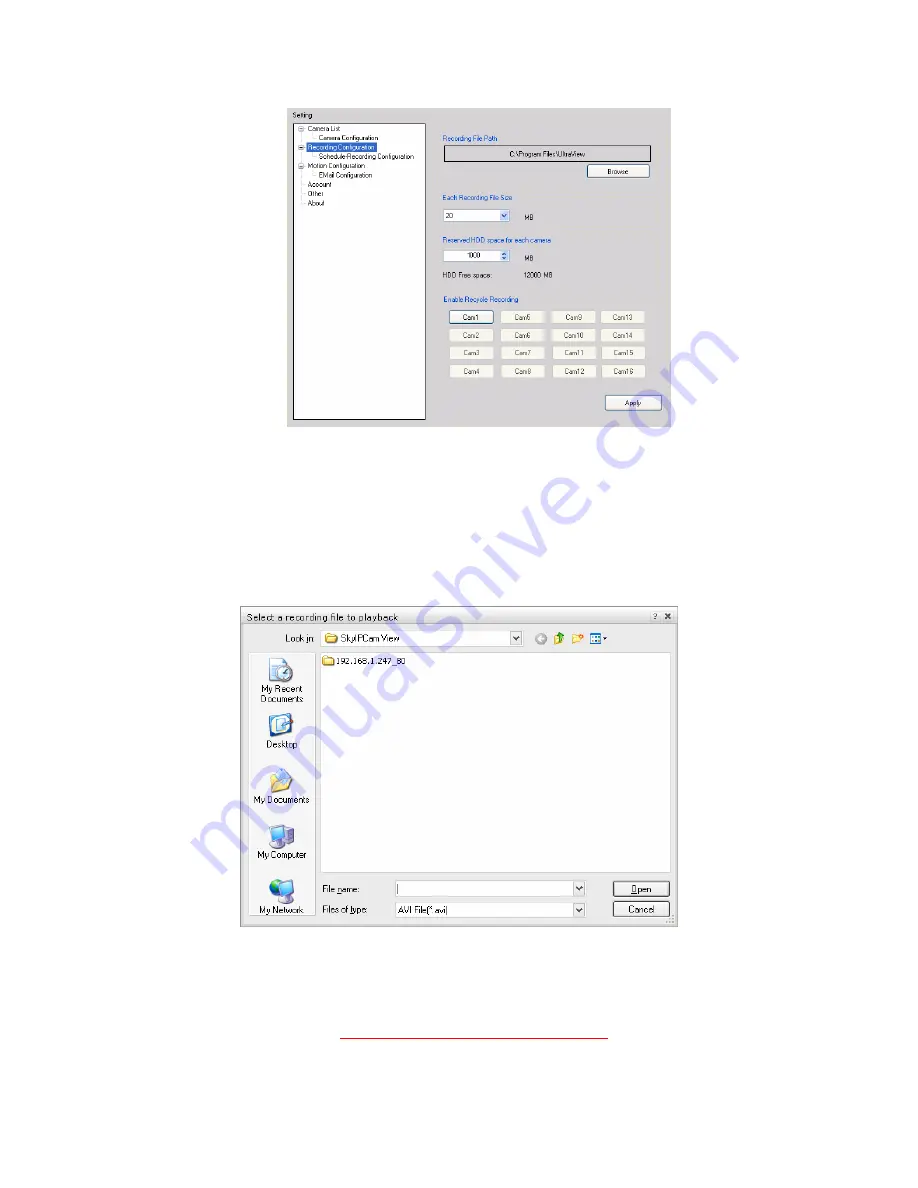
To Playback the Recorded Video 


The recorded video clips are saved in your computer, and can be played using the media player on the 
computer, such as Windows Media Player.  To start playback, simply click the 

PLAY

 button on the 

CONTROLS panel, and the following dialog screen will appear, allowing you to select the file to playback. 


Select the recorded video file under the [camera] path and then click 

Open

 to launch the media player to 

playback. 


NOTE

 If your player on the computer doesn’t have video codec to playback the recorded video. You can 

download video codec from 

http://www.xvid.org/downloads.15.0.html

 to support. 


Summary of Contents for AICN747W

Page 1: ...SkyIPCam747W Wireless Night Vision Pan Tilt Network Camera Model AICN747W User s Manual Ver 1 0...

Page 2: ...PTER 3 8 SOFTWARE INSTALLATION 8 3 1 Installing SkyIPCam Utility 8 3 2 Using SkyIPCam Utility 9 3 3 Viewing Images 14 3 4 Using SkyIPCam View 18 CHAPTER 4 31 CONFIGURATION 31 4 1 Using the Web Configu...

Page 3: ...the items contained in the package carefully You should have the following 5 One Pan Tilt AICN747W Network Camera 5 One Antenna 5 One AC Power Adapter 5 One Wall Mount Kit 5 One GPIO Connector 5 One E...

Page 4: ...3 1 2 Getting to Know Your Camera Front View...

Page 5: ...he spot audio via the Internet allowing you to monitor the on site voice In addition you can connect an external speaker to the camera to talk to people at the camera view Day Night Surveillance Suppo...

Page 6: ...ore you can use the camera in a mixed operating system environment such as Windows 2000 and Windows XP Multiple Applications Supported Through the remote access technology you can use the cameras to m...

Page 7: ...stalling the Wall Mount Kit The camera comes with a Wall Mount Kit which allows you to place your camera anywhere by mounting the camera through the three screw holes located in the base of the Wall M...

Page 8: ...vironment you need to attach the included external antenna to the camera When the camera is powered on the camera will automatically search any access point with default SSID 2 3 Applications of the C...

Page 9: ...y Step 1 Insert the provided CD and wait for the auto run screen to appear Step 2 Click on Install SkyIPCam Utility Note If the autorun screen does not appear automatically go to Start Run type D Util...

Page 10: ...9 Step 3 Keep clicking Next on the following screens Step 4 Click Close to complete the installation 3 2 Using SkyIPCam Utility Step 1 Go to Start All Programs AirLink101 AirLink101 SkyIPCam Utiliy...

Page 11: ...click on the Search button Step 3 You may simply accept the suggested Static IP or you can manually change the last 3 digit number of the IP Address in case that the suggested one has already been use...

Page 12: ...ity has saved changes it will return to the original screen Select your camera from the list and click Link Step 5 When you are prompted for the username and password enter admin for both User name an...

Page 13: ...click Smart Wizard Step 7 You may change the default Camera Name and enter a name for the Location if you like Then enter admin for both Admin Password and Confirm Password Click Next Step 8 You may...

Page 14: ...our internet service provider If you want to set this up at a later time click Next Step 10 Enter the wireless information according to your wireless router s or access point s setting if you would li...

Page 15: ...e RJ 45 Cable from the camera and you may access the camera wireless 3 3 Viewing Images Method 1 Access from Web Browser Step 1 If you know the IP address of your network camera you may open the Web B...

Page 16: ...f it is the first time for your computer to access the Web based viewing page you may be prompted to install the software of ActiveX Control Click on the bar on top of the screen and click on Install...

Page 17: ...you are not able to find the pictures or video clips saved by Snapshot or Manual Record under Windows Vista you may also need to disable Internet Explorer s Protected Mode Open Internet Explorer and c...

Page 18: ...Cam Utility Step 1 Go to Start All Programs AirLink101 AirLink101 SkyIPCam Utiliy and open the Airlink101 SkyIPCam Utility Step 2 Select your camera from the list and click Link Step 3 Follow Step 3 t...

Page 19: ...Cam View To Install the Program Step 1 Insert the installation CD to the CD ROM When the auto run screen pops up click on Install SkyIPCam View from the auto run screen Step 2 Keep clicking Next on th...

Page 20: ...e and operating instructions of SkyIPCam View To launch the program click Start Programs AirLink101 AirLink101 SkyIPCam View and the main screen will appear as below NOTE Please set the resolution to...

Page 21: ...ing and save the files in the computer When you connect only one camera this button s function is the same as the RECORD button TIP By default the ID and Password boxes are blank Click SETTING Account...

Page 22: ...mera This button is available only when the connected camera supports 2 way audio function LISTEN Click to receive the on site sound and voice from the camera This button is available only when the co...

Page 23: ...his window displays the video view of the selected camera which can be divided into 4 9 16 windows according to your selection in VIEW SELECTION panel Camera List This list displays the information of...

Page 24: ...Camera z Select the Input tab to add a camera by entering its IP address directly Enter the camera s IP address default 192 168 1 240 and Port default 80 and then click Add Camera 4 Enter the User na...

Page 25: ...ck the RECORD ALL RECORD button to record manually the second is to record by motion detection the third is to set the recording schedule in Setting Recording Configuration Schedule Recording Configur...

Page 26: ...dule Recording Configuration The recording schedule can be defined by Schedule Period or Recording Time Schedule Period First select the camera from the pull down list Then click Add to set the Start...

Page 27: ...Recording File Path box to assign a new folder z Each Recording File Size This option allows you to select from 20 to 200 MB so that the video will be recorded as another file automatically when the r...

Page 28: ...PLAY button on the CONTROLS panel and the following dialog screen will appear allowing you to select the file to playback Select the recorded video file under the camera path and then click Open to la...

Page 29: ...g Browse and then selecting your favorite music wav or mp3 file in the computer z Recording Select this option to enable the camera to record by motion detected z Send e Mail Select this option so tha...

Page 30: ...ho will receive the email User Name Enter the user name to login the mail server Password Enter the password to login the mail server Subject Enter a subject for the notification email Account You can...

Page 31: ...30 Other It allows you to set the rotation interval if you are monitoring multiple cameras Information Click SETTING About to display the information of the software application...

Page 32: ...click Setup on the main page of Web Configuration The Web Configuration will start from the Basic page 4 2 Basic Setup The Basic menu contains three sub menus that provide the system settings for the...

Page 33: ...settings of the camera will be synchronized with the connected computer Synchronize with NTP Server Select this option and the time will be synchronized with the NTP Server You need to select the prop...

Page 34: ...sers of the camera To delete a user select the one you want to delete and click Delete Guest User Name Enter the guest s name you want to add to use the camera Password Enter the password for the new...

Page 35: ...hould instead use Static IP mode to set a static IP so that the IP address will never change and you will always know what it is Static IP Select this option to assign the IP address for the camera di...

Page 36: ...ss Select the Enable option to enable this feature Then select the Provider from the pull down list and enter the required information in the Host Name User Name and Password boxes Please note that yo...

Page 37: ...ou are finished click Add to save the range setting You can repeat the action to assign multiple ranges for the camera For example when you enter 192 168 0 50 in Start IP Address and 192 168 0 80 in E...

Page 38: ...nect to one of the listed wireless networks Wireless Mode Select the type of wireless communication for the camera Infrastructure or Ad Hoc Channel Select the appropriate channel from the list Authent...

Page 39: ...hexadecimal base 16 notation Key Length Select the WEP key length you use 64 bits or 128 bits WEP Key 1 2 3 4 Enter the WEP key s in the following boxes If you select WPA PSK or WPA2 PSK as the Authe...

Page 40: ...ibration Click Calibration to calibrate the position of the camera lens Pan Steps Set the changing range 1 20 degrees when you click the Left Right button Tilt Steps Set the changing range 1 20 degree...

Page 41: ...100 Click Default to restore the default settings of the three options above Mirror Select the Horizontal option to mirror the image horizontally Select the Vertical option to mirror the image vertic...

Page 42: ...mats VGA QVGA and QQVGA The higher setting VGA obtains better video quality while it uses more resource within your network Video Quality Select the desired image quality from five levels Lowest Low M...

Page 43: ...s audio function so that you can receive the on site sound and voice from the camera Camera Speaker Out Select the Enable option to enable the camera s external speaker function so that the connected...

Page 44: ...er Setting FTP FTP Host Address Enter the IP address or domain name of the target FTP server If you enter the domain name you MUST configure DNS settings in Network IP Setting first Port Number Enter...

Page 45: ...r who will send the email For example John mymail com Sender User Name Enter the user name to login the mail server Sender Password Enter the password to login the mail server Receiver 1 Email Address...

Page 46: ...n list and then select Enable When the detecting area is enabled you can use the mouse to move the detecting area and change the area coverage Name Assign a name to the detecting area Threshold Move t...

Page 47: ...files Event Configuration General Setting Snapshot Recording Subfolder You can assign a descriptive name for the subfolder to save the captured image video files Otherwise leave this option blank to u...

Page 48: ...name that you select in the Schedule Profiles list Days Select the day s that you want to separately assign in the schedule profile The day that has been assigned will be displayed with green color Ti...

Page 49: ...tion or send captured images within the detecting area to the FTP server or email receiver You have to configure corresponding settings such as FTP server and email server to enable this feature Sched...

Page 50: ...and set the Interval time Event Configuration GPIO Trigger Select the Enable option to enable the GPIO trigger function of the camera so that you can set Trigger Out function or send captured images w...

Page 51: ...can save your camera configuration as a backup file on your computer Whenever you want to resume the original settings you can restore them by retrieving the backup file Backup Click Get the backup f...

Page 52: ...ormation menu displays the current configuration and events log of the camera Device Info Display the Basic Video Audio and Network settings of the camera System Log The Logs table displays the events...

Page 53: ...cuit current 70mA AC or 100mA DC maximum 30 Ohm open circuit voltage 240V AC or 350V DC maximum LEDs Power LED amber Link LED green System Hardware Processor ARM9 base RAM 32MB SDRAM ROM 4MB NOR Flash...

Page 54: ...loping applications for motion detection event triggering alarm notification via e mail and a variety of external control functions The GPIO connectors are located on the rear panel of the camera whic...

Page 55: ...unicate messages to each other over media They represent the sender and receivers The data they send is the message The cabling or transmission method they use is the medium Connection In networking t...

Page 56: ...cutive hexadecimal digits It is easier for humans to read hexadecimal numbers than binary numbers I Intranet This is a private network inside an organization or company that uses the same software you...

Page 57: ...types of network are LAN local area network Computers are in close distance to one another They are usually in the same office space room or building WAN wide area network The computers are in differ...

Page 58: ...net mail SNMP Simple Network Management Protocol SNMP was designed to provide a common foundation for managing network devices Station In LANs a station consists of a device that can communicate data...

Page 59: ...s a graphical user interface for workstations that use DOS WPA WPA Wi Fi Protected Access is used to improve the security of Wi Fi networks replacing the current WEP standard It uses its own encryptio...

Page 60: ...Network conditions and environmental factors including volume of network traffic building materials and construction mix of wireless products used radio frequency interference e g cordless telephones...

Reviews: