background image

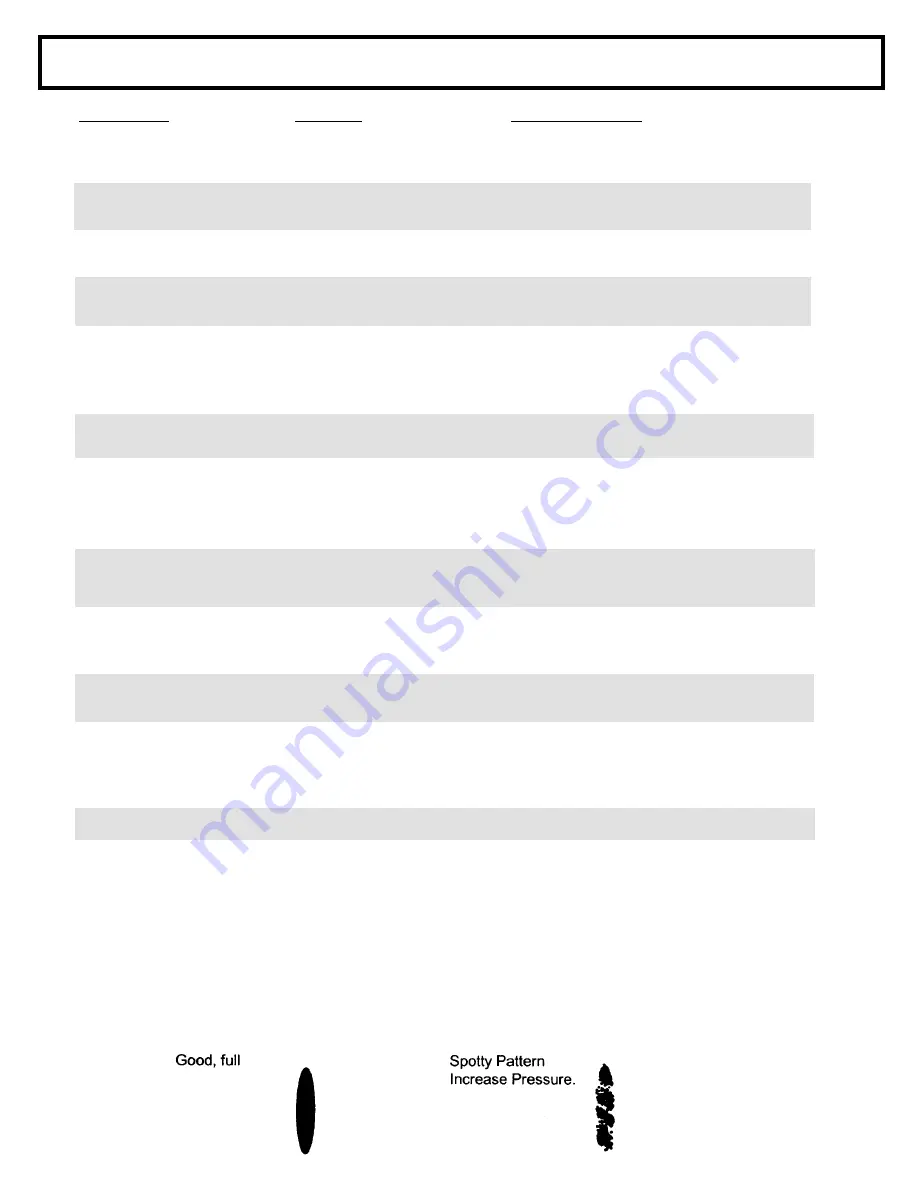
Spray Gun Troubleshooting


DEFECTS   


CAUSE 


CORRECTION


Coarse spray


Low pressure   


Increase the pressure


Excessive fogging


High pressure   


Reduce pressure for satisfactory pattern


(overspray)


Material too thin 


Use less thinner

Pattern too wide


Spray angle too large   

Use smaller spray angle tip

Pattern too narrow 


Spray angle too small   

Use larger spray angle tip. (If coverage is OK, 


try tip in same nozzle group)


Too much material


Tip size too large 


Use next smaller tip


Material too thin


Pressure too high 


Reduce pressure


Too little material


Tip size too small 


Use next larger tip


Material too thick

 Thin distribution in


Worn tip 


Change for new tip


center of pattern


Wrong tip 


Use tip with a smaller spray angle


"horns"


Thick skin on work


Material too viscous 


Thin material


Application too heavy   

Reduce pressure and/or use smaller tip


Coating fails to


Material too viscous 


Thin material


close & smooth over


Spray pattern irregular,


Orifice clogged   


Clean carefully

 deflected


Tip damaged   


Replace with new tip


Craters or pock marks


Solvent balance 


Use 1-3% "short" solvents remainder "long"  


solvents.  (This is most likely to happen with  


material of low viscosity, lacquers etc.)

Bubbles on work


Contamination or dust   

Clean surface to be sprayed

Clogged screens


Extraneous material 


Clean screen


in paint.


Coarse pigments 


Use coarse screen if orifice size allows


Poorly milled pigments   

Use coarser screen, larger orifice tips. Obain ball  


(paint pigments glocculate 

milled paint. If thinner was added, test to see if a  


cover screen. Incompatible 

drop on top of 

paint mixes or flattens out on  


            paint mixture & thinners. 

on the surface. If not, try different thinner  


in fresh batch of paint.

TEST THE PATTERN

15

Summary of Contents for Spray & Stripe 3600

Page 1: ...SERVICE OPERATION MANUAL 001 778 AUG07 MANUAL Spray Stripe Spray Stripe Spray Stripe Spray Stripe...

Page 2: ...uction Assembly 18 Packing Replacement 19 20 Elect Control Board Replacement 21 Pressure Calibration of Board 21 Clutch Replacement 22 Cltuch Troubleshooting 23 PRODUCT DIAGRAMS PARTS LISTS Gearbox As...

Page 3: ...for traffic lines or athletic fields A professional quality spray gun is mounted on a multi position spray arm Great balance and light weight make this striper ideal for a one man operation A tool le...

Page 4: ...plug to prevent accidental starting of the sprayer ALWAYS INSPECT SPRAYING AREA ALWAYS keep spraying area free from obstructions ALWAYS make sure area has good ventilation to safely remove vapors and...

Page 5: ...what kind of material you were spraying with and have him read NOTE TO PHYSICIAN HIGH PRESSURE SPRAY CAN CAUSE EXTREMELY SERIOUS INJURY OBSERVE ALL WARNINGS MEDICALALERT Airless Spray Wounds NOTE TO...

Page 6: ...tinquishing equipment is readily available and properly maintained Safety Warnings GROUNDING Ground the sprayer and other components in the system to reduce the risk of static sparking fire or explosi...

Page 7: ...the accumulation of vapors 2 To eliminate electrostatic discharge ground the spray unit paint bucket and spraying object Use only high pressure airless hoses approved for 3000 psi which is conductive...

Page 8: ...remove jewelry Do not wear loose fitting clothing dangling drawstrings or items that could become caught Engines give off carbon monoxide an odorless colorless poison gas Breathing carbon monoxide ca...

Page 9: ...Water Base to Oil Base Paint Flush with soapy water then mineral spirits 4 Changing from Oil Base to Water Base Paint Flush with mineral spirits followed by soapy water then do a clean water flush 5 S...

Page 10: ...cking nut daily Your pump has Airlessco s patented Triple Life Packing System Packing life will be extended a minimum of three times if the following Packing Adjustment procedure is followed If seepag...

Page 11: ...body when in open position In the closed position there is only a very slight gap Note The valve handle can move both clockwise and counter clockwise and can face different directions 2 Turn the unit...

Page 12: ...3 Grounding A small steel chain grounding strap is installed at the factory to prevent static build up 4 Flush the sprayer As per Flushing Procedure in this manual 2 Remove the snap on cover plate ove...

Page 13: ...when using a self cleaning tip 1 Learn the Functions of the Controls 2 Prepare the Material a Prepare the material according to the material manufacturer s recommendations b Place the suction tube int...

Page 14: ...with an oil based solvent such as mineral spirits d For long term shutdown or storage refer to the Flushing section of this manual Be sure to relieve pressure in the pump after filling with Airlessco...

Page 15: ...028 swivel between gun head and tip guard and aim guard sideways towards the curb WIDE STRIPES Install wider fan striping tips and raise the gun height to achieve the desired width line STENCILS Insta...

Page 16: ...n 7 Completely tighten the retaining nut TO REMOVE CLOGS FROM SPRAY TIP 1 Lock gun safety latch 2 Turn REV TIP handle 180 degrees 3 Disengage trigger lock and trigger gun into the pail 4 If the REV TI...

Page 17: ...l too viscous Thin material Application too heavy Reduce pressure and or use smaller tip Coating fails to Material too viscous Thin material close smooth over Spray pattern irregular Orifice clogged C...

Page 18: ...assembly Unit primes but has no Pressure set too low Turn up pressure or poor pressure Filter s are clogged Clean or replace gun filter inlet filter and or manifold filter Outlet Valve fouled worn Se...

Page 19: ...h the piston rod up into the connecting rod 331 038 align the holes Insert the connecting rod pin 331 065 through the connecting rod piston Slip the sleeve up over the connecting rod pin and insert th...

Page 20: ...d O ring Before reinstalling the outlet seat support apply two drops of Loctite No 242 blue on the threads torque to 20 ft lbs Servicing the Suction Assembly REFER TO FIGURE 4 1 Un thread and remove s...

Page 21: ...d side down Polyethylene leather polyethylene leather polyethylene 3 Take the female adaptor 331 305 which is inverted on both sides place it on top of your assembled lower packings 4 Follow step 2 ab...

Page 22: ...body 5 Start the machine operate slowly to check the piston rod for binding Adjust the bolts holding the fluid pump body to the cover assembly if necessary This will eliminate any binding 76 Tighten p...

Page 23: ...r Fluid Pump Pressure 3 Turn Prime Pressure Relief Valve to the open Prime position Start engine and run at maximum RPM Turn Pressure Control Knob to maximum position fully clockwise 4 Using an insula...

Page 24: ...Phillips head screwdriver remove the three screws holding the clutch face to the clutch mount 6 Disconnect two clutch leads from electrical board leads Carefully cut the small Zip tie holding the clut...

Page 25: ...When the DC voltage from the board is not 13 14 VDC disconnect the control board lead black from the engine magneto lead pink located on the side of the engine With the engine at maximum RPM 3600 pres...

Page 26: ...Hose Connector 117 008 Ball Bearing 305 199 Shaft Pinion 305 287 Machined End Bell 331 038 Crosshead Ass y 331 046 Ball Bearing Part Number Description 331 047 Ball Bearing 331 061 Sleeve Bearing 331...

Page 27: ...g Tip not installed 116 103 Part Number Description 100 342 321 x 1 25 LG Screw 116 100 Compression Spring 119 049 HexScrew 25 20UNC 2A x 1 88 LG 119 050 Screw Pan HD 119 052 Hex Lock Nut 136 217 Jam...

Page 28: ...Frame Assembly 26 301 533 Paint Bucket Lid QTY...

Page 29: ...eel Assembly 27 Part Number Description Qty 106 020 Teflon O Ring 1 141 015 Hose Clamp some models only 1 331 034 Suction Nut 1 331 035 Suction Elbow 1 331 217 Suction Filter 1 Suction Assembly Part N...

Page 30: ...152 203 Striping Paint Oil Base Oil Base Latex Latex Latex Latex Latex Latex Rev TipTM for Striping Fan Width 6 from surface REV GUARD TM Super Compact P N 561 001 11 16 16 F Thread Fits Airlessco an...

Page 31: ...RS STAY CLEAN Spray protectant for your machine to prevent paint from sticking to it 114 030 20 oz can THROAT SEAL OIL Used in the wet cup of a piston pump to prevent paint from drying on the piston c...

Page 32: ...ck Flush Quick Flush Quick Flush Quick Flush Quick Flush Quick Flush Quick Flush Quick Flush Quick Flush Quick Flush Quick Flush Quick Flush Quick Flush Quick Flush Quick Flush Quick Flush Quick Flush...

Reviews: