background image

Pg. 21

12.3  Adaptor Configuration via the browser

The adaptor settings can also be configured using a web browser.  Open the browser and enter the IP address of 
the adaptor, or right-click launch in browser from within CommuniCenter.  Enter the password (if set) and leave the 
User Name blank.  In addition to the settings accessible from the CommuniCenter program, the web browser has 
expanded options under Network and Security.


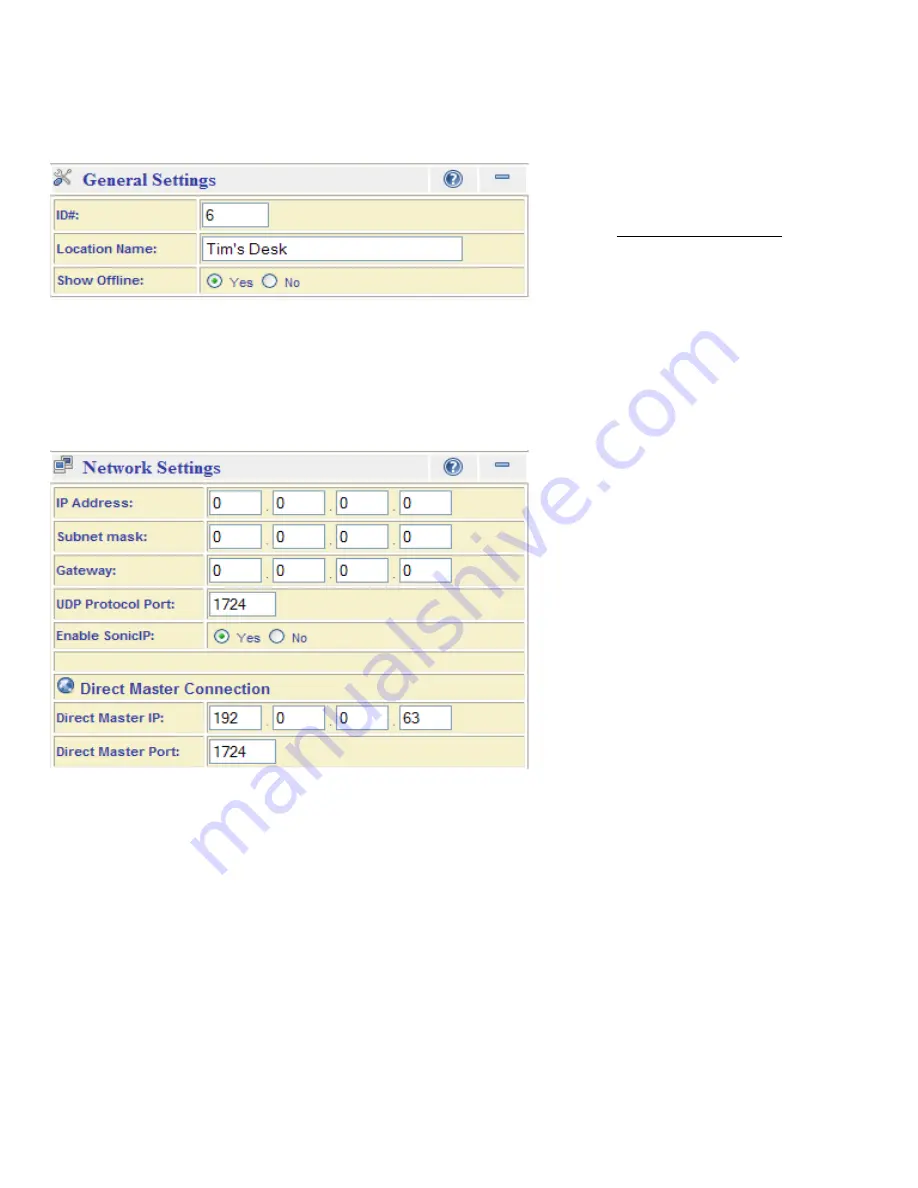
General Settings

ID#: 

Sets the unique ID for the identification of the IPW-1A for the purpose of Group Call and All Call (1 to 2048; 

default = 

"0"

).

Location Name:

 Sets the descriptive name for the IPW-1A. A name should be chosen which is both unique and 

applicable to the installed location / application. 

Show Offline:

 Determines whether the IPW-1A should remain in the CommuniCenter intercom list, even if it 

becomes disconnected or unreachable.

Network (Interface) Settings

IP Address:

 Used to configure the IP address settings for the IPW-1A. For automatic IP assignment, the following 

settings are utilized: 

IP Discovery Enabled: (0.0.0.0) -- Factory Default; all protocols enabled.
Disable AutoIP: 

(0.0.1.0)

Disable BOOTP: (

0.0.2.0)

Disable DHCP: 

(0.0.4.0)

Disable IPZator: 

(0.0.8.0) 

      Note:

 These settings can be used together as a binary bitmask to enable / disable any specific combination of      

      discovery protocols.

Subnet mask:

 Used to assign a Subnet mask when a Static IP is assigned (default = 

"0.0.0.0"

, when automatic IP 

discovery is used). 

Gateway:

 Sets the default Gateway IP address when a Static IP is assigned (default = 

"0.0.0.0"

, when automatic IP 

discovery is used).

UDP Protocol Port:

 Assigns the UDP port to be utilized for communication with the PC master station 

      (default = 

"1724"

). 

Enable SonicIP:

 If set to "Yes", the IPW-1A will verbally announce its IP address over the attached substation 

whenever initialized (default = 

Yes

).

Note:

 If the ID# is left unconfigured, Group Call 

and All Call will not function properly.

Note:

 A gateway setting is only necessary when 

connecting directly to a PC master station 
outside of the LAN (utilizing direct-mode; see 
Appendix A)

Note:

 See Page 23 A.2 for configuration 

instructions for Direct Master Connection.

Summary of Contents for CommunCenter

Page 1: ...OPERATION MANUAL Software for IPW 1A Intercom Over IP Adaptor LAN PWR POWER IN0 IN1 NO C NC T 2 Wires 0211...

Page 2: ...NS 10 Sub station calling in 10 1 Answering a call from sub station 10 2 Monitoring the sub station 10 3 Talking to a sub station 10 4 Activating the dry contacts 10 5 ALL CALL GROUP PAGING 10 6 All C...

Page 3: ...Voltage Use Aiphone PT 1211C included 15 24V AC DC Network Interface 10 100 Base T Ethernet Auto detection RJ 45 IP Assignment Static or Dynamic Hardware Protocols TCP IP UDP DHCP SNMP AutoIP SonicIP...

Page 4: ...he dry contact can be used for door release or an alarm output 1 Load the software onto the PC to be used as a master station Insert CD included with IPW 1A or download the latest version from the Aip...

Page 5: ...Create a password to gain access to the software configuration Scheduling Set specific times during the day week to put the program in and out of unavailable mode Audio Settings Allows you to choose i...

Page 6: ...ndow 9 Available Unavailable Button Allows the user to switch to and from away status 1 5 6 3 4 8 7 9 10 11 12 14 15 16 17 2 13 18 10 Help Button Opens the help window 11 Door Release Button Activates...

Page 7: ...r Button Allows the selected station to be monitored 7 All Call Button Makes a broadcast announcement to all stations visible within CommuniCenter 8 Talk Button Engages transmit communication when the...

Page 8: ...u can select the following from the drop down box Visual pop up will display the Incoming Call pop up Audible wav file will play a preselected wav file Both will enable both the Visual and Audible not...

Page 9: ...nables the user to browse for a file in the Paging Message pop up window Select sub station s via check box Create and name group Pg 9 8 3 Paging Messages o Under the Paging Messages tab you can creat...

Page 10: ...mark Clicking on the Refresh button will update the list with the latest devices available 8 5 Passwords o The Passwords tab allows you to create a password to gain access to the Software Configuratio...

Page 11: ...io archiving and data log archiving features Click on the Audio Archive Enable check box to enable this feature From the Select audio archive folder button you can create your own folder or use the de...

Page 12: ...you have the option of deleting the file by clicking on the Delete selected button o To access the log data file use Windows Explorer to navigate to the folder that you had selected in the set up proc...

Page 13: ...etting must match the bandwidth setting you have for the devices otherwise an error status will occur o Any changes made to the Input Device Output Device or Quality Level will require a restart of th...

Page 14: ...call tone to be heard at the substation Pressing the call button additional times will cause the tone to repeat o When the call button on a substation is pressed the CommuniCenter will either display...

Page 15: ...will be heard at that sub station regardless of configuration In addition the sub station will not change state in the Sub Station List o To monitor a sub station select the station by either double...

Page 16: ...ing Limited to 1 PC at a time on the network 10 6 1 All Call Calls to stations that are on the Sub Station Location List o To make an all call announcement to all sub stations in your list click on th...

Page 17: ...g announcement to manually selected groups open the Sub Station Location List You can open the Sub Station List by clicking on the Location Button o From the Sub Station Location List select the sub s...

Page 18: ...will be heard at the selected station o To send a message to a group of sub stations select either a group of units from the Sub Station Location List or a predetermined group from the Paging Group L...

Page 19: ...List o To access the settings via the program click on Settings or press the S key This will open the Hardware Configuration Window and allow you to configure the IPW 1A o To access the settings via...

Page 20: ...upon power on Expand the Audio section to adjust the quality bandwidth settings of the audio as well as the speaker volume and microphone gain and to enable or disable the pre tone at the substation E...

Page 21: ...tomatic IP assignment the following settings are utilized IP Discovery Enabled 0 0 0 0 Factory Default all protocols enabled Disable AutoIP 0 0 1 0 Disable BOOTP 0 0 2 0 Disable DHCP 0 0 4 0 Disable I...

Page 22: ...ality of the IPW 1A s Reset button Default Enabled o Factory Defaults Allows or disallows the IPW 1A to be reset to Factory Default settings Default Enabled o Update Function Controls the ability to e...

Page 23: ...c to the appropriate destination PC running CommuniCenter o Other CommuniCenter PC s in the either LAN will not communicate with any intercoms set up in direct mode If multiple PC s are required to co...

Page 24: ...configured for what is commonly called Broadcast storm protection which has a limit for bandwidth of a broadcast from any source The primary benefit of such a feature is to prevent a Denial of Servic...

Reviews: