Aigo P8131 Operation Manual Download Page 13

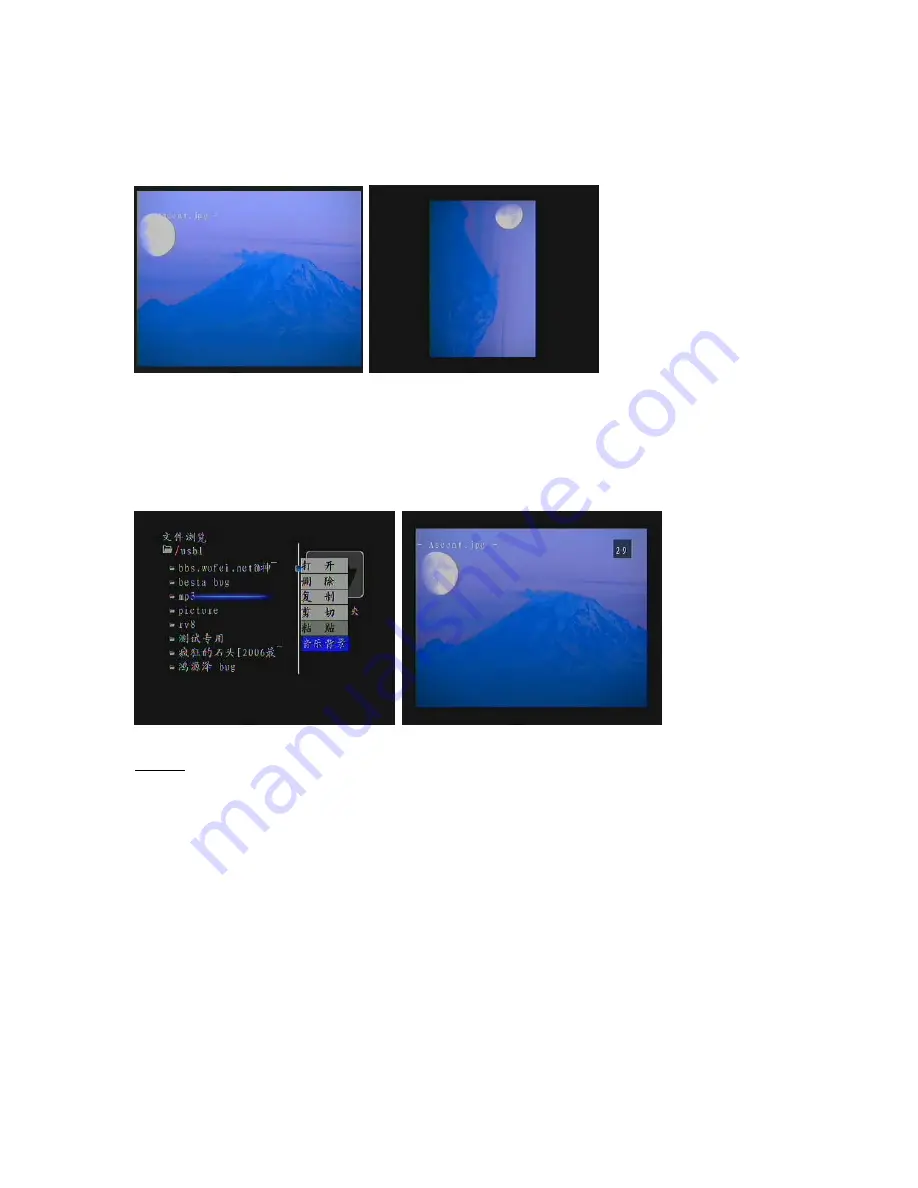
5.4.4 Rotating image 
 

During manual playback use Rotate (8) button  to rotate the image. Every time you press the button the 
image rotates 90 degrees clockwise. The interface and operation are shown below: 


5.4.5 Background Music  
 

PVR P8131 products can be used to create background audio tracks during the image playback  
     Make sure that the desired music files/music folder (there is no sub-folder playback) are highlghted and 
press the Background music (3) button on Remote Control. Check the "background music" option and 
confirm . During image playback press the Background Music (3) button  to enable/disable background 
music. The interface and operation are shown below: 


Caution:  
 
1. Background music can only be used with image playback  
2. When background music is playing no background music information is displayed on the screen. 


5.4.6 Image information 
 

During playback press the information (2) button to view the properties of the current image  
When you press the Information (2) button the screen displays the properties of the current image, including 
the name of image, type, resolution, size and creation date. Press the Information (2) button again to 
remove the information display.  
The interface and operation are shown below: 
 

Summary of Contents for P8131

Page 1: ...eries inserted 4 Quick Start In this part we will explain how to use the mani functions of PVR 8131 4 1 Power up Press the Power button on the bottom right corner of the front panel for about one seco...

Page 2: ...fault settings separates the built in hard drive into two FAT32 partitions if the product capacity is 250 GB the display will show two separate hard drives Local Hard Drive 1 about 117 G and Local Har...

Page 3: ...urn to the Music browser interface This is the Music Playback interface 4 7 Image Playback Entered the Photo section using the browser and locate the images you would like to play back when the cursor...

Page 4: ...recording the upper right corner shows Video This is the Instant Recording interface Press Exit 19 to stop video recording and save the video file 4 8 2 Regular Recording Caution before using the adv...

Page 5: ...nd paste it into the current document level directory Set as background music set the current file or folder as a background audio for image playback Only allows to set background music for image file...

Page 6: ...press Play 17 to confirm When prompted Are you sure that you want to delete this directory and subdirectories choose Yes and press Play 17 to confirm Caution be carefull when deleting files folders y...

Page 7: ...During playback press the volume volume key 9 10 on the remote control to increase decrease the volume between level O and level 30 the default volume setting is 24 When you press the volume volume bu...

Page 8: ...he Chapter sign will be displayed in the top right corner for 10 seconds 5 2 7 Changing channels During playback press the Channel 22 button on Remote Control to switch channels Every time the button...

Page 9: ...utton on the Remote Copntrol to view the current file information Every time you press the Information 2 button the information message will pop up and remain on the screen for five seconds The follow...

Page 10: ...o keep fast forwarding rewinding the fle To increase the fast forward and rewind by 2 x 4 x 8 x and 16 x press the button repeately to cycle between different speeds To return back to playback during...

Page 11: ...layback modes available The interface is shown below 5 3 6 Mute volume During playback press the Mute 4 button to mute the volume When you press the mute 4 button the audio track is muted and the mute...

Page 12: ...return to manual playback mode Overview mode the screen will display 9 images at a time with three images located in three rows 5 4 3 Zooming in During manual playback press Zoom 8 button to enlarge...

Page 13: ...n and confirm During image playback press the Background Music 3 button to enable disable background music The interface and operation are shown below Caution 1 Background music can only be used with...

Page 14: ...select Instant Recording and press Play 17 button to start the instant video recording The interface is shown below 5 5 3 Video settings Select video settings and press Play 17 button to enter the vi...

Page 15: ...ot to save the settings Choose yes to save and exit Choose no to exit without saving the changes The interface is shown below 5 5 4 Video Recording Select Video Recording and press Play 17 button to s...

Page 16: ...interface select Scheduled Recording and press Play 17 button to access the recording interface Scheduled Recording function can be set to five hours In Recording interface the recorder provides addit...

Page 17: ...owed is 30 minutes Time Shift recording allows to suspend TV program while watching television through PVR P8131 You can return later any time to watch the suspended programm at your convinience This...

Page 18: ...will automatically disappear Caution It takes 15 seconds for the system to enter the Time Shift mode The interface is shown below Time Shift interface after 10 seconds of playback 5 6 3 Suspending TV...

Page 19: ...can can connect to the recorder to copy data Follow the steps 1 Connect power cable 2 Connect USB cable cable to PVR P8131 and connect it to PC 3 Press the Power button 4 After the Computer link mess...

Page 20: ...nly responds to USB menu operation when in main Menu and in File Browser 6 Depending on fragmentation of data on USB device and size of the content it takes 3 15 seconds to access the data 5 8 Using S...

Page 21: ...languages Use the left right 15 16 buttons to change the current selection press Exit 19 to exit the language settings menu and confirm the pop up message to save your selection The interface is show...

Page 22: ...firm the pop up message to save your selection The interface is shown below 5 9 5 Display settings Here you can change the display settings for the video output of your connected display Recorder supp...

Page 23: ...your selection 5 9 7 1 Firmware upgrade PVR P8131 supports firmware upgrades you can download the latest firmware from manufacturer s website and use it to enhance the recorder Follow the steps to pe...

Page 24: ...PVR P8131 support format function to format the built in hard drive formatted and both partitions Follow the steps to format the hard drive 1 Choose the hard drive you wish to format press Play 17 and...

Page 25: ...ilm while other video files requires 700 MB or more also allowing for RMVB embedded Subtitles unlike other video formats which require to download the subtitles as plug in text documents and sometimes...

Page 26: ...e open the Settings menu in System folder select Format the hard drive press confirm button and the recorder will be formatted It is not ecommended to use Wndows or any other third party software to f...

Reviews: