Aigo DC-T1200 User Manual Download Page 9

150mm+-2

105

mm+-2

105

mm+-2

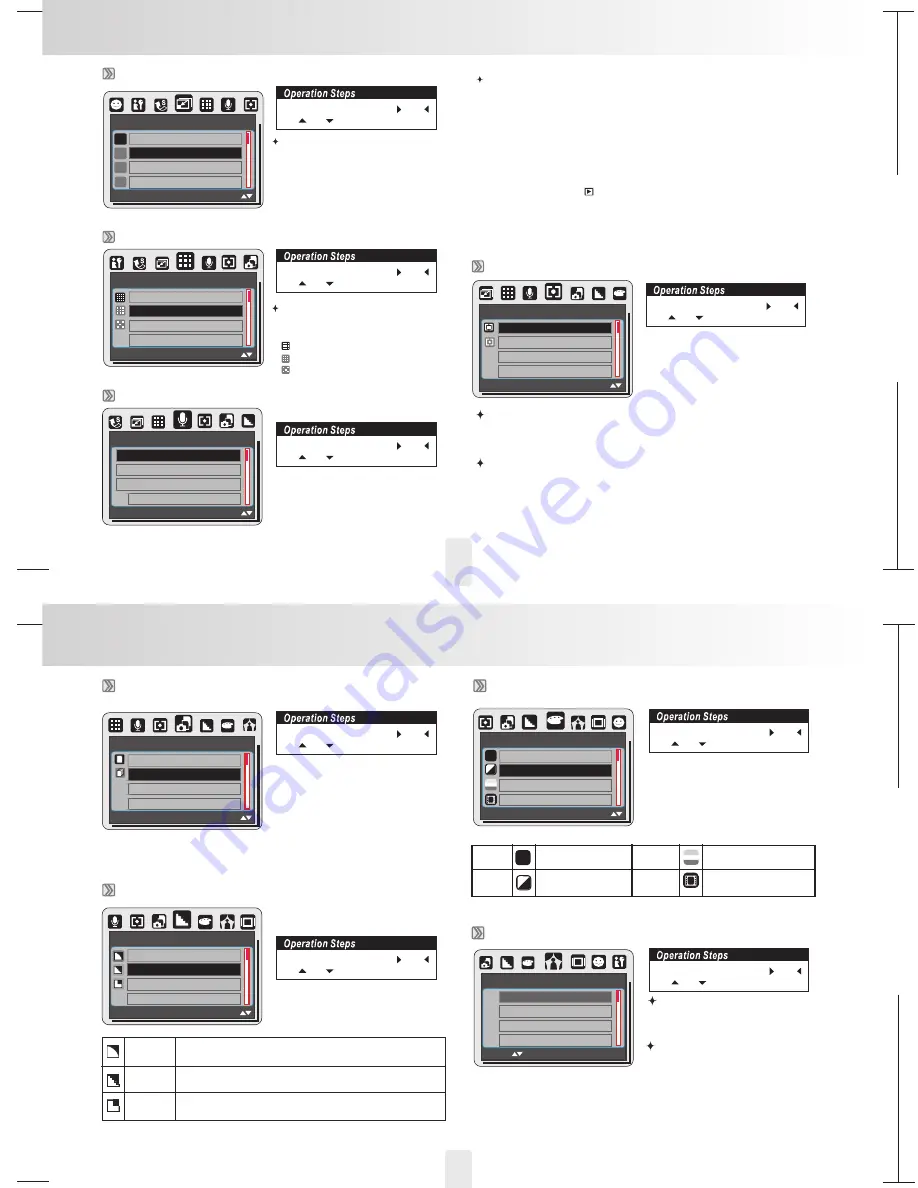
IMAGE SIZE ( Default: 12M )

This feature is for you to choose
the image resolution.

(14M) 4344 x 3258 (by interpolation)
(12M) 4000 x 3000
(8M) 3264 x 2448
(3M) 2048 x 1536
(1M) 1280 x 960

This feature is for you to choose the
scenes are for image&video from
the following options.

(

) S. FINE (Super Fine)

(

) FINE

(

) NORMAL

VOICE MEMO( Default : OFF )

There are 2 ways to add the voice memo to an image:

1. At Mode
(1) Press OK/Menu Button and choose "VOICE MEMO"

for this image you are

going to take or choose "CONTINUOUS" to have voice memos for
the images from now on (you can cancel the voice memo function
by choosing "OFF").

(3) 10 seconds of voice memo will be recorded.

2. At Playback Mode (

)

(1) Choose the image to which you wish to add a voice memo.
(2) Press Up Button and press the video clip recording Button to start

the voice memo.

(3)10 seconds of voice memo will be recorded.

(2) Choose "SINGLE" to enable a voice memo


SIZE

4344x3258

4000x3000

3264x2448

2048x1536

14M

12M

8M

3M

S. FINE

FINE

NORMAL

QUALITY

OFF

SINGLE

CONTINUOUS

VOICE MEMO

METERING ( Default : MULTI )

This feature can only be used under
Program Mode. With Metering Setting,
you can get more superior exposure
condition and take a picture with
brightness.

Multi Metering:

Spot Metering:

If the subject is against the light source or has little contrast, you can

use this function to have the subject be brighter.

Exposure will be evaluated according to the average of the available

light sources in the image area.

This is suitable for general use.

SHOOTING ( Default : SINGLE)

1.

: No continuous shooting.

SINGLE

2.

: You can have the

continuous shooting function starting
by pressing the Shutter Button and on
hold and ending by letting go of the
Shutter Button.

CONTINUOUS

Note:

The continuous shooting function will not becanceled until "SINGLE" is chosen.

SHARPNESS ( Default : NORMAL)

MULTI

SPOT

METERING

SINGLE

CONTINUOUS

SHOOTING

1

SHARPNESS

SOFT

NORMAL

VIVID

EFFECT( Default:NORMAL)

EFFECT

NORMAL

B & W

SEPIA

NEGATIVE

No special effect is
added to the picture.

NOR

Normal

B & W

Still Image Mode

Still Image Mode

QUALITY ( Image Quality ) ( Default : FINE )

SOFT

NORMAL

VIVID

This effect can make the edge of the captured image look
smoother, which is suitable for image editing on PC.

This effect can make the edge of the captured image look
sharp, which is suitable for printing out.

This effect can make the edges of your captured image look
sharper but may result in more image noise.

Turn the image into
black and white.

NOR

FRAME ( Default : OFF )

You can put the selected
photo frame to the image
you capture.

Cancel the Photo Frame
function after use if you
prefer the next image not to
be with Photo Frame.

MOVE :

SET:OK

FRAME

OFF

ON

SEPIA

NEGATIVE

Turn the image into
yellowish brown.

Turn the image into
negative film effect .

1. MENU

2.

or

4.OK

3.

or

1. MENU

2.

or

4.OK

3.

or

1. MENU

2.

or

4.OK

3.

or

1. MENU

2.

or

4.OK

3.

or

1. MENU

2.

or

4.OK

3.

or

1. MENU

2.

or

4.OK

3.

or

1. MENU

2.

or

4.OK

3.

or

1. MENU

2.

or

4.OK

3.

or

16

17

EXIT:MENU

MOVE :

EXIT:MENU

MOVE :

EXIT:MENU

MOVE :

EXIT:MENU

MOVE :

EXIT:MENU

MOVE :

EXIT:MENU

MOVE :

EXIT:MENU

MOVE :

Summary of Contents for DC-T1200

Page 1: ...t 15 Image Size 16 Quality 16 Voice memo 16 Metering 16 Shooting Continues 17 Sharpness 17 Effect 17 Frame 17 OSD Info 18 Face Detection 18 19 Size 19 Quality 19 Metering 19 Effect 19 OSD Information...

Page 2: ...maged in an environment of high temperature To avoid electricity leakage please remove the battery if the camera is expected not to be in use for a long period of time It is normal that the temperatur...

Page 3: ...ps 100 ISO ISO 200 ISO 400 AUTO ISO ISO 800 ISO 1600 White Balance Auto Daylight Cloudy Sunset Fluorescent Tungsten Custom Shooting Mode Single Continuous Metering Spot Multi Image Quality Super Fine...

Page 4: ...daptor Jack when the charging is completed 1 Power off the camera 2 Open the Battery Memory Card Cover 3 Insert the memory card into the card slot and press it down until a click sound happens Please...

Page 5: ...he menu is not displayed on the LCD monitor the Right Button operates as Flash function By pressing the Flash Mode Button you can select different flash options as follows Auto Flash Auto Flash with R...

Page 6: ...press Delete Button to adjust the exposure Press Left Right Button to set the Exposure Value You can adjust the value of the exposure compensation which is ranged from 2 0EV to 2 0EV at 0 5EV incremen...

Page 7: ...ORTRAIT LANDSCAPE a Metering Spot b Sharpness Normal c Effect Normal d Shooting Continuous Shooting Single e Flash 1 Auto Flash 2 Red eye Reduction 3 Flash Off are available Under this mode the settin...

Page 8: ...ed up as below MODE SET FIREWORKS CANDLE LIGHT BEACH AUCTION Beach Mode a Metering Multi b Sharpness Normal c Effect Normal d Shooting Continuous Shooting Single e Flash Off Under this mode the settin...

Page 9: ...le light sources in the image area This is suitable for general use SHOOTING Default SINGLE 1 No continuous shooting SINGLE 2 You can have the continuous shooting function starting by pressing the Shu...

Page 10: ...Web 320X240 30FPS Please press the Mode Button and choose Movie Clip Mode M Video Size Default 640x480 30FPS Movie Clip Mode The video size options are provided as follows 1280 x 720 30FPS 640 x 480...

Page 11: ...8 Slide SLIDE SHOW PLAY INTERVAL 2 SEC EFFECT OFF MOVE PROTECT SELECT ALL Protect 100 0066 EXIT SH 100 0066 EXIT SH 1 Press the OK Menu Button and choose PROTECT 2 Choose SELECT and press OK Menu Butt...

Page 12: ...ld like to rotate 2 Press OK Menu Button and choose ROTATE 3 Choose the rotation you prefer and press OK Menu Button 4 The image after rotation will be stored as a new image o o o DPOF MOVE DPOF STAND...

Page 13: ...S SOUND 3 Select the sound you prefer and press OK Menu Button to confirm the setting Or you can choose OFF to turn off the a start up sound To set up the shooting sound please follow the steps below...

Page 14: ...e the Left Right Button to select another picture and select the number of prints for another picture 4 After setting the number of prints press the Menu OK Button to save 5 Press the Shutter Button t...

Page 15: ...supplied Video USB Cable Turn on the TV and switch the TV Video switch to A V Mode Power on the camera and then switch to the Playback Mode Press down the LEFT or RIGHT direction Button to go to the n...

Page 16: ...you prefer to convert 2 Click on Make Movie then choose Batch Convert 5 6 3 Select photo you prefer to convert 4 Click Convert to make photo convert Please select JPEG as file format otherwise the fi...

Page 17: ...authorization Step 2 5 Choose t or G to log in You Tube Accoun oogle Account 4 33 32 1 Choose file that you like to upload 2 Click Upload to YouTube 8 Click to get permission Allow 6 User will see af...

Page 18: ...12 Mega Pixels 1 1 72 CCD Sensor Approx 12 19 Mega Pixels 4 032 3 024 Approx 12 43 Mega Pixels 4 088 3 040 Optical 3x Zoom 35 102mm EQ for 35mm film F2 8 Wide F5 1 Tele Still Image mode 1 0X 5 0X Play...

Reviews: