Aigo DC-T1200 User Manual Download Page 5

150mm+-2

105

mm+-2

105

mm+-2

9

8

8

Buttons & Function

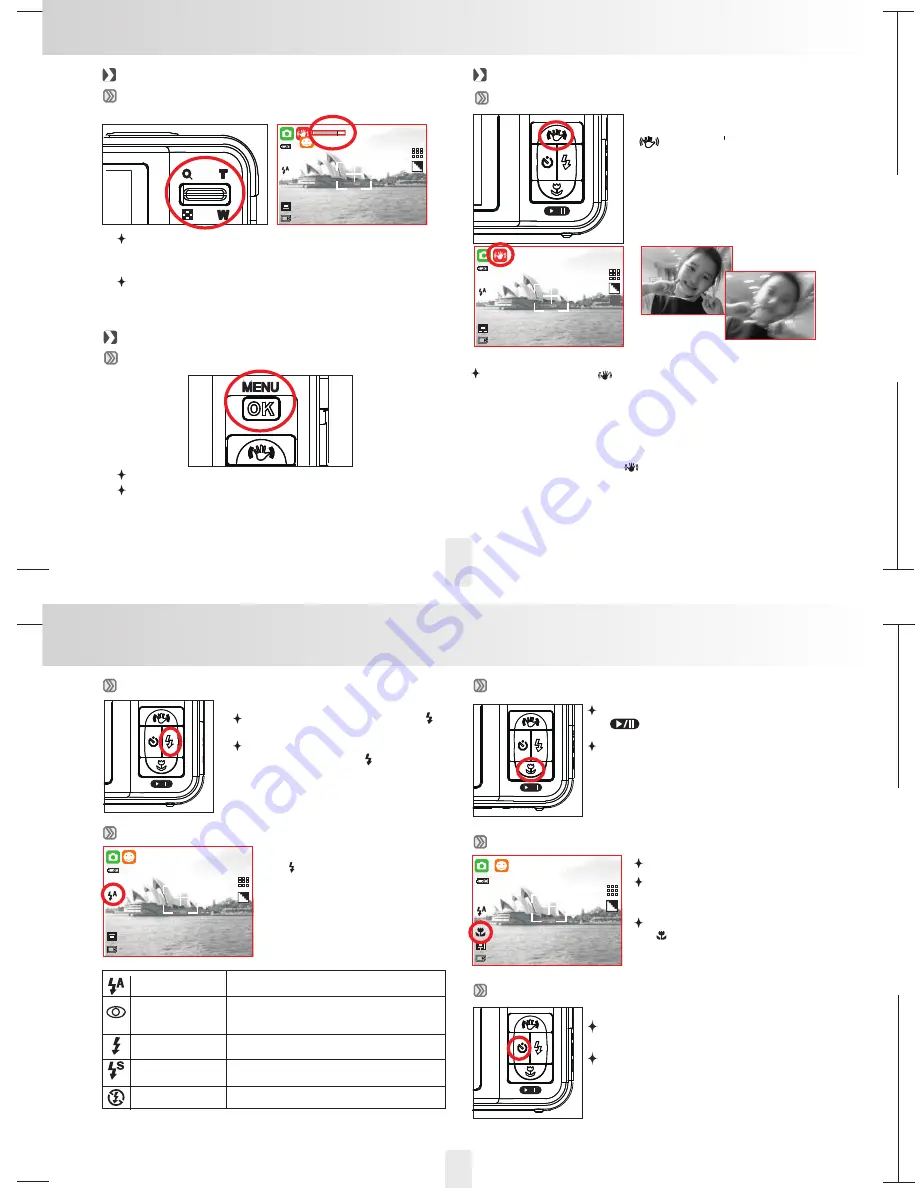
Push up the Tele Button, the Zoom Bar Indicator appearing on
the top side of the LCD Monitor and it shows the current zoom
status.

Tele / Wide Button

Zoom in / Zoom out

Push down the Wide Button, the Zoom Bar Indicator will go
back to the Wide view.

999

12M

Menu / OK Button

Menu / OK Button

Press Menu/OK Button to go to the menu selection .
When the menu is displayed on the LCD monitor,
the Menu/OK Button is used or for confirming data.

Function Button

Up Button / ISH (Image Stabilizer Helper

In Menu Mode, press the Up Button
(

) to move up to the sub menu.

00999

12M

Pressing the ISH Button (

) can activate this function.

This function will only help to "reduce" the chance of blurred image due to
unsteady holding of the camera.

1. Image noise may occur with this feature.
2. When you prefer the next image or movie clip not to be with ISH eature,

please press the ISH Button (

) again.

3. It is suggested to use this feature under low light conditions when the

object is beyond 3.0m from the camera.

Note

Right Button/ Flash Button

In Menu Mode, press the Right Button(

)

to move the cursor to the right tab.

When the menu is not displayed on the LCD
monitor,the Right Button (

) operates as

Flash function.

By pressing the Flash Mode Button
(

) you can select different

flash options as follows.

Auto Flash

Auto Flash with
Red-eye
Reduction

Flash Off

The mode will disable the flash.

Fill-in Flash

This m

ircumstances.

ode will enable the flash to fire in

any c

Slow Sync

The flash will fire and the camera will set the
shutter speed at a proper speed.

Down Button / Macro Button

In Menu Mode, press the Down Button

(

) to move down the submenu cursor.

When the menu is not displayed on the LCD
monitor

,

the Down Button operates as Play

& Pause function for play the voice &
movie clip file in
Playback Mode.

Macro Mode

The focus range is 10~60cm.

A Macro icon will display on
the LCD monitor when you
select Macro Mode.

Please press the Macro Button
(

) to cancel the macro

setting if you prefer the next
image in Auto Focus.

999

12M

The flash fires automatically as required under
shooting mode.

To avoid the subject's eyes appearing red in the
image, this mode can effectively minimize the
likelihood of the red-eye effect.

Left Button/ Self -Timer Button

In Menu Mode, press the Left Button to
move the cursor to the left tab.

When the menu is not displayed on the LCD
monitor, the Right Button operates as
Sefl-time funtion

Buttons & Function

999

12M

Flash Button

Summary of Contents for DC-T1200

Page 1: ...t 15 Image Size 16 Quality 16 Voice memo 16 Metering 16 Shooting Continues 17 Sharpness 17 Effect 17 Frame 17 OSD Info 18 Face Detection 18 19 Size 19 Quality 19 Metering 19 Effect 19 OSD Information...

Page 2: ...maged in an environment of high temperature To avoid electricity leakage please remove the battery if the camera is expected not to be in use for a long period of time It is normal that the temperatur...

Page 3: ...ps 100 ISO ISO 200 ISO 400 AUTO ISO ISO 800 ISO 1600 White Balance Auto Daylight Cloudy Sunset Fluorescent Tungsten Custom Shooting Mode Single Continuous Metering Spot Multi Image Quality Super Fine...

Page 4: ...daptor Jack when the charging is completed 1 Power off the camera 2 Open the Battery Memory Card Cover 3 Insert the memory card into the card slot and press it down until a click sound happens Please...

Page 5: ...he menu is not displayed on the LCD monitor the Right Button operates as Flash function By pressing the Flash Mode Button you can select different flash options as follows Auto Flash Auto Flash with R...

Page 6: ...press Delete Button to adjust the exposure Press Left Right Button to set the Exposure Value You can adjust the value of the exposure compensation which is ranged from 2 0EV to 2 0EV at 0 5EV incremen...

Page 7: ...ORTRAIT LANDSCAPE a Metering Spot b Sharpness Normal c Effect Normal d Shooting Continuous Shooting Single e Flash 1 Auto Flash 2 Red eye Reduction 3 Flash Off are available Under this mode the settin...

Page 8: ...ed up as below MODE SET FIREWORKS CANDLE LIGHT BEACH AUCTION Beach Mode a Metering Multi b Sharpness Normal c Effect Normal d Shooting Continuous Shooting Single e Flash Off Under this mode the settin...

Page 9: ...le light sources in the image area This is suitable for general use SHOOTING Default SINGLE 1 No continuous shooting SINGLE 2 You can have the continuous shooting function starting by pressing the Shu...

Page 10: ...Web 320X240 30FPS Please press the Mode Button and choose Movie Clip Mode M Video Size Default 640x480 30FPS Movie Clip Mode The video size options are provided as follows 1280 x 720 30FPS 640 x 480...

Page 11: ...8 Slide SLIDE SHOW PLAY INTERVAL 2 SEC EFFECT OFF MOVE PROTECT SELECT ALL Protect 100 0066 EXIT SH 100 0066 EXIT SH 1 Press the OK Menu Button and choose PROTECT 2 Choose SELECT and press OK Menu Butt...

Page 12: ...ld like to rotate 2 Press OK Menu Button and choose ROTATE 3 Choose the rotation you prefer and press OK Menu Button 4 The image after rotation will be stored as a new image o o o DPOF MOVE DPOF STAND...

Page 13: ...S SOUND 3 Select the sound you prefer and press OK Menu Button to confirm the setting Or you can choose OFF to turn off the a start up sound To set up the shooting sound please follow the steps below...

Page 14: ...e the Left Right Button to select another picture and select the number of prints for another picture 4 After setting the number of prints press the Menu OK Button to save 5 Press the Shutter Button t...

Page 15: ...supplied Video USB Cable Turn on the TV and switch the TV Video switch to A V Mode Power on the camera and then switch to the Playback Mode Press down the LEFT or RIGHT direction Button to go to the n...

Page 16: ...you prefer to convert 2 Click on Make Movie then choose Batch Convert 5 6 3 Select photo you prefer to convert 4 Click Convert to make photo convert Please select JPEG as file format otherwise the fi...

Page 17: ...authorization Step 2 5 Choose t or G to log in You Tube Accoun oogle Account 4 33 32 1 Choose file that you like to upload 2 Click Upload to YouTube 8 Click to get permission Allow 6 User will see af...

Page 18: ...12 Mega Pixels 1 1 72 CCD Sensor Approx 12 19 Mega Pixels 4 032 3 024 Approx 12 43 Mega Pixels 4 088 3 040 Optical 3x Zoom 35 102mm EQ for 35mm film F2 8 Wide F5 1 Tele Still Image mode 1 0X 5 0X Play...

Reviews: