Aigo DC-T1200 User Manual Download Page 4

150mm+-2

105

mm+-2

105

mm+-2

6

7

Getting Ready

Charging The Battery

The battery is not charged when the camera is shipped.
Charge the battery before use.

A new battery should be charged for at least 2 hours.

Getting Ready

Loading The Battery

Inserting Or Removing A Memory Card

Button & Function

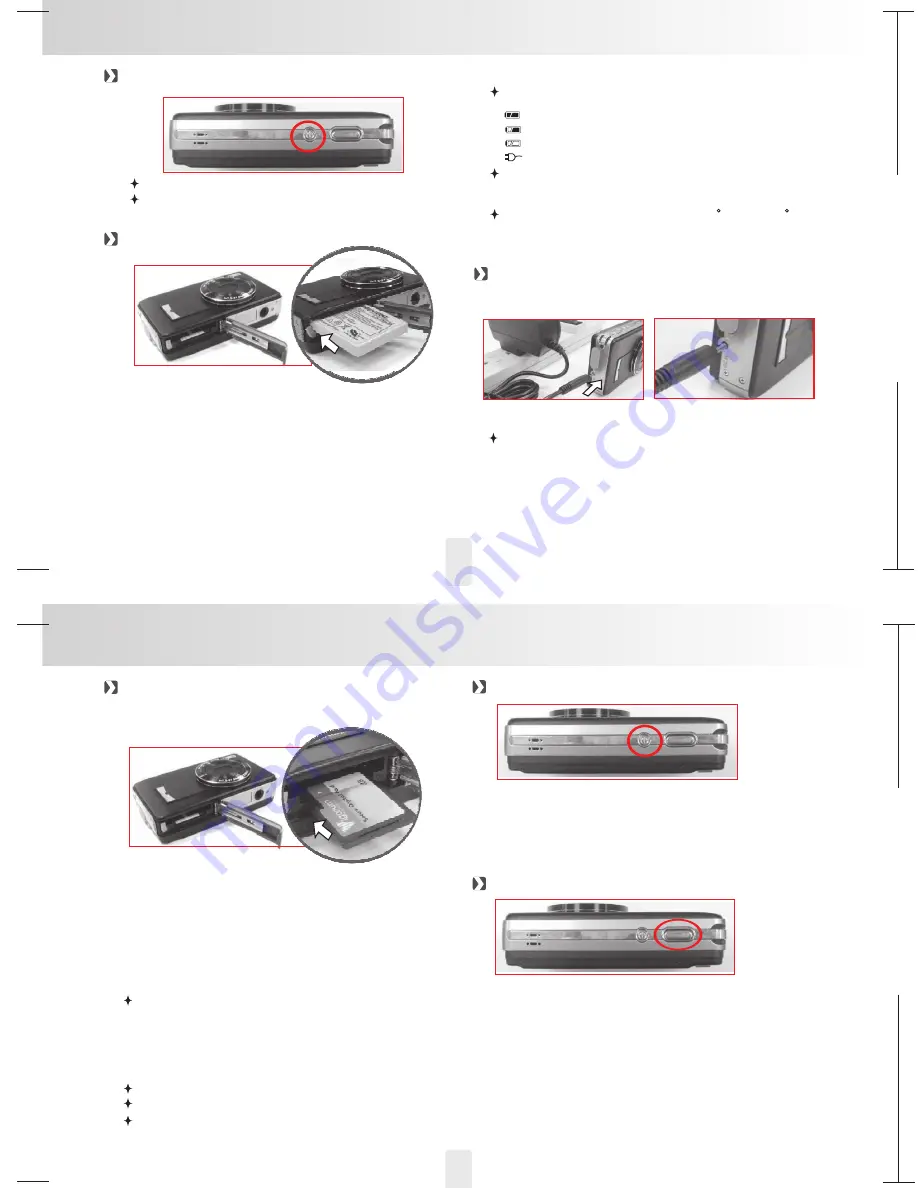
Turn On Or Off The Camera

By pressing again the Power Button can turn off the camera.

By pressing the Power Button can turn on the camera

1. Power off the camera.
2. Slide out Battery Cover to open it.
3. Following the polarity indications and load the battery.
4. Close the Battery Cover.

The below symbols

are the indication

of

on the TFT LCD Monitor

the battery status.

(

):Battery power is full.

(

):Battery power is half drained. Have new a battery ready.

(

):Battery power is drained. Replace with a new batter .

y

The battery may run out if the battery is kept inside the camera
for a long time without using. Please remove the battery when
the camera is not in use.

(

):Battery charging

Charging Procedure

1. Insert the Adaptor Jack to the DC IN socket by the

polarity indications.

2. Connect the Adaptor to the electrical outlet.
3. The LED will light up in orange color whenin charging.
4. The charging is completed when the LED turns green.
5. Remove the Adaptor Jack when the charging is completed.

1. Power off the camera.
2. Open the Battery / Memory Card Cover.
3. Insert the memory card into the card slot and press it

down until a click sound happens. (Please press the memory
card again to get it out once a click sound happens.)

4. Close the Memory Card Cover.

Formatting a brand new

card is strongly

recommended for first use.

memory

The image(s) can be stored either in built-in flash memory
or in memory card. When the memory card is inserted, the
images will be stored in the memory card rather than the
built-in flash memory. On the other hand, the images will be
stored in the built-in flash memory when a memory card is
not inserted.

Power Button

1. By pressing the Power Button can turn on the camera.
2. By pressing again the Power Button can turn off the

camera.

3. If there is no operation during the specified time,

the camera will power off automatically to save
battery life.

Press the shutter button half way to do the focusing and

then press the shutter button fully down to capture an image.

Shutter

The battery may not work normally under 0 C or over 40 C .
It's normal that the temperature of the camera rises after
used for a long period.

Do not support Memory Card under 128MB
When using 8G SD Card, the single file is up to 4G.

Playback result will be affected by different brand of memory
card. Various delays might occur during playback HD file.

Kindly note:

Summary of Contents for DC-T1200

Page 1: ...t 15 Image Size 16 Quality 16 Voice memo 16 Metering 16 Shooting Continues 17 Sharpness 17 Effect 17 Frame 17 OSD Info 18 Face Detection 18 19 Size 19 Quality 19 Metering 19 Effect 19 OSD Information...

Page 2: ...maged in an environment of high temperature To avoid electricity leakage please remove the battery if the camera is expected not to be in use for a long period of time It is normal that the temperatur...

Page 3: ...ps 100 ISO ISO 200 ISO 400 AUTO ISO ISO 800 ISO 1600 White Balance Auto Daylight Cloudy Sunset Fluorescent Tungsten Custom Shooting Mode Single Continuous Metering Spot Multi Image Quality Super Fine...

Page 4: ...daptor Jack when the charging is completed 1 Power off the camera 2 Open the Battery Memory Card Cover 3 Insert the memory card into the card slot and press it down until a click sound happens Please...

Page 5: ...he menu is not displayed on the LCD monitor the Right Button operates as Flash function By pressing the Flash Mode Button you can select different flash options as follows Auto Flash Auto Flash with R...

Page 6: ...press Delete Button to adjust the exposure Press Left Right Button to set the Exposure Value You can adjust the value of the exposure compensation which is ranged from 2 0EV to 2 0EV at 0 5EV incremen...

Page 7: ...ORTRAIT LANDSCAPE a Metering Spot b Sharpness Normal c Effect Normal d Shooting Continuous Shooting Single e Flash 1 Auto Flash 2 Red eye Reduction 3 Flash Off are available Under this mode the settin...

Page 8: ...ed up as below MODE SET FIREWORKS CANDLE LIGHT BEACH AUCTION Beach Mode a Metering Multi b Sharpness Normal c Effect Normal d Shooting Continuous Shooting Single e Flash Off Under this mode the settin...

Page 9: ...le light sources in the image area This is suitable for general use SHOOTING Default SINGLE 1 No continuous shooting SINGLE 2 You can have the continuous shooting function starting by pressing the Shu...

Page 10: ...Web 320X240 30FPS Please press the Mode Button and choose Movie Clip Mode M Video Size Default 640x480 30FPS Movie Clip Mode The video size options are provided as follows 1280 x 720 30FPS 640 x 480...

Page 11: ...8 Slide SLIDE SHOW PLAY INTERVAL 2 SEC EFFECT OFF MOVE PROTECT SELECT ALL Protect 100 0066 EXIT SH 100 0066 EXIT SH 1 Press the OK Menu Button and choose PROTECT 2 Choose SELECT and press OK Menu Butt...

Page 12: ...ld like to rotate 2 Press OK Menu Button and choose ROTATE 3 Choose the rotation you prefer and press OK Menu Button 4 The image after rotation will be stored as a new image o o o DPOF MOVE DPOF STAND...

Page 13: ...S SOUND 3 Select the sound you prefer and press OK Menu Button to confirm the setting Or you can choose OFF to turn off the a start up sound To set up the shooting sound please follow the steps below...

Page 14: ...e the Left Right Button to select another picture and select the number of prints for another picture 4 After setting the number of prints press the Menu OK Button to save 5 Press the Shutter Button t...

Page 15: ...supplied Video USB Cable Turn on the TV and switch the TV Video switch to A V Mode Power on the camera and then switch to the Playback Mode Press down the LEFT or RIGHT direction Button to go to the n...

Page 16: ...you prefer to convert 2 Click on Make Movie then choose Batch Convert 5 6 3 Select photo you prefer to convert 4 Click Convert to make photo convert Please select JPEG as file format otherwise the fi...

Page 17: ...authorization Step 2 5 Choose t or G to log in You Tube Accoun oogle Account 4 33 32 1 Choose file that you like to upload 2 Click Upload to YouTube 8 Click to get permission Allow 6 User will see af...

Page 18: ...12 Mega Pixels 1 1 72 CCD Sensor Approx 12 19 Mega Pixels 4 032 3 024 Approx 12 43 Mega Pixels 4 088 3 040 Optical 3x Zoom 35 102mm EQ for 35mm film F2 8 Wide F5 1 Tele Still Image mode 1 0X 5 0X Play...

Reviews: