


DAC4507
25
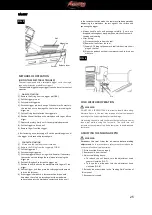
FIG. 5
METHODS OF OPERATION
(USING THE SELECTABLE TRIGGER)
The tool is equipped with a selectable trigger set in the single
sequential actuation mode(black trigger).
The selectable trigger(orange trigger) can also be set for contact
actuation
□
SINGLE ACTUATION
1).
Remove the O-ring from the trigger pin(FIG6)
2).
Pull the trigger pin out
3).
Put the black trigger on
4).
Push the trigger pin back, using a little hammer if necessary,
Use caution not to damage the tool when reinserting the
trigger pin.
5).
Put the O-ring back to fasten the trigger pin
6).
Position the nail outlet on the workpiece with finger off the
trigger
7).
Depress the safety firmly until it is completely depressed
8).
Pull the trigger to drive a nail
9).
Remove finger from the trigger.
After fastening once, fastening will not be possible again until
the trigger is released and pressed again.
□
CONTACT ACTUATION
1).
Disconnect the tool from the air resource.
2).
Remove the O-Ring from the trigger pin (FIG 6).
3).
Pull the trigger out.
4).
Put the orange trigger on.
5).
Push the trigger pin back, using a little hammer if necessary.
Use caution not to damage the tool when reinserting the
trigger pin.
6).
Put the O-Ring back to fasten the trigger pin.
7).
Position the nail outlet on the workpiece with finger off the
trigger
8).
Pull the trigger, and then press the safety against the wood
to drive the fastener.
9).
If the trigger is held back, a fastener will be driven each
time when the safety is pressed against the wood work
surface to depress the workpiece contact and drive a nail.
In the contact actuation mode, the tool may also be operated by
depressing the workpiece contact against the surface and
squeezing the trigger
Always handle nails and package carefully. If nails are
dropped, collating bent may be broken, which will cause mis-
feeding and jamming.
After nailing:
5).
Disconnect air hose from the tool.
6).
Remove all nails from the tool.
7).
Supply 5-10 drops of pneumatic tool lubricant into the air
plug on the tool.
8).
Open the petcock on the air compressor tank to drain any
moisture.
FIG. 6
COLD WEATHER OPERATION
WARNING
DO NOT USE A FROZEN TOOL. Allow tool to thaw before using.
Moisture frozen in the tool may impede internal components
resulting in the risk of injury and/or tool damage.
When using the tool in cold conditions the tool will cycle slower
than usual while driving the first nails. The cycle rate will
increase as the tool warms up. Keep tool warm to avoid reduced
cycle rate.
ADJUSTING THE NAILING DEPTH
WARNING
Disconnect the tool from the air source before making
adjustments.
Such precautionary safety measures reduce the
risk or unintentional tool operation.
1.
Disconnect tool from air supply.
2.
Remove nails from the tool.
3.
Adjust tool driving depth:
To reduce the nail depth, turn the adjustment knob
counter clockwise (FIG 7).
To drive the nail deeper, turn the adjustment knob
clockwise (FIG 8).
4.
Reload nails as described in the "Loading Nails" section of
this manual.
5.
Reconnect air supply.
Pusher
Nail
Release lever
Magazine
Pin
Summary of Contents for DAC4507
Page 29: ...DAC4507 29...