


RATTLER LRF
USER MANUAL
21
2.2.12 RETICLE COLOR
You can change the color of the reticle.
Enable reticle first.
1. Hold button to show the menu.
2. Select Color menu item and press button to switch the color of reticle.
White, Green, Red, and Black colors are selectable.
3. Hold button to save and exit.
2.2.13 TRAJECTORY CORRECTION
Enable the trajectory correction to shot the target with high accuracy by
marking the offset between the big crosshair and small crosshair.
Trajectory correction available only with Reticle 1 type. Select Reticle 1 in the
Reticle menu.
1. In the live view mode, hold the wheel to show the menu.
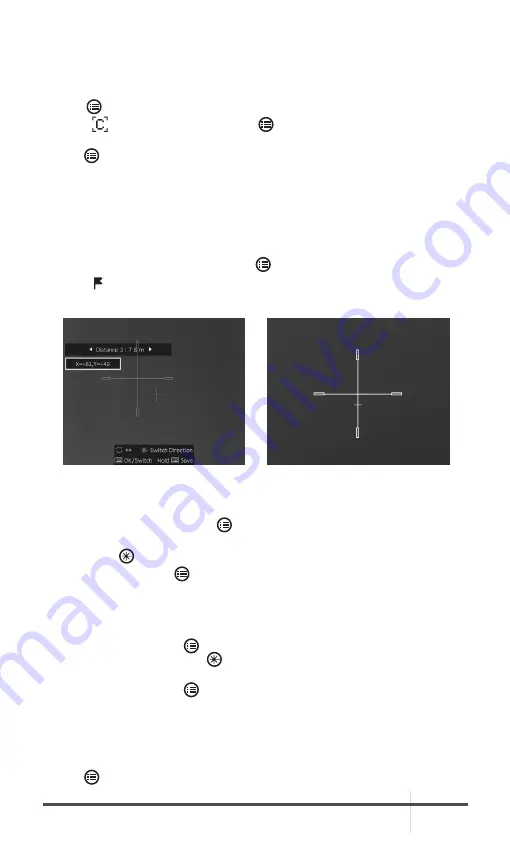
2. Select Trajectory menu item. Two crosshairs show in the view. The big one
is reticle crosshair, and the small one is trajectory correction crosshair.
3. Set the distance.
1) Press the wheel button to select the distance, and then rotate the
wheel to adjust the distance between the target and the device.
2) Press to switch the selected distance value.
3) Press the wheel to save the distance settings.
4. Set the crosshair position of trajectory correction.
1) Aim the big crosshair at the target.
2) Shot and mark the actual drop point of the bullet.
3) Rotate the wheel to move the small cursor to the position of the
actual drop point. Press to switch the moving direction of the small
cursor. You can view the coordinate of the cursor in the view.
5. Press the wheel button to save the coordinates of the current position.
6. Rotate the wheel to switch to the next distance.
7. Repeat step 3 to 5 to set another trajectory correction position.
You can save up to five corrections for different distances. Corrective aiming
points will be displayed with short lines on the reticle.
8. Hold button to exit.
FIGURE 2-10. TRAJECTORY CORRECTION


