background image

17  Technical Information


Connection J1 Remote I/O Interconnections 


222/288 

Turbo-V 1001 Rack Controller User Manual / 87-901-033-01 

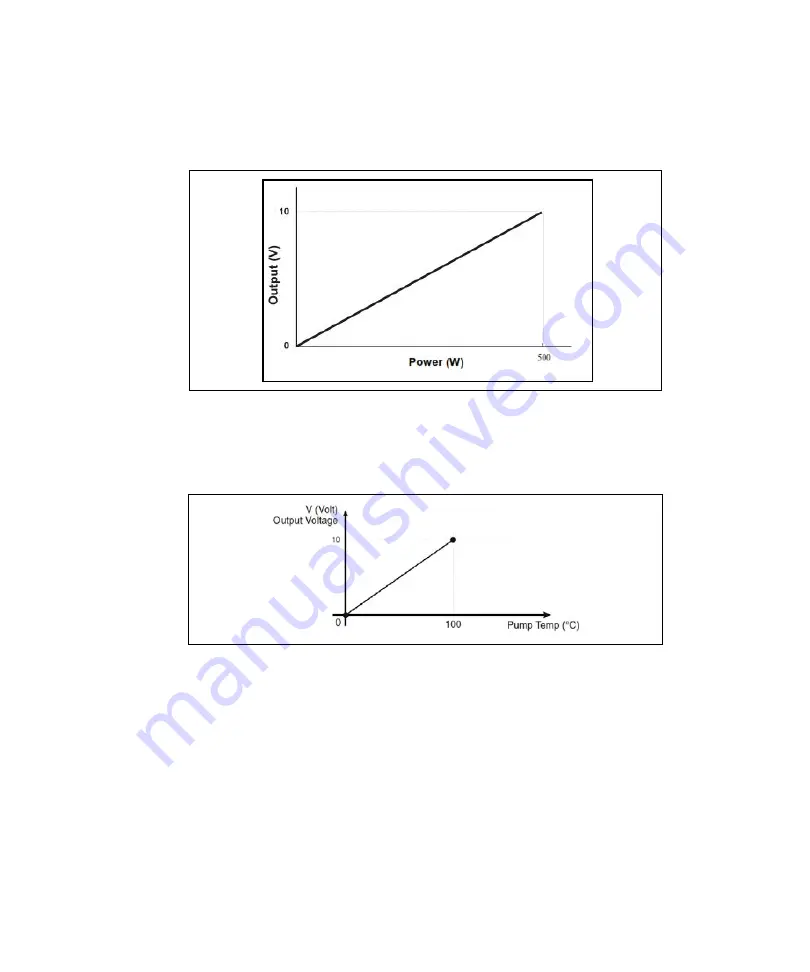
The analog output power related is showed in the following diagram: 


Figure 12   

The analog output pump temperature related is showed in the 
following diagram: 


Figure 13   

Summary of Contents for Turbo -V 1001

Page 1: ...Turbo V 1001 Rack Controller Models X3501 64003 87 901 033 01 06 2013 Manual de Instrucciones User Manual ...

Page 2: ...ument are furnished under a license and may be used or copied only in accordance with the terms of such license Restricted Rights Legend If software is for use in the performance of a U S Government prime contract or subcontract Software is delivered and licensed as Commercial computer software as defined in DFAR 252 227 7014 June 1995 or as a commercial item as defined in FAR 2 101 a or as Restri...

Page 3: ...Turbo V 1001 Rack Controller Turbo V 1001 Rack Controller User Manual 87 901 033 01 3 288 Turbo V 1001 Rack Controller ...

Page 4: ...Turbo V 1001 Rack Controller 4 288 Turbo V 1001 Rack Controller User Manual 87 901 033 01 ...

Page 5: ...mmagazzinamento 17 Preparazione per l installazione 18 Installazione 19 Uso20 Manutenzione 20 Procedure di uso 23 Manutenzione 23 Smaltimento 24 Messaggi di errore 25 2 Gebrauchsanleitung 27 Allgemeines28 Lagerung 29 Vor der Installation 30 Installation 31 Gebrauch 32 Wartung 32 Steuerungen Anzeigen und Verbinden des Controllers33 ...

Page 6: ...erales 40 Emmagasinage 41 Preparation pour l installation 42 Installation 43 Utilisation 44 Entretien 44 Commandes Indicateurs et Connecteurs du Contrôleur 45 Procedures d utilisation 47 Entretien 47 Mise au rebut 48 Messages d erreur 49 4 Manual de istrucciones 51 Información general 52 Almacenamiento 53 Preparación para la instalación 54 Instalación 55 Uso56 ...

Page 7: ...ntenimiento 59 Eliminación 60 Mensajes de error 61 5 Manual de Istruções 63 Informações gerais 64 Armazenagem 65 Preparação para a instalação66 Instalação 67 Utilização 68 Manutenção 68 Procedimentos de uso 71 Manutenção 71 Eliminação 72 Mensagens de erro 73 6 Bedrijfshandleiding 75 Algemene informatie 76 Opslag 77 Voorbereiding voor installatie 78 Installatie 79 ...

Page 8: ...sprocedures 83 Onderhoud 83 Afvalverwerking 84 Foutmeldingen 85 7 Istruktionsbog 87 Generel Information 88 Opbevaring 89 Forberedelser før installation 90 Installation 91 Anvendelse 92 Vedligeholdelse 92 Indikatorer og Kontakter på Styreenheden93 Instruktion 95 Vedligeholdelse 95 Bortskaffelse 96 Fejlmeddelelser 97 8 Bruksanvisning 99 Allmän Information 100 Förvaring 101 ...

Page 9: ... och Kontakter på Styrenheten 105 Instruktioner för bruk 107 Underhåll 107 Bortskaffning 108 Felmeddelanden109 9 Instruksjon Manual 111 Generell informasjon112 Lagring 113 Forberede installasjonen 114 Installasjon 115 Bruk 116 Vedlikehold 116 Kontroller Indikatorer og Kontakter på Styreenheten 117 Instruksjoner for bruk 119 Vedlikehold 119 Eliminering 120 Feilmeldinger 121 ...

Page 10: ... Käyttö 128 Huolto 128 Valvojan Säätimet Osoittimet ja Liittimet 129 Käyttötoimenpiteet 131 Huolto 131 Hävittäminen 132 Vianetsintä 133 11 Felhasználói Kézikönyv 135 Általános információk 136 Tárolás 137 A telepítésre való előkészítés138 Telepítés 139 Használat 140 Karbantartás 140 A vezérlő parancsai kijelzői és csatlakozói 141 Használati eljárások 143 Karbantartás 143 ...

Page 11: ...gotowanie do instalacji 150 Instalacja 151 Uzytkowanie 152 Konserwacja 152 Sterowniki Wskazniki I Laczniki Kontrolera 153 Procedure uzytkowania 155 Konserwacja 155 Przetworstwo odpadow 156 Bledne informacje 157 13 Návod k Použití 159 Všeobecné informace 160 Uskladnění 161 Příprava k instalaci 162 Instalace 163 Použití 164 Údržba 164 Ovládání indikátory a konektory Kontroléru 165 ...

Page 12: ...a Obsluhu 171 Všeobecné informácie 172 Uskladňovanie 173 Príprava pre inštaláciu 174 Inštalácia 175 Použitie 176 Údržba 176 Povely Ukazovatele a Prípojky Controller 177 Postup pri použití 179 Údržba 179 Likvidácia 180 Oznamy vád 181 15 Priročnik za Navodila 183 Splošne informacije 184 Skladiščenje185 Priprava za montažo 186 Montaža 187 Uporaba 188 ...

Page 13: ...padkov 192 Obvestilo o napaki 193 16 Instructions for Use 195 General Information 196 Storage 197 Preparation for Installation 198 Installation 199 Use200 Maintenance 200 Use Procedure 203 Maintenance 203 Disposal 204 Error Messages 205 17 Technical Information 207 Turbo V 3KT Rack Controller Description 210 Controller Specifications 212 Controller Outline 213 Fuse Holder Assembly 214 ...

Page 14: ...nector 230 Procedure to Connect the Serial and I O Ports to an External Cable 231 RS 232 RS 485 Communication Description 232 Examples 236 Window Meanings 238 Power Derating Function Temperature Condition 249 How to Use by Front Panel 250 Programming 254 INPUT OUTPUT Menu 262 SETPOINT Submenu 264 SERIAL Menu 266 Examples 268 Orderable Parts 281 ...

Page 15: ...53 Preparación para la instalación 54 Instalación 55 Uso 56 Mantenimiento 56 Mandos Indicadores y Conectores 57 Procedimientos de uso 59 Encendido del controler 59 Puesta en marcha de la Bomba 59 Parada de la Bomba 59 Mantenimiento 59 Eliminación 60 Mensajes de error 61 Traducción de las instrucciones originales ...

Page 16: ... no cumpla con las normas nacionales específicas Los controlers de la serie Turbo V 1001 Rack son convertidores de frecuencia controlados por un microprocesador realizados con componentes en estado sólido y con capacidad de autodiagnosis y autoprotección Características del controler Ajuste automático de la tensión de entrada Operatividad del frontal remoto serial Pilotaje del ventilador de enfria...

Page 17: ...cífica que al no realizarse correctamente podría provocar graves lesiones personales ATENCIÓN Los mensajes de atención se visualizan antes de procedimientos que al no respetarse podrían provocar daños al equipo NOTA Las notas contienen información importante extraída del texto Almacenamiento Durante el transporte y el almacenamiento de los controlers se deberá cumplir con las condiciones ambiental...

Page 18: ... haberse producido durante el transporte ponerse en contacto con la oficina de venta más cercana Durante la operación de desembalaje prestar una atención especial a no dejar caer el controler y evitarle golpes No dispersar el embalaje en el medio ambiente El material es completamente reciclable y cumple con los requisitos definidos en la Directiva 94 62 CE y sus modificaciones posteriores para la ...

Page 19: ...rrollan altas tensiones que pueden causar graves daños o la muerte Antes de efectuar cualquier operación de instalación o mantenimiento del controlador desconectarlo del enchufe de alimentación NOTA El controler puede instalarse en una mesa o dentro de un rack específico En cualquier caso es necesario que el aire de refrigeración pueda circular libremente alrededor del aparato No instalar y o util...

Page 20: ...r el controler efectuar todas las conexiones eléctricas y neumáticas y consultar el manual de la bomba conectada ADVERTENCIA Para evitar lesiones a las personas y al aparato si la bomba está apoyada sobre una mesa cerciorarse que es estable No poner en marcha nunca la bomba si la brida de entrada no está conectada al sistema o no está cerrada con la brida de cierre Mantenimiento Il Turbo V 1001 Ra...

Page 21: ...omática por un error este pulsador deberá ser apretado dos veces la primera para reajustar el controler y la segunda para volver a poner en marcha la bomba 2 Pulsador para visualizar en pantalla número y tiempo de duración del ciclo vida operativa de la bomba y número de serie 3 Pulsador para visualizar en pantalla corriente temperatura potencia y velocidad de rotación de la bomba Está siempre act...

Page 22: ... de los parámetros Figura 3 Panel Trasero del Controler X3501 64003 1 Módulo de alimentación del controler con fusibles toma de alimentación y filtro EMC 2 Puerto de comunicación RS 232 RS 485 3 Conector para las señales lógicas de input output con salida analógica programable el conector de acoplamiento viene suministrado con el correspondiente puente de cierre del Interlock 4 Cable para la bomba...

Page 23: ...marcha la bomba es necesario habilitar la conexión de interlock de seguridad Con este fin acoplar al conector J1 el conector correspondiente suministrado en dotación Parada de la Bomba Para detener la bomba hay que apretar el pulsador STOP del panel frontal Mantenimiento Los controlers de la serie Turbo V 1001 Rack no necesitan ningún mantenimiento Cualquier operación ha de ser efectuada por perso...

Page 24: ...vancia de la directiva CE denominada WEEE Este símbolo válido sólo para los países miembros de la Comunidad Europea indica que el producto sobre el cual ha sido aplicado NO debe ser eliminado junto con los residuos comunes sean éstos domésticos o industriales y que por el contrario deberá ser sometido a un procedimiento de recogida diferenciada Por lo tanto se invita al usuario final a ponerse en ...

Page 25: ... en el conector J1 a causa de la interrupción del cortocircuito entre el pin 3 y el pin 9 y entre el pin 4 y pin 15 del conector P1 o a causa de la apertura de la señal de interlock externo Eliminar el cortocircuito entre el pin 3 y el pin 9 y entre el pin 4 y pin 15 del conector J1 o cerrar la señal de interlock exterior FAULT PUMP OVERTEMP La temperatura del rodamiento superior de la bomba ha su...

Page 26: ...s veces el pulsador START para volver a poner en marcha la bomba FAULT SHORT CIRCUIT Durante el funcionamiento normal después de la fase de puesta en marcha se ha detectado una condición de cortocircuito en el circuito de potencia Comprobar las conexiones entre la bomba y el controler Apretar dos veces el pulsador START para volver a poner en marcha la bomba OVERVOLTAGE Ha occurrido una avería en ...

Page 27: ...rmation 196 Storage 197 Preparation for Installation 198 Installation 199 Use 200 Maintenance 200 Controls Indicators and Connectors 201 Use Procedure 203 Controller Startup 203 Starting the Pump 203 Pump Shutdown 203 Maintenance 203 Disposal 204 Error Messages 205 Original Instructions ...

Page 28: ...people non authorized interference with the equipment or any action contrary to that provided for by specific national standards The Turbo V 1001 Rack Controller are microprocessor controlled solid state frequency converters with self diagnostic and self protection features Controller features Input voltage auto setting Front Remote Serial Operation 24 Vdc pump fan cooling drive Vent Purge valves ...

Page 29: ...r practice which if not followed correctly could lead to serious injury CAUTION The caution messages are displayed before procedures which if not followed could cause damage to the equipment NOTE The notes contain important information taken from the text Storage When transporting and storing the controllers the following environmental requirements should be satisfied temperature from 20 C to 70 C...

Page 30: ...e packing If this shows signs of damage which may have occurred during transport contact your local sales office When unpacking the controller ensure that it is not dropped or subjected to any form of impact Do not dispose of the packing materials in an unauthorized manner The material is 100 recyclable and complies with Directive 94 62 CE and subsequent amendments Figure 1 Controllers Packing ...

Page 31: ...injury or death Before servicing the unit disconnect the input power cable NOTE The Turbo V controller can be used as a bench unit or a rack module but it must be positioned so that free air can flow through the holes Do not install or use the controller in an environment exposed to atmospheric agents rain snow ice dust aggressive gases or in explosive environments or those with a high fire risk D...

Page 32: ...mation Make all vacuum manifold and electrical connections and refer to Turbo V pump instruction manual prior to operating the Turbo V controller WARNING To avoid injury to personnel and damage to the equipment if the pump is lying on a table make sure it is steady Never operate the Turbo V pump if the pump inlet is not connected to the system or blanked off Maintenance The Turbo V 1001 Rack Contr...

Page 33: ...utomatically by a fault this push button must be pressed once to reset the controller and a second time to restart the pump 2 Keyboard push button to recall on the display the cycle number cycle time and pump life and serial number 3 Keyboard push button to recall on the display the pump current pump temperature pump power rotational speed It is always active regardless of the selected operating m...

Page 34: ...allow to navigate the menu and to change the parameters values Figure 3 Controller X3501 64003 Rear Panel 1 Controller power entry module consisting of mains fuses mains socket and EMC filter 2 RS 232 RS 485 communication port connector 3 Logic input output signals connector plus programmable analog output mating connector supplied with Interlock link 4 Pump cable 5 Vent Valve and Purge Valve cont...

Page 35: ...the Interlock safety connection must be secured This can be achieved by connecting to J1 connector the supplied mating connector Pump Shutdown To shutdown the pump press the START STOP push button on the controller front panel Maintenance The Turbo V 1001 Rack Controller does not require any maintenance Any work performed on the controller must be carried out by authorized personnel When a fault h...

Page 36: ... is applied in accordance with the EC WEEE Waste Electrical and Electronic Equipment Directive This symbol valid only in countries of the European Community indicates that the product it applies to must NOT be disposed of together with ordinary domestic or industrial waste but must be sent to a differentiated waste collection system The end user is therefore invited to contact the supplier of the ...

Page 37: ...l of J1 connector is activated by an interruption of the link between pin 3 and 9 or between pin 4 and 15 of P1 connector or because the external interlock signal is open Reset the short circuit between pin 3 9 and between pin 4 15 of J1 connector or close the external interlock signal FAULT PUMP OVERTEMP The pump upper bearing temperature exceeded 60 C Wait until the temperature decrease below th...

Page 38: ...o start the pump FAULT SHORT CIRCUIT During normal functioning after the start up phase a short circuit condition has been detected in the power circuit Check connections and shortages between pump and controller Press the START push button twice to start the pump OVERVOLTAGE A failure has occurred in the controller power supply section or the controller has received a disturbance from the mains P...

Page 39: ...224 Controller to Pump Connection 225 Input Output Electrical Specifications 226 Auto Pump Speed Mode with Purge Vent Device Accessory On Command Mode with Purge Vent Device Accessory Only Autotime Mode with Purge Vent Device Accessory Only 228 Controlled Venting 228 Stop Speed Reading230 Serial Communication J2 Connector 230 Procedure to Connect the Serial and I O Ports to an External Cable231 RS...

Page 40: ...bedded Data Logger Manager New Function 246 Drive the External Fan 248 Power Derating Function during High Temperature Condition 249 How to Use by Front Panel 250 Startup 250 Main Screen 250 Pump Start Stop and Reset Fail 251 Counters Controller Data 252 Programming 254 Configuration Menu 257 PUMP SETTING Menu 259 INPUT OUTPUT Menu 262 SETPOINT Submenu 264 SERIAL Menu 266 ...

Page 41: ...Technical Information Error Messages 17 Turbo V 1001 Rack Controller User Manual 87 901 033 01 209 288 Auto Test Phase 279 Orderable Parts 281 Examples 268 Fails 276 ...

Page 42: ...cessor and digital section The controller converts mains voltage supply into a 3 phase low voltage medium frequency output which is required to power the pump The controller can be operated by a remote host computer via the serial connection A Windows based software is available T Plus optional The DSP generates the variable output frequency and controls the 3 phase output voltage according to the...

Page 43: ...Technical Information Turbo V 1001 Rack Controller Description 17 Turbo V 1001 Rack Controller User Manual 87 901 033 01 211 288 Figure 4 Turbo V 1001 Rack Controller ...

Page 44: ...e temperature 20 C to 70 C Fuse Mains 2 x T10 AH slow blow 250 V 5x20 fuses Serial communication T Plus kit RS232 cable with a 9 pin D type male connector and a 9 pin D type female connector and T Plus software optional Power cable With European or NEMA plug 3 meters long optional Pump cable 5 meters long fixed cable In compliance with norms EN 61010 1 2001 EN 61326 1 2006 Emission level Class B f...

Page 45: ... 213 288 NOTE All connecting cables for remote I O and serial connections if longer than 3 m must be of the shielded type Controller Outline The outline dimensions for the Turbo V 1001 Rack Controller are shown in the following figures Figure 5 Controller models X3501 64003 outline Turbo V 1001 Rack ...

Page 46: ...der Assembly The following figure shows the location of this assembly Figure 6 Rear panel Proceed as follows to replace one or both fuses 1 Remove the fuse holders position A with a small screwdriver 2 Replace the fuse 3 Use only T type fuses of the following characteristics 250 Vac 10 A 5x20 mm High breaking capacity A ...

Page 47: ...shipped with pin 3 shorted with pin 9 and pin 4 shorted with pin 15 make the connection with AWG 24 0 25 mm2 or smaller wire to the pins indicated in the figure to obtain the desired capability It is a 15 pins D type connector the available signals are detailed in the table the following paragraphs describe the signal characteristics and use Tab 3 PIN N SIGNAL INPUT OUTPUT 1 START STOP IN 2 START ...

Page 48: ...he START STOP signal is connected to the 24 Vdc pin and the START STOP signal to the GROUND pin in this condition the pump automatically starts as soon as the controller recognizes the input supply Plug Pump INTERLOCK safety input signal opt isolated to control the pump rotation activation With the supplied mating connector the INTERLOCK signal is connected to the 24Vdc pin and the INTERLOCK signa...

Page 49: ...ence quantity is the frequency the current drawn or the pressure measured it is possible to set the hysteresis in of the threshold value to avoid bouncing It is possible to delay the set point checking for a programmable delay time For example reference quantity frequency threshold 500 Hz threshold hysteresis 1 activation logic high level active delay time 0 s ...

Page 50: ...ault settings reference quantity frequency threshold 582 Hz Threshold hysteresis 2 activation type high level active delay time 0 s These settings can be changed by means of serial interfaces see Windows Meaning table windows form 101 to 105 The same settings are used by the SET POINT CONTACT OUTPUT SET POINT CONTACT OUTPUT This output relay contact works in the same way like THE PROGRAMMABLE SET ...

Page 51: ...his contact output is normally open SPEED SETTING PWM input signal opt isolated to set the pump speed The PWM signal characteristics must be the following frequency 100 Hz 20 amplitude from 5 to 24 V duty cycle range from 25 to 75 toff T corresponding to a rotational frequency from 200 Hz to 650 Hz linearly With duty cycle 25 rotational frequency 200 Hz with duty cycle 75 rotational frequency 650 ...

Page 52: ...value is 440 Hz it is settable via serial line by means of window 117 see the serial command table The Low Speed function can also be activated by serial communication with window 1 and the low speed value can be adjusted via window 117 Both low speed value win 117 and high speed value win 120 are limited between 440 Hz value that can t be set by the user and Maximum excitation frequency win 121 6...

Page 53: ...GRAMMABLE ANALOG SIGNAL this signal is an output voltage from 0 to 10 Vdc max load 1 5 mA proportional to a reference quantity frequency power pump temperature chosen by the user by means of the front panel commands or through serial command window 111 The default setting is frequency see the following example diagrams Figure 11 650 ...

Page 54: ...I O Interconnections 222 288 Turbo V 1001 Rack Controller User Manual 87 901 033 01 The analog output power related is showed in the following diagram Figure 12 The analog output pump temperature related is showed in the following diagram Figure 13 ...

Page 55: ...Manual 87 901 033 01 223 288 Connection P1 PURGE VENT Figure 14 NOTE ref 7 in figure above The Turbo V 1001 Pumping system can have as an optional accessory the purge vent device model X3501 68002 Through P1 connector the controller is able to drive the Vent Valve Normally Open placed on the accessory ...

Page 56: ... 033 01 Connection P2 EXTERNAL FAN This is a dedicated 24 Vdc connector to supply the optional external fan kit through a suitable optional extention cable see Orderable Parts table See Window Meaning table and HOW TO USE BY FRONT PANEL chapter to know the external fan possible settings Figure 15 NOTE ref 8 in figure above ...

Page 57: ...ive meter long cable is provided to connect the controller to the pump The following figures show the pump connector configuration where pins A F upper bearing sensor B C D 3 phase output to pump motor E ground A G pump body temperature sensor Figure 16 Pump connector The pump cable can be extended by means of an optional extension cable see Orderable Parts table ...

Page 58: ...ations PURGE VENT VALVES the Turbo V 1001TwisTorr Pumping System can integrate the Purge and Vent valves The two valves are Normally Closed N C so if a power fail occurs the valves will remain closed The valves operating mode can be set by serial communication with WIN 125 or using front panel interface see following diagram for details The valve operating mode can be changed only with the pump in...

Page 59: ... Mode with Purge Vent Device Accessory Only If WIN 125 2 the both the valves are managed by an automatic procedure When activated this procedure guarantees that the pump is slowed down properly modulating in automated way the Vent Valve see the figure above for details NOTE there are some limitations See the description in the body of the text for details ...

Page 60: ...ting WIN 122 1 the Vent Valve opens only if the pump is in STOP status if the pump is in STARTING NORMAL or AUTOTUNING status the valve stays close if the pump is in BRAKING status the Vent Valve performs a Controlled Venting Setting WIN 122 0 the Vent Valve is closed independently from the pump status Autotime Mode with Purge Vent Device Accessory Only The default setting for vent operating mode ...

Page 61: ... following conditions the Vent Valve performs a Controlled Venting If WIN 125 1 On Command mode WIN 122 1 and the pump is in BRAKING status If WIN 125 2 Auto Pump Speed mode and the pump is in BRAKING status During a Controlled Venting procedure the Vent Valve opening time is modulated so that the pump deceleration quickness is maintained in the range between 3 and 5 Hz s The timing is adjusted ev...

Page 62: ...tivated all the related functions set point output programmable analog output if related to the frequency will follow the frequency reading NOTE The T Plus Software optional allows the operator to set all the programmable feature Serial Communication J2 Connector Figure 20 This is a 9 pin Female D type serial input output connector to control via an RS 232 or RS 485 connection the Turbo 1001 Pumpi...

Page 63: ...ype Male connector into the J2 serial connector Procedure to Connect the Serial and I O Ports to an External Cable The following picture shows the right procedure to connect a cable to the I O or to the serial port connector A shielded cable of 30 m maximum length has to be utilized for both serial and I O port connections NOTE Take care to have a good contact soldered between the metallic connect...

Page 64: ... Communication Description Both the RS 232 and the RS 485 interfaces are available on the connector J2 The communication protocol is the same see the structure below but only the RS 485 manages the address field Therefore to enable the RS 485 is necessary to select the type of communication as well as the device address by means of the T Plus software ...

Page 65: ...n the following way the host MASTER send a message CRC to the controller SLAVE the controller answer with an answer CRC to the host The MESSAGE is a string with the following format STX ADDR WIN COM DATA ETX CRC where NOTE When a data is indicated between two quotes it means that the indicated data is the corresponding ASCII character STX Start of transmission 0x02 ADDR Unit address 0x80 for RS 23...

Page 66: ... 1 0 OFF 1 ON Numeric N 6 0 9 right justified with 0 Alphanumeric A 10 from blank to _ ASCII ETX End of transmission 0x03 CRC XOR of all characters subsequent to STX and including the ETX terminator The value is hexadecimal coded and indicated by two ASCII character The addressed SLAVE will respond with an ANSWER whose structure depends from the MESSAGE type When the MESSAGE is a reading command t...

Page 67: ...ACK 1 byte 0x6 The command execution has been successfully completed NACK 1 byte 0x15 The command execution has been failed Unknown Window 1 byte 0x32 The specified window in the command is not a valid window Data Type Error 1 byte 0x33 The data type specified in the command Logic Numeric or Alphanumeric is not accorded with the specified Window Out of Range 1 byte 0x34 The value expressed during ...

Page 68: ...estination Controller 02 80 30 30 30 31 31 03 42 33 STX ADDR WINDOW WR ON ETX CRC Source Controller Destination PC 02 80 06 03 38 35 STX ADDR ACK ETX CRC Command STOP Source PC Destination Controller 02 80 30 30 30 31 30 03 42 32 STX ADDR WINDOW WR OFF ETX CRC Source Controller Destination PC 02 80 06 03 38 35 STX ADDR ACK ETX CRC ...

Page 69: ...ation Controller 02 80 31 30 30 31 31 03 42 32 STX ADDR WINDOW WR ON ETX CRC Source Controller Destination PC 02 80 06 03 38 35 STX ADDR ACK ETX CRC Command SOFT START OFF Source PC Destination Controller 02 80 31 30 30 31 30 03 42 33 STX ADDR WINDOW WR OFF ETX CRC Source Controller Destination PC 02 80 06 03 38 35 STX ADDR ACK ETX CRC ...

Page 70: ... or Front Panel control mode Serial 0 Remote 1 Front Panel 2 default 1 100 R W L Soft Start can be written only in Stop condition YES 1 NO 0 101 R W N Set Point reference quantity 0 Frequency 1 Current 2 Time 3 Normal default 0 102 R W N Set Point threshold expressed in Hz mA s _ mbar default 720 103 R W N Set Point delay time between the pump start and the set point check starting s 0 to 999999 d...

Page 71: ...configured as Impluse the Interlock signal acts only at the start Impulse 0 Continuous 1 default 1 111 R W L Analog output link the output voltage can be related to different quantities 0 frequency 1 power 2 bearing temp default 0 117 R W N Low speed setting Hz 350 to WIN 121 default 750 120 R W N High speed setting Hz 350 to WIN 121 default 825 121 R W N Maximum rotational frequency in Hz can be ...

Page 72: ...onding to 0 to 13107 sec Default 15 143 R W N External Fan Configuration 0 Always ON 1 Automatic 2 Serial default 2 144 R W L External Fan activation 0 OFF 1 ON default 0 145 R W L Purge Valve open close N C 0 close 1 open Default 1 147 R W N Vent Valve opening Time expressed in 0 2 s 0 to 65535 bit 0 infinite min 0 2 s Max 13107 s default 0 155 R N Power Limit Applied expressed in W 157 R W L Gas...

Page 73: ...owerexpressedinW 203 R N Driving frequency expressed in Hz 204 R N Pump bearing temperature expressed in C 205 R N System status Stop 0 Waiting intlk 1 Ramp Up 2 Auto tuning 3 Braking 4 Normal 5 Fail 6 206 R N Error code Bit description see the following figure 211 R N Controller Internal temperature in C 222 R N Body pump temperature in C 232 R N Rotational frequency in Hz 300 R N Cycle time in m...

Page 74: ...nt service 400 R A CRC EPROM QE QE8XXXX where XXXX are variable 402 R A CRC Param PA PA8XXXX where XXXX are variables 404 R A CRC parameter structure XXXX 406 R A Program Listing code revision XXXX 407 R A Parameter Listing code revision XXXX 500 to 502 Reserved to Agilent service 503 R W N RS 485 address 0 to 31 default 0 504 R W L Serial type selection 0 RS 232 1 RS 485 default 0 ...

Page 75: ...ntroller User Manual 87 901 033 01 243 288 8 7 6 5 4 3 2 1 0 CABLE MEAS TOO HIGH LOAD NO CONNECTION SHORT CIRCUIT PUMP OVERTEMP T bearing 60 C OVERVOLTAGE CONTROLL OVERTEMP T 65 C OUTPUT FAIL Vdc UNDERVOLTAGE V supply 81 Vdc Figure 22 Window N 206 Bit Description ...

Page 76: ... Soft Start mode is disabled by default The Soft Start mode can be activated by a suitable software by Remote I O or by Front Panel command see the paragraphs INTERCONNECTIONS and RS 232 485 COMMUNICATION DESCRIPTION Soft Start frequency steps are the followings 150 Hz 250 Hz 350 Hz 450 Hz 550 Hz and 650 Hz The pump remains at each step for a period of 300 s A fail condition occurs if the pump is ...

Page 77: ...scription of each command always on screen and User Interface adaptable to the Pump Status are only some of the features developed to make the approach to pump settings easy and to reduce the number of steps during pump configuration Moreover special care is given to the GUI Graphical User Interface to reproduce the environment of well known User Interfaces such as Microsoft Windows applications t...

Page 78: ... 033 01 Embedded Data Logger Manager New Function This controller integrates the data logger function it enables the controller to manage some log files with a big amount of data The user can download this data using the T plus software Figure 24 The EDLM Interface will be as shown below Figure 25 ...

Page 79: ...eld having default value 16 and fixed sample time of 10 minutes only 3 Initiate download by pressing the Start Download button which would be enabled after selecting a file When the user clicks on this button the input data would be validated and the download would begin During the download process the Start Download button would read Abort Downloading This could be used to abort the data download...

Page 80: ...c Setting WIN 143 1 the external fan is always ON during the Ramp up status In the others status the fan behavior depends only on WIN 144 value WIN 144 1 external fan ON WIN 144 0 external fan OFF That means that WIN 144 determines the Fan status when the pump reaches the normal status 3 Serial With WIN 144 2 default value the external fan is configured in serial mode in this condition the fan beh...

Page 81: ...re can be read by WIN 211 WARNING The user must set the gas type load WIN 157 and Cooling mode WIN 106 before starting the pump The applied power limit is readable by serial line WIN 155 If the pump body temperature exceed 55 C or the pump bearing temperature exceed 60 C or the Controller temperature exceed 60 C the controller goes in status 6 Fail The controller compensates according to maximum a...

Page 82: ...nds and shows A G I L E N T V A C U U M T E C H N O L O G I E S T U R B O 7 5 0 A U T O T E S T O K After 4 seconds the display shows the following screen page Main Screen STATUS indicates the operating regime of the pump Stop Interlock Starting Autotune Braking Normal Fail XXXHz is the current rotational frequency of the pump MODE Front Remote Serial NOTE If the pump is not connected and in case ...

Page 83: ...t the fail condition NOTE The front panel START STOP function is available only if the controller is set to FRONT mode If it is set to REMOTE mode when the key is pressed an error message is shown indicating COMMAND LOCKED IN REMOTE if it is set to SERIAL mode the COMMAND LOCKED IN SERIAL MODE error message is displayed The error message is displayed for approx 1 second before moving to the previo...

Page 84: ...XXXm Time of last cycle minutes P LIFE XXXXXX total operating time hours of the pump Pressing twice the pushbutton the following information is displayed MN Model Number of the controller SN Serial Number Pressing a third time the following message is displayed FW Firmware version PA Parameter Listing version S T A T U S X X X H z C O N T R O L L E R F W X X X X X X X X X X P A Y Y Y Y Y Y Y Y Y Y...

Page 85: ...ain the display goes back to main screen If not otherwise specified the following status are showed with a solid symbol no blinking request Not showed in programming PD Power Derating blinking warning Purge when active shows the status of the PURGE VALVE OPEN Vent when active blinking the VENT VALVE is OPEN or a CONTROLLER VENT BRAKING is active HS Shows the high speed selection the controller is ...

Page 86: ...follows COUNTERS LOW SPEEDspeed become INCREASE and DECREASE it s possible to select the next or previous value of a parameter in the case of compulsory parameters or to increase decrease the individual digit of a parameter in the case of numeric parameters The MEASURES and COUNTERS buttons become NEXT and PREVIOUS it s possible to select the next parameter or next digit of a numeric parameter or ...

Page 87: ...d for approx 1 second the changes are cancelled and the previous parameter value is displayed Switching from a parameter to the previous parameter using the PREVIOUS key indicates the intention to abort any changes made to the specific parameter Abort is indicated by the caption Change aborted that is displayed for approx 1 second before moving to the previous parameter S T A T U S X X X H z H I G...

Page 88: ...ion can proceed in a forwards NEXT button or backwards PREVIOUS button direction It is possible to enter a sub branch by pressing the INCREASE button If no buttons are pressed for more than 1 minute the controller automatically quits the programming menu canceling any modifications made to the current parameter The figure below shows the first level of the configuration menu and the links to the r...

Page 89: ...rogramming 17 Turbo V 1001 Rack Controller User Manual 87 901 033 01 257 288 Configuration Menu Figure 27 F5 F4 F3 F2 MODE PUMP SETTING INPUT OUTPUT SETPOINT SERIAL FRONT SERIAL REMOTE HIGH SPEED ADJ START MODE TYPE BAUD RATE ...

Page 90: ...panel SERIAL accepts commands from the serial interface REMOTE accepts commands from the remote input connector The first selection displayed is the value currently enabled The selected choice is highlited with a special character on the right side The selected item shall be showed blinking as first entry in the circular menu S T A T U S X X X H z C O N F I G U R A T I O N M O D E P U M P S E T T ...

Page 91: ...Technical Information Programming 17 Turbo V 1001 Rack Controller User Manual 87 901 033 01 259 288 PUMP SETTING Menu Figure 28 ...

Page 92: ...ER 10 seconds after the pump has reached NORMAL status the fan is switched off and the driving power of the pump is reduced to XXX SERIAL the cooling fan is controlled directly via the serial port VENT VALVE MODE it s possible to operate the optional vent valve selecting between following mode of operation AUTO TIME the valve is controlled by the controller SERIAL the valve is controlled by the se...

Page 93: ...icates whether the pump is cooled with water or not The controller limits the power supplied to the pump according to this setting ACTIVE STOP enables YES or disables NO active braking STOP SPEED READING enables YES or disables NO the reading function of the pump rotational frequency during braking after stop command ...

Page 94: ... Controller User Manual 87 901 033 01 INPUT OUTPUT Menu Figure 29 START MODE START INTERLOCK START STOP LEVEL START STOP EDGE INTERLOCK TYPE CONTINUOUS IMPULSIVE ANALOG OUT TYPE LCD CONTRAST FREQUENCY 0 POWER TEMPERATURE 9 SPEED DISPLAY KRPM Hz Flow 3 6 IMPUT OPTPUT F 1 ...

Page 95: ...the INTERLOCK signal 3 9 and 4 15 to stop the pump INTERLOCK TYPE selects the interlock mode on I O connector CONTINOUS if enabled the unit wants the contact on I O connector to be closed should be the contact open error condition WAITING FOR INTERLOCK is displayed IMPULSIVE if enabled the unit wants the interlock to be closed only at start command should be removed the contact after start command...

Page 96: ...17 Technical Information SETPOINT Submenu 264 288 Turbo V 1001 Rack Controller User Manual 87 901 033 01 SETPOINT Submenu Figure 30 ...

Page 97: ...de SET VALUE after selection of the analog output type select the desired value from 0000 to 9999 HYSTERESYS if a Hysteresys value is required it can be adjusted between 00 and 99 MASK TIME Selectable between 00 00 00 and 99 99 99 OUTPUT LOGIC The contact logic is configured depending on Activation Type parameter status If Activation Type is high level active the contact is configured as normally ...

Page 98: ...17 Technical Information SERIAL Menu 266 288 Turbo V 1001 Rack Controller User Manual 87 901 033 01 SERIAL Menu This menu contains the settings for management of the RS232 485 serial line Figure 31 ...

Page 99: ... selecting this from 600 1200 4800 9600 38400 baud SERIAL MODE permits setting of the type of interface to RS232 point to point or RS485 multidrop SERIAL ADDRESS sets the address of the node in the case of the RS485 interface This parameter is not visible if the RS232 is selected To exit the menu press COUNTERS and MEASURE pushbuttons for at least 2 sec ...

Page 100: ...1 Examples NEXT button to select MODE MODE FRONT REMOTE SERIAL From FRONT to SERIAL DECREASE button DECREASE button S T A T U S X X X H z C O N F I G U R A T I O N M O D E P U M P S E T T I N G S T A T U S X X X H z M O D E F R O N T R E M O T E S T A T U S X X X H z M O D E F R O N T R E M O T E ...

Page 101: ...ct PUMP SETTING PUMP SETTING HIGH SPEED ADJ 0000 TO 9999 Hz S T A T U S X X X H z M O D E R E M O T E S E R I A L S T A T U S X X X H z M O D E C H A N G E O K S T A T U S X X X H z M O D E S E R I A L F I E L D B U S S T A T U S X X X H z C O N F I G U R A T I O N M O D E P U M P S E T T I N G S T A T U S X X X H z P U M P S E T T I N G H I G H S P E E D A D J L O W S P E E D A D J ...

Page 102: ...tton to raise the value DECREASE button to diminish the value PREVIOUS button to go to the previous digit NEXT button to pass to the next digit INCREASE button to raise the value DECREASE button to diminish the value PREVIOUS button to go to the previous digit NEXT button to pass to the next digit S T A T U S X X X H z H I G H S P E E D A D J X X X X T O Y Y Y Y H z X X X X H z S T A T U S X X X H...

Page 103: ...ious digit NEXT button to confirm the value PREVIOUS button to turn to the previous menu S T A T U S X X X H z H I G H S P E E D A D J X X X X T O Y Y Y Y H z X X X X H z S T A T U S X X X H z H I G H S P E E D A D J C H A N G E O K S T A T U S X X X H z H I G H S P E E D A D J X X X X T O Y Y Y Y H z X X X X H z S T A T U S X X X H z P U M P S E T T I N G H I G H S P E E D A D J L O W S P E E D A...

Page 104: ...ect SOFT START SOFT START YES NO From YES to NO DECREASE button to move down NEXT button to select NO S T A T U S X X X H z P U M P S E T T I N G H I G H S P E E D A D J L O W S P E E D A D J S T A T U S X X X H z P U M P S E T T I N G L O W S P E E D A D J S O F T S T A R T S T A T U S X X X H z S O F T S T A R T Y E S N O S T A T U S X X X H z S O F T S T A R T Y E S N O ...

Page 105: ...ENT DELAY 0000 TO 9999 VENT OPEN TIME 0000 TO 9999 0 NO LIMIT SETPOINT R1 ADJ TYPE FREQUENCY POWER TIME NORMAL S T A T U S X X X H z S O F T S T A R T C H A N G E O K S T A T U S X X X H z S O F T S T A R T N O Y E S S T A T U S X X X H z V E N T D E L A Y X X X X H z S T A T U S X X X H z V E N T O P E N T I M E 0 N O L I M I T X X X X H z ...

Page 106: ...O 9999 XX XX unit of measurement relative to the type For FREQUENCY For POWER For TIME MASK TIME 00h 00m 00s S T A T U S X X X H z S E T V A L U E X X X X H z S T A T U S X X X H z S E T V A L U E X X X X W S T A T U S X X X H z S E T V A L U E X X X X s e c S T A T U S X X X H z S E T V A L U E X X h X X m X X s ...

Page 107: ...Technical Information Examples 17 Turbo V 1001 Rack Controller User Manual 87 901 033 01 275 288 OUTPUT LOGIC _ _ S T A T U S X X X H z O U T P U T L O G I C _ _ ...

Page 108: ...O_CONN 1 PUMP_OVERTEMP 2 CONTROLLER_OVERTEMP 4 VDC_UNDERVOLTAGE 8 VDC_OVERVOLTAGE 32 SHORT_CIRCUIT 64 ROTOR_BLOCK 128 TOO_HIGHLOAD 128 PUMP_AIR 128 F A I L 0 0 1 C H E C K C O N N E C T I O N T O P U M P M O D E F A I L 0 0 2 P U M P O V E R T E M P M O D E F A I L 0 0 4 C O N T R O L L E R O V E R T E M P M O D E ...

Page 109: ...033 01 277 288 F A I L 0 0 8 V D C U N D E R V O L T A G E M O D E F A I L 0 3 2 V D C O V E R V O L T A G E M O D E F A I L 0 6 4 S H O R T C I R C U I T M O D E F A I L 1 2 8 R O T O R B L O C K M O D E F A I L 1 2 8 T O O H I G H L O A D M O D E F A I L 1 2 8 P U M P A I R M O D E ...

Page 110: ...mples 278 288 Turbo V 1001 Rack Controller User Manual 87 901 033 01 Two or more fail each fail are showed for 2 seconds XXX fails code Y number of fails F A I L 2 5 6 O V E R F R E Q U E N C Y M O D E N Y F A I L S X X X M O D E ...

Page 111: ...o take the three phase test diagnosis pressing the COUNTERS MEASURES LOW SPEED buttons at the same time for at least 2 sec This test checks the motor windings electrical continuity and symmetry Furthermore it is able to detect a short circuit between a motor phase winding and the Protection Earth Figure 32 START STOP LOW SPEED COUNTERS MEASURES ...

Page 112: ...L Press any button to exit and return to the main screen During the test no function is associated to the buttons S T A T U S X X X H z T H R E E P H A S E T E S T D I A G N O S I S S T A T U S X X X H z T H R E E P H A S E T E S T D I A G N O S I S P A S S S T A T U S X X X H z T H R E E P H A S E T E S T D I A G N O S I S F A I L ...

Page 113: ...288 Orderable Parts Tab 8 Description Part number Turbo V 1001 Rack Controller X3501 64003 T Plus communication software and serial cable kit 969 9883 Turbo V HT Rack Air Cooling kit X3501 68001 Mains cable NEMA plug 3m long 969 9958 Mains cable European plug 3m long 969 9957 Turbo V vent X3501 68002 ...

Page 114: ...17 Technical Information Orderable Parts 282 288 Turbo V 1001 Rack Controller User Manual 87 901 033 01 ...

Page 115: ......

Page 116: ......

Page 117: ......

Page 118: ......

Page 119: ......

Page 120: ...Mead Road Oxford Industrial Park Yarnton Oxford OX5 1QU UK Tel 44 0 1865 291570 Fax 44 0 1865 291571 Toll free 00 800 234 234 00 China Agilent Technologies China Co Ltd Vacuum Products Division No 3 Wang Jing Bei Lu Chao Yang District Beijing 100102 China Tel 86 0 10 64397888 Fax 86 0 10 64391318 Toll free 800 820 3278 Korea Agilent Technologies Korea Ltd Vacuum Products Division Shinsa 2nd Bldg 2...

Reviews: