background image

3-12

TS-8900 Functional Test System Site Preparation and Installation Guide  

3

Site Preparation and Power Requirements

Safety Ground Connection

As the Agilent TS-8900 is connected to the AC mains by means 
of a plug/socket connection, a permanent earth ground must be 
supplied to reduce the risk of electric shock. 

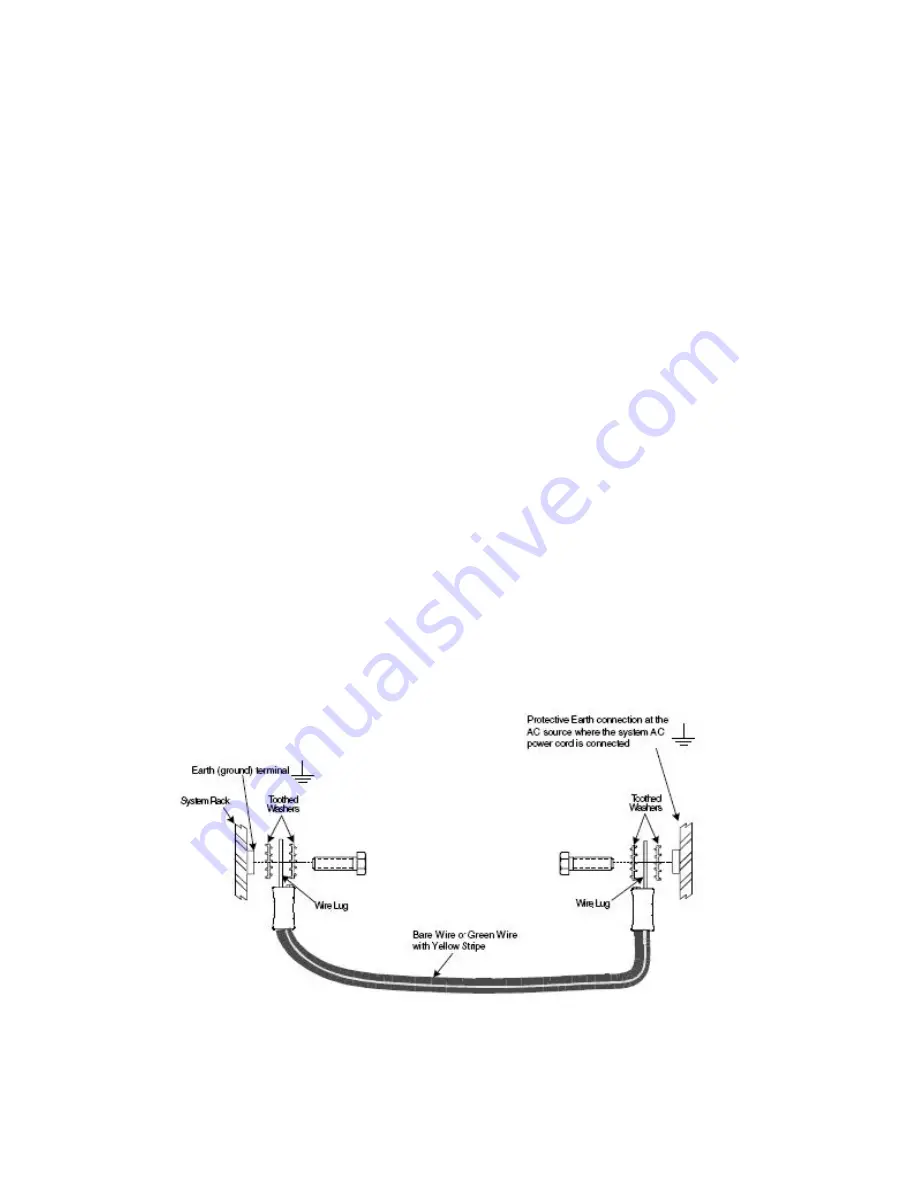
Make a permanent connection from the system rack to 
protective earth ground. This connection will serve as a 
redundant Protective Earth Connection to the primary 
Protective Earth connection, which is part of the AC power 
cord. The "Earth (ground) terminal" found at the bottom of the 
system rack, see 

Figure 3-5

, should be connected by a wire 

separate from the system AC power cord to the Protective Earth 
connection at the AC source where the system AC power cord is 
connected. The wire must be the same wire size as the 
protective conductor of the system AC power cord. The wire 
may be either a bare conductor or a green with yellow stripe 
insulated conductor. 

The redundant Protective Earth connection wire shall have a 
correctly sized wire lug on both ends. The wire lugs shall also be 
sized to fit the "Earth (ground) terminal” stud or bolt as found 
on the system rack and for the Protective Earth connection at 
the source end of system AC power cord. In some cases, the 
Protective Earth connection at the source end of the system AC 
power cord will receive the conductor without a wire lug.

Figure 3-5 

Safety Ground Connections

Summary of Contents for TS-8900

Page 1: ...Agilent Technologies Agilent TS 8900 Functional Test System Site Preparation and Installation Guide...

Page 2: ...find information about technical and professional services product support and equipment repair and service on the Web http www agilent com contacts Eng lish noscript html Double click the link to Te...

Page 3: ...d Regulatory Markings 2 5 Declaration of Conformity 2 7 Electrostatic Discharge ESD Precautions 2 8 End of Life Waste Electrical and Electronic Equipment WEEE Directive 2002 96 EC 2 9 3 Site Preparati...

Page 4: ...System Transportation Instructions 3 14 Ramp Requirements 3 14 Hallway and Door Width Requirements 3 14 If the System Cannot be Moved in the Crate 3 14 4 Installing The Keyboard Mouse and Printer Tool...

Page 5: ...3 Figure 3 2 Recommended TS 8900 Functional Test System Layout overhead view 3 5 Figure 3 3 Rear View of The TS 8900 Functional Test System 3 6 Figure 3 4 E1135C Power Cord Installation 3 8 Figure 3...

Page 6: ...vi TS 8900 Functional Test System Site Preparation and Installation Guide THIS PAGE IS INTENTIONALLY LEFT BLANK...

Page 7: ...d Regional Headquarters 1 3 2 Safety and Regulatory Information Table 2 1 Environment Requirements 2 3 Table 2 2 Safety Symbols and Regulatory Markings 2 5 Table 2 3 Suggested Anti Static Solutions fo...

Page 8: ...viii TS 8900 Functional Test System Site Preparation and Installation Guide THIS PAGE IS INTENTIONALLY LEFT BLANK...

Page 9: ...te Preparation and Installation Guide First Edition April 2011 Agilent Technologies 1 Legal Information Warranty 1 2 Technology Licenses 1 2 Restricted Rights Legend 1 2 Service And Support 1 3 Agilen...

Page 10: ...warranty terms in the separate agreement shall control Technology Licenses The hardware and or software described in this document are furnished under a license and may be used or copied only in acco...

Page 11: ...d equipment repair and service on the Web http www agilent com Double click the link to Test Measurement Select your country from the drop down menus The Web page that appears next has contact informa...

Page 12: ...nctional Test System Site Preparation and Installation Guide 1 Legal Information Manufacturing Address Agilent Technologies Microwave Products Malaysia Sdn Bhd Bayan Lepas Free Industrial Zone 11900 P...

Page 13: ...afety Information 2 2 Safety Summary 2 2 Safety Notice 2 2 General 2 2 Environmental Conditions 2 3 Before Applying Power 2 4 Operator Safety Information 2 4 Safety Symbols and Regulatory Markings 2 5...

Page 14: ...s of this product may be impaired if it is used in a manner not specified in the operation instructions CAUTION A CAUTION notice denotes a hazard It calls attention to an operating procedure practice...

Page 15: ...ucts that appear damaged or defective should be made inoperative and secured against unintended operation until they can be repaired by a qualified service personnel WARNING The protection provided by...

Page 16: ...ard Verify there are multiple and sufficient protective means rated for the voltages you are applying to assure the operator will NOT come into contact with any energized conductor even if one of the...

Page 17: ...ols and Regulatory Markings Safety symbols Warning risk of electric shock Warning hot surface Caution refer to accompanying documents Laser radiation symbol marked on products that have a laser output...

Page 18: ...gistered trademark of the Spectrum Management Agency of Australia This signifies compliance with the Australian EMC Framework regulations under the terms of the Radio Communications Act of 1992 ISM 1A...

Page 19: ...The Declaration of Conformity DoC for this product is available on the Agilent Technologies website You can search for the DoC by its product model or description at the following web address http re...

Page 20: ...and or test disruption While not an exhaustive list of anti static precautions Table 2 3 shows suggestions to consider as you plan your system area ESD Symbol Caution Static Sensitive Electrostatic d...

Page 21: ...e affixed product label see below indicates that you must not discard this electrical electronic product in domestic household waste Product Category With reference to the equipment types in the WEEE...

Page 22: ...2 10 TS 8900 Functional Test System Site Preparation and Installation Guide 2 Safety and Regulatory Information THIS PAGE IS INTENTIONALLY LEFT BLANK...

Page 23: ...wer Requirements 3 7 Power Recommendations 3 7 Additional Power Information 3 9 Mains Disconnect Requirements 3 10 Disconnect Circuit Breaker Requirements 3 10 Mains Circuit Breaker Requirements 3 10...

Page 24: ...irements Preparing Your Site for the System WARNING No operator serviceable parts inside Refer servicing to qualified personnel To prevent electrical shock do not remove instrument covers The protecti...

Page 25: ...irements 3 TS 8900 Functional Test System Site Preparation and Installation Guide 3 3 Typical System Figure 3 1 shows a typical hardware configuration of the TS 8900 Functional Test system Figure 3 1...

Page 26: ...Requirements System Dimensions Table 3 1 shows rack dimensions for the primary rack only Table 3 1 Primary Rack Dimensions Size No of Bays per Pallet Height Width Depth Estimated Weight 1 6m 1 1616mm...

Page 27: ...s a recommended layout for a typical TS 8900 Functional Test System Allow 1 meter 3 3 feet of space behind the system for service WARNING The Remote ON Standby switch at the upper right hand corner of...

Page 28: ...section describes the electrical power requirements of the Agilent TS 8900 Functional Test System using the Agilent E1135C Power Distribution Unit PDU It also describes how to connect AC mains power t...

Page 29: ...ns Provide a separate AC mains for the system due to the current requirements of the system Use copper wire for the system drop between the AC source and system For Agilent E1135C PDU a jumper wire ma...

Page 30: ...Requirements WARNING Electrical Shock Hazard Protection This is a Safety Class 1 Product provided with a protective earthing ground incorporated in the power cord The mains plug shall be inserted into...

Page 31: ...or block and the ground connection to a terminal bolted to the chassis Power is connected to the mains disconnect switch and a ground terminal attached to the chassis For ease of installation in areas...

Page 32: ...equirements The disconnect circuit breaker must be Rated for the maximum system amperes Approved for use in building installations in your locality Marked Mains Disconnect or the equivalent in your lo...

Page 33: ...m Important recommendations about wiring Make certain that the wire used for the neutral is the same size as the hot leads or larger Do not rely on conduit for the ground always use at least one wire...

Page 34: ...5 should be connected by a wire separate from the system AC power cord to the Protective Earth connection at the AC source where the system AC power cord is connected The wire must be the same wire s...

Page 35: ...ntain proper airflow keep the area directly above the fans as well as the intake air louvers on the back clear for a minimum of 1 meter 3 3 feet Cleaning Instructions WARNING To prevent electrical sho...

Page 36: ...hen evaluating hallways doors and elevators along the route the system must travel If the System Cannot be Moved in the Crate If obstacles or lack of space restrict moving the crated system remove the...

Page 37: ...aration and Installation Guide First Edition April 2011 Agilent Technologies 4 Installing The Keyboard Mouse and Printer Tools Required 4 2 Installation Procedure 4 3 Printer Tray 4 3 Mouse Tray 4 4 P...

Page 38: ...shelf mouse tray and printer tray onto the Test Rack how to connect the keyboard and mouse and how to connect an optional strip printer NOTE Four captive nuts are installed on the front of the test r...

Page 39: ...Printer Tray Attach the printer tray to the keyboard shelf Make sure that the two hooks engage the shelf and the bottom of the tray is inserted into the tab under the keyboard shelf Figure 4 1 Attach...

Page 40: ...tion Guide 4 Installing The Keyboard Mouse and Printer Mouse Tray Attach the mouse tray to the keyboard shelf Make sure that the two hooks engage the shelf and the bottom of the tray is inserted into...

Page 41: ...rd Mouse and Printer 4 TS 8900 Functional Test System Site Preparation and Installation Guide 4 5 Palm Rest Install the plastic palm rest by slipping it into the sots in the keyboard shelf Figure 4 3...

Page 42: ...les are labelled Keyboard and Mouse Slide the excess cabling into the slot in the keyboard shelf Figure 4 4 Connecting Keyboard and Mouse If you have an optional Strip Printer not provided by Agilent...

Reviews: