background image

AgfaPhoto Compact 103   


19 


Changing the LCD Monitor Display


The type of information displayed on the LCD monitor can be changed taping the 

onscreen display 

button

. Tap the button repeatedly to change the LCD display from one type to another. In Photo/Movie 

Mode, the LCD display can be changed into any of the following: 


Basic 


Full 


None 


Guideline 


The OSD information may vary depending on the record mode type. 


The following icons, if enabled, are still displayed on the LCD even when OSD off or 

Guide lines on: AEB, AF lamp, Drive mode, Flash and Macro. 


Use the "Guide lines" to properly set image for capture. 


In Playback mode, the LCD display can be changed into any of the following: 


Basic 


Full 


None 


LCD display cannot be changed in the following situations: 


Recording video or audio clips. 


Playing video or audio clips. 


Playing slideshow. 


Recording Images, Videos and Voices 

 
Taking Images 


Now that you are familiar with your camera, you are now ready to take your images. Taking images with 

your camera is very simple. 


1.


Turn on the camera by pressing the 

Power

 button. 


2.


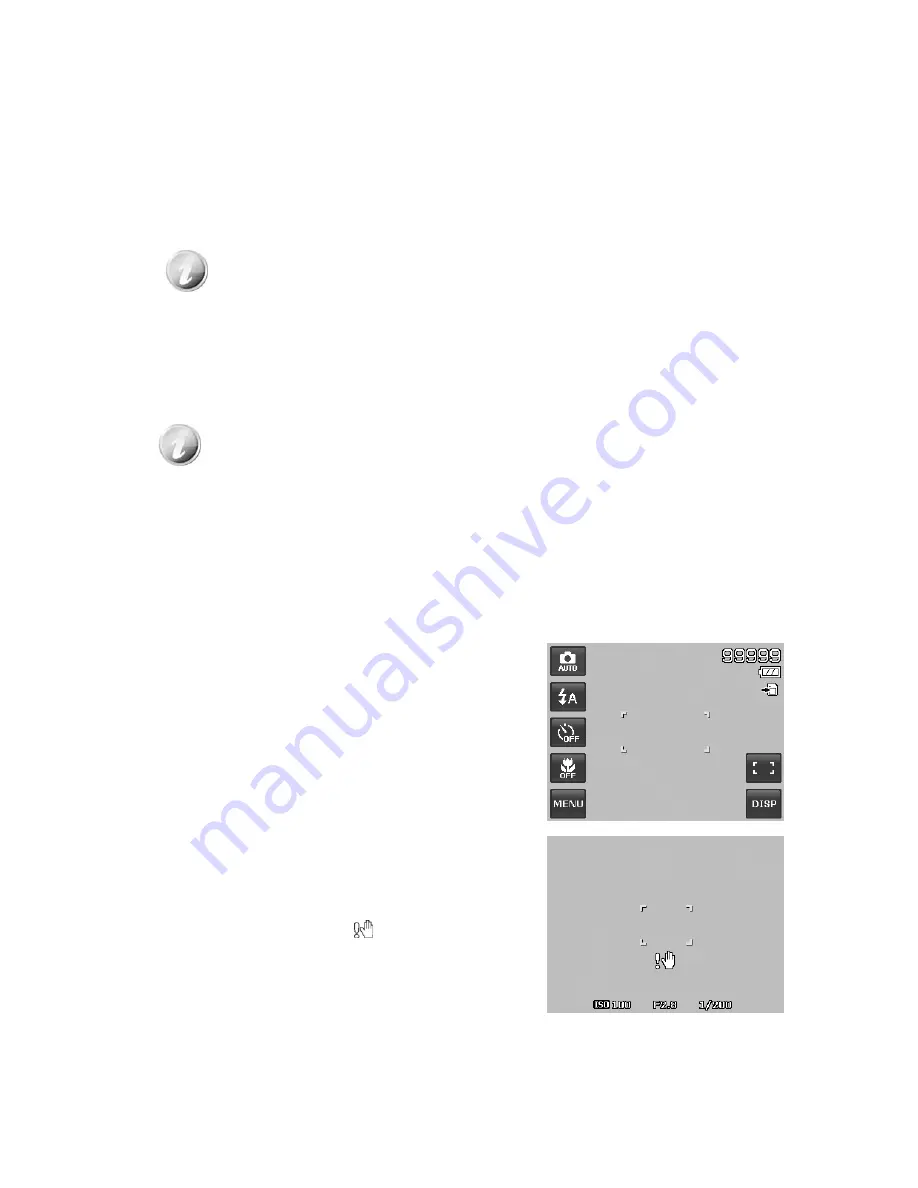
Frame the shot using the focus bracket on the LCD 
monitor. See illustration on the right. 


3.


Pressing the 

Shutter 

button down halfway automatically 

focuses and adjusts the exposure, and pressing the 

Shutter 

button down fully captures the images. 


When the shake warning icon 

  appears, hold the camera 

steadily, with your arms at your side or use a tripod to 
stabilize the camera to prevent blurred images. 


Press the shutter button 

halfway 


Summary of Contents for Compact 103

Page 1: ...Compact 103 User manual ...

Page 2: ...ouch Screen 13 Touch screen Layout 13 Changing the LCD Monitor Display 19 Recording Images Videos and Voices 19 Taking Images 19 Using the Stabilizer 20 Setting the Zoom Control 20 Using Flash 21 Setting the Focus Mode 21 Setting the Drive Mode 22 Setting the AF Area Face tracking Touch Shot 23 Using the Record Menu 24 Setting the Scene Mode 24 Using Voices REC 32 Setting Photo Size 32 Setting Qua...

Page 3: ...cording 44 Playing Voice Memo 44 Volume Control 45 Playback Menu 45 Using the Setup Menu 56 Setting Sounds 56 Setting Power Save 56 Setting LCD Save 57 Setting Date Time 57 Setting Language 57 Setting File Numbering 57 Setting TV Out 57 Setting LCD Brightness 58 Setting Battery Type 58 Setting Memory Kit 58 Reset All 59 Making Connections 59 Connecting the Camera to a TV 59 Connecting the Camera t...

Page 4: ... and the receiver Connect the equipment to an outlet on a circuit different from that to which the receiver is connected Consult the dealer or an experienced radio TV technician for help Warning A shielded type power cord is required in order to meet FCC emission limits and to prevent interference to radio and television reception Use only shielded cable to connect I O devices to this equipment An...

Page 5: ... Waste Equipment by Users in Private Households in the European Union This symbol on the product or on its packaging indicates that this product must not be disposed of with your other household waste Instead it is your responsibility to dispose of your waste equipment by handing it over to a designated collection point for the recycling of waste electrical and electronic equipment The separate co...

Page 6: ...Microsoft DirectX 9 0C USB port and CD ROM drive For Macintosh Power Mac G3 or later Mac OS 10 3X 10 6 Mass storage Memory 512or above Q Time player ver 6 0 3 or above USB port and CD ROM drive Main Features 12 megapixel resolution Up to 4x optical zoom and 5x digital zoom 2 7 inch color LCD touch screen 32MB internal flash memory with optional external SD SDHC card Supports up to 4GB of SD card a...

Page 7: ...ck the contents of your camera package It should contain AgfaPhoto Compact 103 AA battery x 2 pcs Rechargeable optional Battery charger optional Camera strap USB cable AV cable optional CD Rom Quick Start Guide User Manual optional Camera pouch optional ...

Page 8: ...mera Views Front View 1 Flash 2 Microphone 3 Self timer LED AF Assist Lamp 4 Lens Back View 5 LCD monitor 6 Zoom Button 7 LED indicator 8 Playback Button Top View 9 Speaker 10 Stabilizer button 11 Shutter button 12 Power button ...

Page 9: ...e power on off Stabilizer The stabilizer sets the optimal ISO value according to light levels to compensate for camera shake Press to set stabilizer on off Shutter Press to capture an image or start stop recording video or audio clip Zoom buttons In Record mode press the W button to zoom out or T button to zoom in In Playback mode press to zoom in to magnify image or zoom out enter 9 image calenda...

Page 10: ...ap to return main menu or last screen OK Tap to apply the setting Help Tap to launch help screen Camera Memory Internal memory Your camera is equipped with 32MB of internal memory Users can store images up to 12MB If there is no memory card inserted in the memory card slot all images videos and audio clips recorded are automatically stored in the internal memory External storage Your camera suppor...

Page 11: ... Please read Battery Information on page 4 before inserting removing batteries 1 Make sure the power is off before inserting the battery 2 Unlock and open the Battery memory card compartment at the bottom of the camera 3 Insert the battery into the compartment with the terminal facing inside the camera with correct orientation as shown 4 Close and lock the Battery memory card compartment ...

Page 12: ...lace 4 Close and lock the Battery memory card compartment To remove the SD SDHC card 1 Unlock and open the Battery memory card compartment 2 Gently push the card until it pops out 3 Pull out the card carefully Turning the Power On and Off Press the Power button to turn on the camera There are two ways to turn on the camera The startup image displays briefly and the startup sound plays if enabled T...

Page 13: ...r Hour Minute 2 Tap or to change the value for the date and time 3 Tap to apply If necessary tap to return the language menu Now you are ready to start taking images and videos Holding down the or buttons to change the values continuously Modes Your camera has two modes Record Mode This is the default mode while you turn on the camera every time You are able to take images and record videos audio ...

Page 14: ...to capture 3 Zoom indicator Displays zoom 4 Shots remaining Indicates the remaining shots available 5 Battery Indicates battery level 6 Storage media Indicates current storage media in use 7 Shake warning Indicates that the camera is shaking 8 Touch button AF area Face tracking Tap to display the AF area face tracking popup menu 9 Touch button Display Tap to switch the display mode of the LCD moni...

Page 15: ...hutter speed settings 21 Aperture value Displays aperture settings 22 Touch button Menu Tap to launch record menu 23 Touch button Macro Tap to display the macro popup menu 24 Touch button Self timer Burst Tap to display the self timer burst popup menu 25 AEB Indicates AEB function is enabled 26 Touch button Flash Tap to popup the flash menu 27 Touch button Record mode Tap to launch the scene mode ...

Page 16: ...es current storage media in use 6 Touch button Display Tap to switch the display mode of the LCD monitor 7 White balance Displays white balance settings 8 Metering Displays metering settings 9 Movie size Displays movie size settings 10 Touch button Menu Tap to launch record menu 11 Touch button Macro Tap to display the macro popup menu 12 Touch button Pre Record Tap to set pre record on off 13 Tou...

Page 17: ...e image 7 Shutter speed Displays shutter speed setting of the image 8 Flash Displays flash setting of the image 9 White balance Displays white balance setting of the image 10 ISO Displays ISO setting of the image 11 Exposure Displays exposure setting of the image 12 Folder Filename Indicate the location filename of the image 13 Date Time Displays the recorded date time of the image 14 DPOF Indicat...

Page 18: ... the display mode of the LCD monitor 7 Folder Filename Indicate the location filename of the video clip 8 Date Time Displays the recorded date time of the video clip 9 Video size Indicates the size of video clip 10 Touch button Menu Tap to launch playback menu 11 Touch button Previous file Tap to view the previous file 12 Protect Indicates file is protected 13 Playback mode Indicates playback mode...

Page 19: ...ip 6 Touch button Display Tap to switch the display mode of the LCD monitor 7 Folder Filename Indicate the location filename of the audio clip 8 Date Time Displays the recorded date time of the audio clip 9 Touch button Menu Tap to launch playback menu 10 Touch button Previous file Tap to view the previous file 11 Protect Indicates file is protected 12 Playback mode Indicates playback mode 13 Play...

Page 20: ...nged into any of the following Basic Full None LCD display cannot be changed in the following situations Recording video or audio clips Playing video or audio clips Playing slideshow Recording Images Videos and Voices Taking Images Now that you are familiar with your camera you are now ready to take your images Taking images with your camera is very simple 1 Turn on the camera by pressing the Powe...

Page 21: ...4 for more details Stabilizer on Setting the Zoom Control Using a combination of 4 times optical zoom and 5 times digital zoom permits zoom photography at up to 20 times magnification While the digital zoom can be a useful feature the more an image is enlarged zoomed the more pixelated grainier the image will appear Please refer to Setting the Digital Zoom on page 38 on how to setup digital zoom T...

Page 22: ...eduction The flash fires twice to reduce the red eye effect Forced on The flash fires whenever you press the shutter button regardless of lighting conditions Slow sync The flash fires with a slow shutter speed Forced off The flash is turned off Flash function is only available in shooting still images but not available in Burst and AEB modes Do not charge the flash while pressing the zoom button C...

Page 23: ...ble in recording still images The Drive mode setting is automatically set to off when you turn off the camera To activate Drive mode Tap the onscreen Drive button to display the popup drive mode menu and tap the desired icon The table below shows the available Drive mode settings Icon Item Description 10 Sec Sets a 10 second delay to capture image after pressing the shutter button 2 Sec Sets a 2 s...

Page 24: ... target s Up to 10 faces can be detected in the same time How to use Touch shot 1 Tap the onscreen AF Area button and then choose Touch shot 2 Frame the subject with the yellow focus frame on the screen 3 Tap the yellow focus frame and a dotted line area appears on screen 4 Drag the focus frame to desired position within the dotted line area 5 Release your finger from the screen the camera perform...

Page 25: ...lowing 30 modes you can capture the image with the most appropriate settings 1 From the Record Menu tap to select Scene Mode Or tap onscreen Record mode button red color to enter scene mode 2 There are 2 different styles of submenu available Picture style Lists each scene mode by a sample picture in loop Icon style Lists all scene modes by 30 icons on screen Picture style Icon style 3 Tap or to vi...

Page 26: ...ically adjusts suitable shooting settings like shutter speed and aperture values Intelligent Scene The camera detects the shooting conditions and automatically switches to the appropriate scene mode Portrait The camera blurs the background to focus on the subject Landscape This feature is used to emphasize wide scenic views Sunset This feature enhances the red hue for recording sunset images Backl...

Page 27: ...e tracking to auto detect faces to capture When smiles are detected it continuously captures the image Blink Detection This feature detects if the subject blinked an eye when the image is captured and gives the user an option whether to save it or not Pre composition This feature captures a image temporarily as a reference Full press shutter after referring the subject to the reference point Love ...

Page 28: ...e camera changed to Landscape mode automatically To activate Intelligent Scene 1 Select Intelligent Scene from the Scene Mode menu 2 Focus the camera on the subject to capture 3 The camera detects the shooting conditions and switches to an appropriate scene mode 4 Half press the shutter button to focus the subject The frame turns green to indicate focus is set 5 Press the shutter button to take th...

Page 29: ...icuous while preserving resolution in areas of the picture outside of the skin The camera detects skin color area such as the face and processes the image to make the skin appear smooth Using Food Mode How to share your dining experiences and comments of interesting widgets on your blog by close up images Just get the camera and set the scene with food mode This mode features on macro focus and au...

Page 30: ...ack the first shot 8 Repeat step 4 to 6 until the pattern is filled in images 9 Tap Save button to save the composed image 10 Or tap Cancel button to go back last shot 11 The image can be transferred to PC via USB cable Please refer to Connecting the Camera to a PC on page 59 or memory card reader and uploaded to website Auction mode provides 4 kinds of pattern as follow The image is set to low qu...

Page 31: ...s on the screen allowing you to re take the shot before your subject or subjects move on To activate Blink Detection 1 Select Blink Detection mode from Scene Mode menu 2 Half press the Shutter button to focus the subject The frame turns green to indicate focus is set 3 Press the Shutter button to capture the image and automatically save the Image 4 If the camera detects subject blinked eye a Save ...

Page 32: ...are the one taking the picture for yourself then self portrait mode is necessary besides the tripod With your long arm s help the camera begin face tracking in self portrait mode If a face had been recognized the camera performs 2 second countdown with a beep notice then take a shot without pressing the Shutter button Tips to make a great shape by self portrait photography Lean in towards the came...

Page 33: ...tion the more memory space is required The table below shows the Photo Size values for still images Icon Pixel Size Printing Size Suggestion Icon Pixel Size Printing Size Suggestion 4000 x 3000 A2 Size 2048 x 1536 4 x 6 4000 x 2672 Standard print paper 1920 x 1080 HDTV 3264 x 2448 A3 Size 640 x 480 E mail 2592 x 1944 A4 Size Setting Quality The Quality sets the quality compression at which the ima...

Page 34: ... for a variety of lighting conditions and permits images to be captured that approach the conditions that are seen by the human eye As you tap and turn through the pages you can see the closet 3 adjusting preview on screen synchronously Icon Item Description Auto White Balance The camera automatically adjusts the white balance Daylight Ideally used for bright sunny conditions Cloudy Ideally used f...

Page 35: ...adjusted To adjust ISO disable Stabilizer first Setting Metering This sets the metering method for calculating the exposure Icon Item Description Multi The entire area of the screen is measured and the exposure is calculated Center Averages the light metered from the entire frame but gives greater weight to the subject matter at the center Spot A very small portion of the center of the screen is m...

Page 36: ...n the front of the camera see Front View on page 7 emits an red light by half pressing the Shutter button allowing the camera to focus easily To set AF Lamp 1 From the Record menu tap AF Lamp 2 Tap On Off to enable disable AF lamp Setting Sharpness This function allows you to enhance or soften finer details of your images To set Sharpness 1 From the Record menu tap Sharpness 2 Tap the desired opti...

Page 37: ...ration 2 Tap the desired option button to apply The table below shows the available Saturation settings Icon Item Description High Enhance the saturation Normal Normal saturation Low Reduce the saturation Setting Contrast This function allows you to adjust the contrast of your images To set Contrast 1 From the Record menu tap Contrast 2 Tap the desired option button to apply Icon Item Description ...

Page 38: ...nction applies different colors or tones for a more artistic effect on the still images or videos As you tap and turn through the pages you can see the closet 3 adjusting preview on screen Icon Item Description Normal The camera records normally Vivid The camera captures the image with more contrast and saturation emphasizing on the bold colors Sepia Images are captured in sepia tones B W Images a...

Page 39: ...quality deteriorates Off Uses the optical zoom only Digital Zoom is not available in Face tracking on ISO6400 Speedy Burst Movie and Voice Recording modes The maximum Intellect zoom scale varies depending on the image type and resolution Setting the Date Stamp The date of recording can be printed directly on the still images This function must be activated before the image is captured Once date an...

Page 40: ...e 2 Focus your camera on the subject that you want to take 3 Press the Shutter button to start recording 4 Use the Zoom button to zoom in out the subject 5 To pause recording tap the Pause button 6 To continue recording tap the Pause again 7 To stop recording press the Shutter button When the camera stop recording due to reaching maximum capacity 4GB for a single video simply press the Shutter but...

Page 41: ...ndards are followed Recorded videos are set to Internet standard resolution of 640 X 480 Recording automatically stops when the file reaches 100 MB To record a YouTube video select from the Movie Size function Available recording time for a YouTube video is up to 10 minutes White Balance Metering Color Mode To set above settings please refer to Using the Record Menu on page 24 Pre Record You can c...

Page 42: ...ge video audio 4 To play a video or audio clip tap the onscreen Play button See Playing Videos on page 44 and Playing Voice Recording on page 44 for more details Viewing in Photo Stream Mode The photo stream mode displays files side by side and supports finger motions allows you to browse files with ease To use photo stream navigation Switch from single navigation by tapping any part of the screen...

Page 43: ...n Zoom button left once to enter Thumbnail mode To use thumbnail navigation Drag left or right to scroll Dragging to scroll won t choose or activate anything on the screen Flick to scroll quickly You can wait for the scrolling to come to a stop or touch anywhere on the screen to stop it immediately Scroll a row horizontally to the previous next row by tapping the onscreen or button Tap one of the ...

Page 44: ... with still images only In single navigation mode press Tele key zoom in on the Zoom button repeatedly until the desired zoom view The 4 arrows on the LCD monitor indicate that the image is zoomed in You can zoom to view an image up to 12X Drag the enlarged image to desired position Press the Shutter button to close zoom view Draw a circle clockwise counterclockwise in single navigation mode to en...

Page 45: ...up Playing Voice Recording 1 Set the camera to Playback mode 2 Tap the onscreen Play button to play the voice recording 3 Tap the button to pause playback tap the button to resume 4 Tap the button to stop the playback and return single navigation mode 5 Tap the button to set repeat on off Volume cannot be adjusted when you Pause Onscreen control panel and playing info appears 2 seconds then hide T...

Page 46: ... to turn pages 4 Tap the desired option button to enter submenu 5 Configure the settings in the submenu 6 Tap the button to save and apply changed settings 7 Tap the or button to exit the menu or return main menu anytime Search Photos Built in search engine list files in the specific conditions By Favorite By Scene By Date Display all To use the search function 1 Select Search Photos by tapping it...

Page 47: ...es of the scene in single navigation mode The files of each group have a group icon in front of filename and display a specific Playback icon or Slide show The slideshow function enables you to playback all your still images automatically in order one image at a time To view slide show 1 From the Playback menu tap Slide show The Slide show menu appears 2 Set the slideshow settings 3 Tap onscreen S...

Page 48: ...ouch The unique feature is designed to create a retouched copy for a still image with the best balance of contrast and saturation To use Quick Retouch 1 Set the camera to Playback mode and locate the desired image by single navigation 2 Tap the onscreen Menu button to launch playback menu and tap Quick retouch 3 Tap to select a retouched level by the onscreen or button Available levels Low Normal ...

Page 49: ...or more to correct distorted image until the subject in the image is straight and in correct size 4 Tap the button to popup confirm menu 5 Tap YES to save corrected image as a new image Cancel to abort The camera allows applying this feature up to 10 times in the same perspective angle to an image Radial Blur The Radial Blur is an effect creates blurs around a point simulating the result of a zoom...

Page 50: ...is saved in black and white Negative Image appears to be the opposite of the original image Mosaic Image is saved with mosaic tiles Vivid Red Image is saved with reddish tint Vivid Green Image is saved with greenish tint Vivid Blue Image is saved with bluish tint Painter Use your imagination and this Painter application to create exclusive images with the touch screen Painter is an easy drawing to...

Page 51: ... Memo A maximum of 30 seconds of audio can be recorded as a memo for captured still images To record voice memo 1 Set the camera to Playback mode and locate the desired image by single navigation 2 Tap the onscreen Menu button to launch playback menu and tap Voice Memo 3 Start recording by tapping the onscreen button 4 If your memo is less than 30 seconds tap the button again to stop the recording...

Page 52: ... image is still retained in the memory Select Select multiple files to delete at the same time All Delete all files To delete a single file 1 Tap Single button in the delete submenu to popup confirm menu 2 Tap YES to delete the file Cancel to abort To delete attached voice memo 1 Locate an image with voice memo attached in single navigation 2 Tap the onscreen voice only button in the delete submen...

Page 53: ...lect multiple files from the thumbnail view to lock unlock Lock All Lock all files Unlock All Unlock all files To protect unprotect a single file 1 Select Single in the protect submenu 2 Tap or buttons to scroll the display 3 When the desired file is displayed on the LCD monitor tap the onscreen Lock Unlock button to protect unprotect it 4 Tap button anytime to exit the protect screen and return s...

Page 54: ... locate the desired image by single navigation mode 4 Tap the onscreen Menu button to launch playback menu and tap Trim 2 Press the Wide Tele key on the Zoom button to change trim size 3 Tap the 4 way indicator on the screen to move trim area to your desired position 4 Tap the button to save the trimmed image as a new image and return single navigation mode NO Description 1 Return button 2 Preview...

Page 55: ... mode and locate the desired image by single navigation mode 2 Tap the onscreen Menu button to launch playback menu and tap Rotate 3 Tap the or button to rotate the image 4 Tap the button to replace the original image as the rotated one and return to single navigation mode Startup Image You can specify the startup image from the captured images for camera To set startup image 1 Set the camera to P...

Page 56: ... to launch playback menu 2 Tap to select DPOF Available settings are as follows Single Select a single image to mark All Mark all images in the memory card Reset Reset all DPOF settings to initial settings To set DPOF on a single image all images 1 Tap to select Single or All on the DPOF submenu 2 For single image tap the or button to scroll and select an image to mark for printing 3 Specify the n...

Page 57: ... to select Sounds 2 Configure settings by tapping the option button 3 Tap the button to apply Item Available Settings Description Startup Sound 1 Sound 2 Sound 3 Off Selects the startup sound when camera is turned on Shutter On Off Enables or disables shutter sound when shutter button is pressed Shutter sound is not available when recording videos or voice clips Beep On Off Enable or disable the b...

Page 58: ... which language menus and messages are to be displayed on the LCD monitor Please refer to Initial Settings on page 12 to know about how to configure the settings Setting File Numbering This function allows you to select the method in which to assign file numbers to images Available settings are Series Assigns number to files in sequence even if the folder is changed Reset The file numbering will s...

Page 59: ...s and data Available settings are Format Tap to format currently used memory Copy to Card Tap to copy all files stored in the internal memory to the memory card If there is a memory card inserted in the memory slot and you execute Copy to Card the camera automatically saves all files to the memory card If the images were saved in the internal memory when inserting memory card into the camera You c...

Page 60: ...f the video equipment you are going to connect to the camera To connect your camera to a TV 1 Turn on the camera 2 Set the TV out to match the TV s video out format See Setting TV Out on page 57 3 Connect the USB AV 3 in 1 cable to the USB port on the bottom of your camera 4 Connect the other end of the cable to the TV s AV input port 5 The LCD monitor turns black and all images and videos are dis...

Page 61: ...by your PC The camera s internal memory and memory card would display as removable drives in PC After the connection no image is displayed on the LCD monitor Connecting the Camera to a Printer You can print your images directly using a PictBridge compatible printer 1 Turn on your Printer Check that the printer is turned on there is paper in the printer and there are no printer error messages 2 Con...

Page 62: ...ee major settings Select An image can then be selected to print All Prints all images Index Prints all images as thumbnails To set Print Select 1 Tap the or button to scroll and select an image for printing 2 Specify the number of copies Tap or to increase decrease the number 3 Tap the button to set date stamp On Off 4 Tap the button to start printing To set Print All and Print Index Repeat the sa...

Page 63: ...urn on the LCD Empty battery icon is displayed on the LCD then the camera turns off Batteries are exhausted please replace or recharge LCD monitor displays No image There are no files in current used memory or the format of the file may not be supported LCD monitor displays Not available for this file Function is only available for specific file types File format is not supported LCD monitor displ...

Page 64: ...36 16 9 1920 x 1080 VGA 640 x 480 Resolution Movie z 1280 x 720 16 9 _Only support SDHC_Class 6 z 640 x 480 z 320 x 240 z 640 x 480 Web Scene Mode Auto Movie Program Intelligent Scene Portrait Landscape Sunset Backlight Kids Night Scene Fireworks Snow Sports Party Candlelight Night Portrait Soft Skin Flowing Water Food Building Text Foliage Auction Smile Capture Blink Detection Pre Composition Lov...

Page 65: ...are More information on the complete AgfaPhoto digital camera product range can be found at www agfaphoto com www plawa com Service Repair Hotline EU 00800 752 921 00 from a landline only Service Repair Hotline UK 44 1908 488676 Service Support Hotline Germany 0900 1000 042 1 49 euro min from a German landline only Online Service International contact support apdc plawa com Service Repair USA Cana...

Page 66: ...AgfaPhoto Compact 103 65 names are registered trademarks of their respective owners Product design and technical features can be changed without notice Contact AgfaPhoto Holding GmbH www agfaphoto com ...

Page 67: ...rt and warranty information contact the distributor or manufacturer For service support and warranty information contact the distributor or manufacturer All other brands and product names are registered trademarks of their respective owners Product design and technical features can be changed without notice AgfaPhoto Holding GmbH www agfaphoto com Manufactured by plawa feinwerktechnik GmbH Co KG w...

Reviews: