AG Neovo X-150 User Manual Download Page 10


9

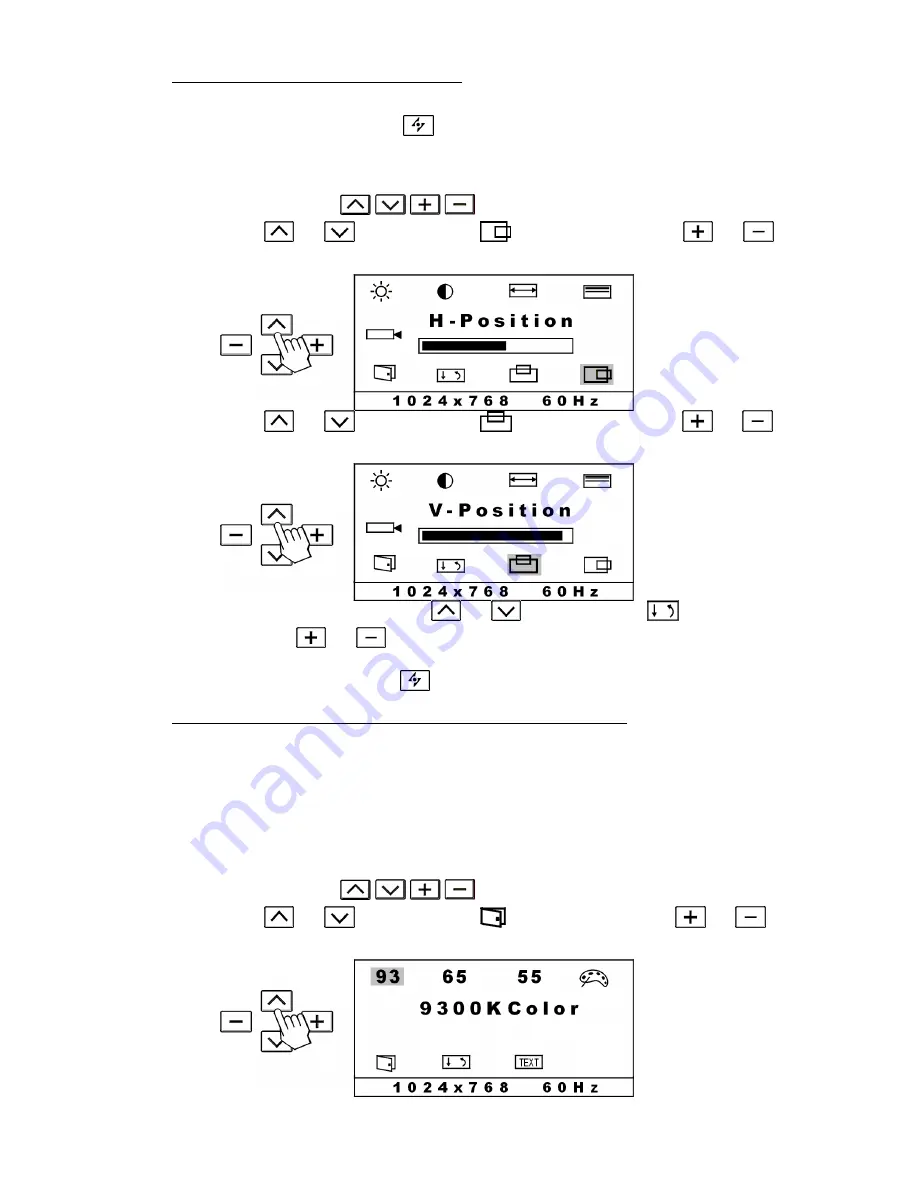
3.1.4 Adjusting H. Position and V. Position 

The H. Position and V. Position settings allow you to adjust the centering of the 
picture. You may just press 

  button to optimize both the settings 

automatically. If you want to customize the settings for specific application, please 
follow the steps. 

1. 

Press any one of 

  button to activate OSD menu. 

2. Press  or 

 button to select 

  (H-Position), and press 

 or 


button to center the screen horizontally.   


3. Press  or 

 button to select 

  (V-Position), and press 

 or 


button to center the screen vertically. 


4. 

To close the OSD menu, press 

 or 

 button to select 

  (Save & Exit), 

and press 

 or 

 button. 

Note: You may also press 

  to exit OSD menu but without saving. 

3.1.5    Selecting color temperature(9300K, 6500K, 5500K COLOR) 

You can change the picture color temperature. Three preset color temperature 
modes are available. 

· 

9300K Color: recommended for general use 

· 

6500K Color: recommended for color management 

· 

5500K Color: recommended for photo retouch 

1. 

Press any one of 

  button to activate OSD menu. 

2. Press  or 

 button to select 

  (Next Page), and press 

 or 


button. The color temperature-setting page appears. 


Summary of Contents for X-150

Page 1: ...0 ...

Page 2: ...Red Green Blue Color 10 3 1 7 Setting input signal priority TO VIDEO IN 11 3 1 8 Adjusting OSD menu parameters OSD Position and OSD Timer 11 3 1 9 Adjusting the Text Graphic and Sharpness 12 3 1 10 Optimizing the contrast level automatically Auto Contrast 12 3 1 11 Resetting RECALL the adjustments 13 3 1 12 Selecting the DOS mode of your system Graphic Text 13 3 2 IF THE SIGNAL IS COMING FROM VIDE...

Page 3: ...ble is damaged or frayed o The monitor has been dropped or the cabinet damaged o A distinct change in performance indicates a need for servicing Using the Tilt Use the monitor s tilt capability to adjust its vertical orientation to an appropriate position Grasp the top corners of the monitor with both hands and tilt to the desired angle This monitor s tilt angle is within 0 20 Maintenance Clean th...

Page 4: ...ation When you transport this monitor for repair or shipment use the original carton and packing materials 2 Getting Started 2 1 Package Contents Before using this monitor make sure the following items are included in your carton box Monitor 1 Power adapter 1 Power cord 1 D sub 15 pin VGA signal cable 1 Video signal cable adapter Mini dim 8 pin connector to S VHS and CVBS jack 1 Optional S VHS vid...

Page 5: ...lution and or refresh rate of the input signal Also closes the OSD On Screen display AUTO function will not work if the input signal is coming from VIDEO IN connector DVD VCD VCR players etc UP button Activates the On Screen Display menu and move the cursor clockwise Down button Activates the On Screen Display menu and move the cursor counterclockwise Increase button Activates the On Screen Displa...

Page 6: ...CVBS signal 2 3 Setup Please follow the following instructions to setup monitor Step 1 Remove all packing materials and wrapping from the monitor and then tear down the plastic dust cover from the screen surface Step 2 With the computer or video equipment turned off connect the enclosed VGA signal cable Connecting to an IBM or IBM compatible computer Rear View ...

Page 7: ...ls and 60Hz Press the AUTO button The monitor will optimizes the display automatically If the monitor is connected to a video equipment such as DVD or VCR player please skip this step 2 4 Setting the input signal priority This monitor will detect the video input source VGA In or VIDEO In automatically You may switch the input signal priority if both inputs are connected Please refer to Customizing...

Page 8: ...ton The second page appears 3 Press or button to select Next Page and press or button The third page appears as below 4 Press or button to select Language and press or button to select the language you prefer 5 To close the OSD menu press or button to select Save Exit and press or button Note You may also press to exit OSD menu but without saving 3 1 2 Adjusting Brightness and Contrast 1 Press any...

Page 9: ...nsate the drift of computer signals You may just press button to optimize both the settings If you want to fine tune the settings please follow the steps 1 Press any one of button to activate the OSD menu 2 Press or button to select Clock and press or button to adjust the picture performance 3 Press or button to select Phase and press or button to adjust the picture performance 4 To close the OSD ...

Page 10: ...ton to select V Position and press or button to center the screen vertically 4 To close the OSD menu press or button to select Save Exit and press or button Note You may also press to exit OSD menu but without saving 3 1 5 Selecting color temperature 9300K 6500K 5500K COLOR You can change the picture color temperature Three preset color temperature modes are available 9300K Color recommended for g...

Page 11: ...d press or button The second page appears 3 Press or button to select User Color and press or button to confirm the selection The Red Blue and Green Color slide bars appear in the center of menu 4 Press or button to select R Red Color and press or button to adjust the red color you prefer 5 Press or button to select G Green Color and press or button to adjust the green color you prefer 6 Press or ...

Page 12: ... back to VGA IN automatically 3 To close the OSD menu press or button to select Save Exit and press or button Note You may also press to exit OSD menu but without saving 3 1 8 Adjusting OSD menu parameters OSD Position and OSD Timer The settings allow you to change the OSD menu position and the duration of OSD menu count start from the last input 1 Press any one of button to activate OSD menu 2 Pr...

Page 13: ...nd page 3 Press or button to select Next Page and press or button for the third page 4 Press or button to select Sharpness and press or button to optimize the sharpness for your specific application 5 To close the OSD menu press or button to select Save Exit and press or button Note You may also press to exit OSD menu but without saving 3 1 10 Optimizing the contrast level automatically Auto Contr...

Page 14: ...r the third page 4 Press or button to select Recall and press or button to activate it 5 To close the OSD menu press or button to select Save Exit and press or button Note You may also press to exit OSD menu but without saving 3 1 12 Selecting the DOS mode of your system Graphic Text There are two kinds of DOS mode Graphic DOS mode 640x400 resolution and Text DOS mode 720x400 resolution Because th...

Page 15: ...t OSD menu but without saving 3 2 If the signal is coming from VIDEO IN DVD VCD VCR players etc 3 2 1 Selecting OSD menu LANGUAGE This OSD system supports English French German Spanish and Italian languages 1 Press any one of button to activate OSD menu 2 Press or button to select Language and press or button to select the language you prefer 3 To close the OSD menu press or button to select Save ...

Page 16: ...er 4 To close the OSD menu press or button to select Save Exit and press or button Note You may also press to exit OSD menu but without saving 3 2 3 Adjusting Hue Color The settings allow you to adjust the image color of your monitor according to your preference 1 Press any one of button to activate OSD menu 2 Press or button to select Hue and press or button to adjust the hue level you prefer 3 P...

Page 17: ...riority to VGA In 3 To close the OSD menu press or button to select Save Exit and press or button Note You may also press to exit OSD menu but without saving 3 2 5 Selecting VIDEO SOURCE TO S VIDEO or TO CVBS This monitor is equipped with both S Video and CVBS CVBS jack connectors It will detect the video source automatically You may switch the input signal priority if both inputs are connected 1 ...

Page 18: ... the factory default 1 Press any one of button to activate OSD menu 2 Press or button to select Recall and press or button to activate it 3 To close the OSD menu press or button to select Save Exit and press or button Note You may also press to exit OSD menu but without saving ...

Page 19: ...enu On Screen Display menu is locked to avoid unwanted adjustment Press button for 15 seconds to unlock the main control menu NO VIDEO SIGNAL FROM VGA IN No signal input is detected from VGA In connector Check the power switch of your computer if it is in the ON position Check the video signal cable if it has been properly connected to video input 1 Ensure that no pins are bent or pushed in the vi...

Page 20: ...you are not in 1024 by 768 resolution Please refer to the Customizing Your Monitor section of this user manual for details Screen image is not Centered properly Some lines missing Press button to run the automatic adjustment Adjust H Position and V Position to fine tune Please refer to the Customizing Your Monitor section of this user manual for details There are red green blue or black tiny dots ...

Page 21: ...diagonal 1024 x 768 vertical stripe 30kHz 60kHz 50Hz 75Hz 80MHz Screen size Pixel format Horizontal frequency Vertical frequency Maximum pixel clock Connections Power 3 pin AC plug Power consumption 48W On 5W Stand by 5W Off Physical characteristics Weight Net 4 9Kg Tilt angle 0º 20º ...

Page 22: ...n accordance with the instructions may cause harmful interference to radio communications However there is no guarantee that interference will not occur in a particular installation If this equipment does cause harmful interference to radio or television reception which can be determined by turning the equipment off and on the user is encouraged to try to correct the interference by one or more of...

Page 23: ... Naturskyddsforeningen The Swedish Society for Nature Conservation and NUTEK The National Board for Industrial and Technical Development in Sweden The requirements cover a wide range of issues environment ergonomics usability emission of electrical and magnetic fields energy consumption and electrical and fire safety The environmental demands concern restrictions on the presence and use of heavy m...

Page 24: ...f certain computer displays Cadmium damages the nervous system and is toxic in high doses TCO 95 requirement states that batteries may not contain more than 25 ppm parts per million of cadmium The colour generating layers of display screens must not contain any cadmium Mercury Mercury is sometimes found in batteries relays and switches Mercury damages the nervous system and is toxic in high doses ...

Reviews: