Hardware Reference Guide
55
A
TTACHING
E
XTERNAL
A
NTENNAS
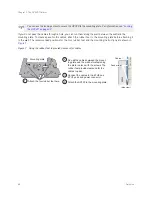
Figure 5 Connecting the grounding cable to the grounding lug on the unit
A
TTACHING
E
XTERNAL
A
NTENNAS
Once you have grounded your AP170, you are ready to connect the
antennas.
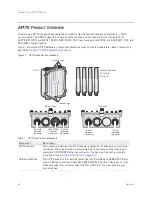
The omnidirectional antennas are available from Aerohive (SKUs
AH-ACC-170-ANT-2G, AH-ACC-170-ANT-5G). These antennas fit the
N-type antenna connectors on the top and bottom of the AP170. The two
connectors on the bottom of the unit are for the 2.4 GHz antennas, and
the two on the top of the unit are for the 5 GHz antennas (device and
antennas are labeled).
To connect the antennas, screw them onto the antenna connectors by
hand, turning them clockwise until tight.
It is extremely important to properly ground your device to
complete your installation.
You do not need to use a tool to tighten the antennas or apply self-
amalgamating PTFE (polytetrafluoroethylene) tape around the
threads of the connectors to create a waterproof seal.
Remove the short piece of cable sheath from the end of the
grounding cable that does not have the connector.
Wrap the exposed wires clockwise snugly around one of the
six grounding lugs and tighten the nut securely.
Connect the other end of the grounding cable to a
proper ground.
1
2
3
Exposed
wire
Grounding nut
Grounding lugs
5 GHz
5 GHz
24 GHz
24 GHz
Summary of Contents for Aerohive APs
Page 1: ...Aerohive Hardware Reference Guide ...
Page 7: ...Contents 6 Aerohive ...
Page 17: ...Chapter 1 The AP330 and AP350 Platforms 16 Aerohive ...
Page 47: ...Chapter 3 The AP320 Platform 46 Aerohive ...
Page 61: ...Chapter 4 The AP170 Platform 60 Aerohive ...
Page 91: ...Chapter 8 The High Capacity HiveManager 90 Aerohive ...


