background image

13

E

N

G

L

IS

H

ENGLISH

How to Install the Driver

Minimum system requirements:

•  Pentium 133 MHz or more
•  Microsoft ® Windows ™ 98 SE/ME/2000/XP
•  RAM 20 MB
•  USB Port (2.0)

If your computer runs on Windows 2000 or a more recent sys-
tem, your MP3 player does not require any particular software or 
drivers. However, the device does require the latest service pack 
version to be installed. In the event of problems try to install 
the current Microsoft service pack for the respective operating 
system. For this, go to:

http://www.microsoft.com

 NOTE: 

Important: 

Windows 98SE users must install the driver prior 

to hooking up the device with the PC. The PC may have to be 
restarted. WIN 98 fi rst edition is not supported.

•  Place the supplied CD driver into the CD-ROM drive of 

your PC.

•  Click on ‘Driver’.
•  Follow the instructions on how to install.

Connecting the MP3 player with your PC

1.  Connect the MP3 player using the USB connection cable, 

with your PC.

2.  Insert the smaller USB connection into the USB jack (10) 

of the MP3 player and the other end into a vacant USB 
connection of your PC.

3.  Once the connection has been successfully established the 

display will read „READY“. 

4.  The MP3 player is displayed as a removable medium and 

can be used as such.

5.  To store and export fi les, proceed as stated in the operating 

software of your PC.

6.  Once the fi les have been transferred, fi rst unlog the MP3 

player from your PC. Proceed as stated in the operating 
software of your PC to safely remove the hardware.

 NOTE: 

•  Never remove the MP3 player from the PC during data 

transfer. This even applies if the data transfer should 
come to a halt. To separate the MP3 player from the PC, 
follow the notes of your PC software to safely separate 
hardware, i.e. the removable medium. 

•  Unplug the earplugs from the device before you start the 

exchange of data.

•  We can not be held responsible for the loss of fi les as a 

result of improper operation.

•  The device is not DRM-compatible.

Charging the Battery

The device is operated by the integrated lithium ion battery. In 
order to recharge the battery, connect the device to your com-
puter by means of the USB connection cable, or use the AC/DC 
adapter of the accessory.

1.  If the device is being charged up by the PC, the word 

„READY“ appears in the display (7). The charging process is 
indicated by the battery status indicator.

2.  If charging takes place via the mains adapter, the device 

switches on. The display is switched off after some time, 
although the charging process is continued. The control 
lamp on the mains adapter lights up in red during charging.

 NOTE: 

•  If only one bar is visible in the battery status display (6), 

the charge status of the battery is low and the battery 
needs recharging.

•  The battery charging time is approx. 5 hours, depending 

on the charge status.

• 

The battery operating time depends on the operating 
parameters (e.g. volume).

•  The battery is fully charged 

a)  when the battery charge indicator (6) shows that it is 

full.

b)  when the control lamp on the mains adapter changes 

from red to green.

•  The PC must be switched on during charging in order for 

the battery to be charged.

How to operate the MP3 player

Switching the MP3 player on

In order to switch the MP3 player on, press the 

II

 key (1); the 

name “AEG / WELCOME!” appears briefl y in the display. The 
length of time for which this display appears depends on the 
amount of data. The menu then appears in the display (7).

Switching the MP3 player off

While a piece of music is being played back, keep the 

II

 key 

(1) held down until “


(Stopp)” appears in the display. If the 

II


key (1) is held down a second time until “GOOD BYE!” appears 
in the display, the device switches itself off. 

 NOTE: 

•  The MP3 player switches itself off automatically if not ope-

rated for a shorter period of time while in stop or pause 
mode (see „Power“). 

•  If the „Display” option is activated in the menu the display 

switches off after the set time in order to save electricity 
(see „Display“).

•  During the charging process the device cannot be swit-

ched off due to the automatic charging connection.
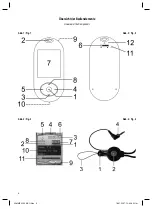
Earphones (Fig.4)

1.  Release the strain relief (1) of the earphones by pressing 

the centre of the release (2). 

2.  Guide the string (3) of the strain relief through the eyelet (2) 

(Fig.1) of the MP3 player.

3.  Connect the strain relief (1) with the earphones again until it 

catches with a “click”.

4.  Then connect the 2.5 mm Stereo jack plug (4) with the 

earphones connection (9) (Fig.1).

05-MMS 4209 AEG Neu   13

18.01.2007, 12:42:58 Uhr

Summary of Contents for MMS 4209

Page 1: ...enungsanleitung Garantie Bedienungsanleitung Garantie Instruction Manual Guarantee Multimedia MP3 Player 2 0 USB Multimedia MP3 Player 2 0 USB MMS 4209 MMS 4209 05 MMS 4209 AEG Neu 1 18 01 2007 12 42 41 Uhr ...

Page 2: ...e Seite 3 Bedienungsanleitung Seite 4 Technische Daten Seite 9 Garantie Seite 10 ENGLISH ENGLISH Contents Overview of the Components Page 3 Instruction Manual Page 12 Technical Data Page 17 Guarantee Page 17 ENGLISH ENGLISH 05 MMS 4209 AEG Neu 2 18 01 2007 12 42 42 Uhr ...

Page 3: ...3 Übersicht der Bedienelemente Overview of the Components Abb 1 Fig 1 Abb 3 Fig 3 Abb 2 Fig 2 Abb 4 Fig 4 05 MMS 4209 AEG Neu 3 18 01 2007 12 42 43 Uhr ...

Page 4: ...gesehenen Zweck Dieses Gerät ist nicht für den gewerblichen Gebrauch bestimmt Halten Sie das Gerät vor Hitze direkter Sonneneinstrah lung Feuchtigkeit auf keinen Fall in Flüssigkeit tauchen und scharfen Kanten fern Benutzen Sie das Gerät nicht mit feuchten Händen Verwenden Sie das Gerät nicht in einer feuchten oder schwülen Umgebung Um elektrischen Stromschlag zu vermeiden darf dieses Gerät nicht ...

Page 5: ...niemals den MP3 Player vom PC während des laufenden Datenaustausches Dieses gilt auch wenn der Datenfluss zum Erliegen kommen sollte Um den MP3 Player vom PC zu trennen befolgen Sie die Hinweise Ihrer PC Software um Hardware bzw Wechseldatenträ ger sicher zu entfernen Stecken Sie den Ohrhörer vom Gerät ab bevor Sie mit dem Datenaustausch beginnen Wir sind nicht verantwortlich für den Verlust von Da...

Page 6: ...lt bleibt das Bild für kurze Zeit stehen WARNUNG Das Hören bei hoher Lautstärke kann die Ohren des Hörers schädigen Zur vorigen nächsten Datei springen I 5 1 x drücken Beginnt das aktuelle Lied wieder von vorne 2 x drücken Springt zum vorherigen Titel 3 x drücken Spielt ein Lied davor usw Halten Sie die Taste gedrückt setzt ein Musiksuchlauf ein der Ton wird stumm geschaltet I 4 Mit dieser Taste k...

Page 7: ...om Untermenü wieder ins Hauptmenü zu wechseln HINWEIS Drücken Sie die M Taste 8 kurz wird Ihnen im jeweiligen Modus eine Auflistung der vorhandenen Dateien angezeigt Musik Um den MP3 Modus auszuwählen HINWEIS Sind keine Daten auf dem Gerät vorhanden erscheint Warnung Keine Daten im Display Video Um den Video SMV Modus auszuwählen HINWEIS Sind keine Daten auf dem Gerät vorhanden erscheint Keine Date...

Page 8: ...t oder der Wiedergabemodus geändert wird Zufällig Wiederholte Zufallswiedergabe Die Musikstücke werden in Zufallsreihenfolge wiedergege ben und dann wiederholt bis die Wiedergabe gestoppt oder der Wiedergabemodus geändert wird Vorschau Intro Alle Titel werden für 10 Sekunden angespielt Der derzeit ausgewählte Wiedergabemodus Abb 3 4 wird oben im Display Abb 1 7 angezeigt Equalizer Ihr MP3 Player h...

Page 9: ...ege lungsfunktion ausgeschaltet ist Vergewissern Sie sich dass die kopierten Dateien nicht geschützt sind Integrierter Akku leer Laden Sie den Akku wie beschrieben auf Musikdateien können nicht wiedergegeben werden Vergewissern Sie sich dass der Speicher MP3 WMA Dateien enthält Vergewissern Sie sich dass die kopierten Dateien nicht geschützt sind Stellen Sie sicher dass es sich nicht um eine DRM g...

Page 10: ...allen nicht unter die Garantie und sind deshalb kostenpflichtig Die Garantie erlischt bei Fremdeingriff Nach der Garantie Nach Ablauf der Garantiezeit können Reparaturen kostenpflich tig vom entsprechenden Fachhandel oder Reparaturservice ausgeführt werden Kostenlose Hotline Haben Sie Fragen zu Ihrem neuen Gerät Unser Serviceteam steht gerne für Sie bereit Kleinere Probleme lassen sich oft schon tel...

Page 11: ...derholen Zufällig Vorschau Eq Normal Rock Jazz Klassik Pop Bass Hintergrundlicht 1 Minute 2 Minute 5 Minute Immer Autom Abschalten Deaktivieren 1 Minute 2 Minute 5 Minute 10 Minute Aufnahmetyp Quelle Mic Rate Normal Mittel Hoch Exit Lyrik Lrc Aus Lrc An Sprache Information Exit Datei löschen Seite 9 Für genauere Erklärungen sehen Sie bitte im entsprechenden Abschnitt nach 05 MMS 4209 AEG Neu 11 18...

Page 12: ...the device with wet hands Do not operate the device in a humid or sultry environment To avoid an electrical shock do not expose this device to drops of water or splash water Maintenance The inside of this device does not hold any parts which require maintenance by the user For maintenance please refer to a qualified customer services point Consult your dealer if you are in any doubt with regard to ...

Page 13: ...nection cable or use the AC DC adapter of the accessory 1 If the device is being charged up by the PC the word READY appears in the display 7 The charging process is indicated by the battery status indicator 2 If charging takes place via the mains adapter the device switches on The display is switched off after some time although the charging process is continued The control lamp on the mains adap...

Page 14: ...he display reads Key lock The key lock inhibits the operation of all buttons on the MP3 player This prevents you from accidentally activating buttons while using the MP3 player when you are out 1 To activate the key lock push the ON OFF switch 6 to the left The lock symbol appears in the display 2 In order to release the key lock push the ON OFF switch to the right The lock symbol in the display g...

Page 15: ...ess the I I buttons 4 5 For an automatic picture change press the VOL button 3 In order to switch back to the manual picture change press the VOL button again NOTE If there are no files stored in the device No File appears in the display Record Microphone It is possible to make voice recordings using the built in microphone 1 In the main menu select the Record mode and press the M key 8 Recording n...

Page 16: ...ain switched on until the screensaver is activated 1 min 2 mins 5 mins always off Power Stand by Setting for the automatic shutdown of the device Here you can select between the following settings Disable Off 1 min 2 mins 5 mins and 10 mins Record Setting Setting for the microphone recording bit rate 1 Navigate with the I I keys 4 5 and change the options with the M key 8 Sou Mic Rate Normal low s...

Page 17: ...or notice Guarantee The device supplied by our Company is covered by a 24 month guarantee starting on the date of purchase receipt During the life of the guarantee any fault of the device or its accessories ascribable to material or manufacturing defects will be eliminated free of charge by repairing or at our discretion by replacing it The guarantee services do not entail an extension of the life...

Page 18: ...at One Repeat All Shuffle Repeat Preview Eq Normal Rock Jazz Classical Pop Bass Display 1 min 2 mins 5 mins always Power Disable 1 min 2 mins 5 mins 10 mins Record Setting Sou Mic Rate Normal Middle High Exit Lrc Lrc OFF Lrc ON Laguages About Exit File delete Page 16 For more detailed explanations please see the corresponding section 05 MMS 4209 AEG Neu 18 18 01 2007 12 43 07 Uhr ...

Page 19: ...19 ENGLISH ENGLISH 05 MMS 4209 AEG Neu 19 18 01 2007 12 43 07 Uhr ...

Page 20: ...05 MMS 4209 AEG Neu 20 18 01 2007 12 43 07 Uhr ...

Page 21: ...05 MMS 4209 AEG Neu 21 18 01 2007 12 43 07 Uhr ...

Page 22: ...ld til garantierklæring 24 miesiące gwarancji na podstawie karty gwarancyjnej Záruka 24 mésíců podle prohlášení o záruce A garanciát lásd a használati utasításban Гарантийные обязательства смотри руководство пользователя Kaufdatum Händlerstempel Unterschrift Koopdatum Stempel van de leverancier Handtekening Date d achat cachet du revendeur signature Fecha de compra Sello del vendedor Firma Data de...

Reviews: