background image

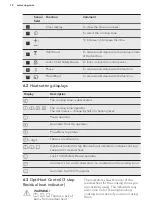
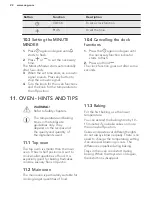
Button

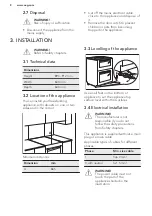
Function

Description

CLOCK

To set a clock function.

PLUS

To set the time.

10.3 

Setting the MINUTE

MINDER

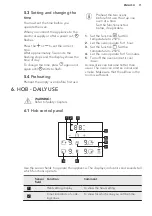
1.

Press   again and again until 

starts to flash.

2.

Press   or   to set the necessary

time.

The Minute Minder starts automatically

after 5 seconds.

3.

When the set time ends, an acoustic

signal sounds. Press any button to

stop the acoustic signal.

4.

Turn the knob for the oven functions

and the knob for the temperature to

the off position.

10.4 

Cancelling the clock

functions

1.

Press the   again and again until

the necessary function indicator

starts to flash.

2.

Press and hold  .

The clock function goes out after some

seconds.

11. 

OVEN - HINTS AND TIPS

WARNING!

Refer to Safety chapters.

The temperature and baking

times in the tables are

guidelines only. They

depend on the recipes and

the quality and quantity of

the ingredients used.

11.1 

Top oven

The top oven is smaller than the main

oven. It has 3 shelf positions. Use it to

cook smaller quantities of food. It is

especially good for baking fruitcakes,

cookies, savoury flans or quiche.

11.2 

Main oven

The main oven is particularly suitable for

cooking larger quantities of food.

11.3 

Baking

For the first baking, use the lower

temperature.
You can extend the baking time by 10 –

15 minutes if you bake cakes on more

than one shelf position.
Cakes and pastries at different heights

do not always brown equally. There is no

need to change the temperature setting

if an unequal browning occurs. The

differences equalize during baking.
Trays in the oven can distort during

baking. When the trays are cold again,

the distortions disappear.

www.aeg.com

22

Summary of Contents for CIB6732ACM

Page 1: ...USER MANUAL EN User Manual Cooker CIB6732ACM ...

Page 2: ...ew minutes reading to get the very best from it Visit our website to Get usage advice brochures trouble shooter service and repair information www aeg com support Register your product for better service www registeraeg com Buy Accessories Consumables and Original spare parts for your appliance www aeg com shop CUSTOMER CARE AND SERVICE Always use original spare parts When contacting our Authorise...

Page 3: ...ds involved Children between 3 and 8 years of age and persons with very extensive and complex disabilities shall be kept away from the appliance unless continuously supervised Children of less than 3 years of age should be kept away from the appliance unless continuously supervised Do not let children play with the appliance Keep all packaging away from children and dispose of it appropriately WAR...

Page 4: ...process has to be supervised A short term cooking process has to be supervised continuously WARNING Danger of fire Do not store items on the cooking surfaces Do not use a steam cleaner to clean the appliance Do not use harsh abrasive cleaners or sharp metal scrapers to clean the glass door or the glass of hinged lids of the hob since they can scratch the surface which may result in shattering of t...

Page 5: ...signed by the manufacturer of the cooking appliance or indicated by the manufacturer of the appliance in the instructions for use as suitable or hob guards incorporated in the appliance The use of inappropriate guards can cause accidents 2 SAFETY INSTRUCTIONS 2 1 Installation WARNING Only a qualified person must install this appliance Remove all the packaging Do not install or use a damaged applia...

Page 6: ...n isolation device which lets you disconnect the appliance from the mains at all poles The isolation device must have a contact opening width of minimum 3 mm Fully close the appliance door before you connect the mains plug to the mains socket 2 3 Use WARNING Risk of injury and burns Risk of electrical shock This appliance is for household use only Do not change the specification of this appliance ...

Page 7: ...te the appliance Disconnect the mains plug from the mains socket Make sure the appliance is cold There is the risk that the glass panels can break Replace immediately the door glass panels when they are damaged Contact the Authorised Service Centre Be careful when you remove the door from the appliance The door is heavy Fat and food remaining in the appliance can cause fire Clean regularly the app...

Page 8: ...ing appliance with cabinets on one or two sides and in the corner A Minimum distances Dimension mm A 685 3 3 Levelling of the appliance Use small feet on the bottom of appliance to set the appliance top surface level with other surfaces 3 4 Electrical installation WARNING The manufacturer is not responsible if you do not follow the safety precautions from Safety chapters This appliance is supplied...

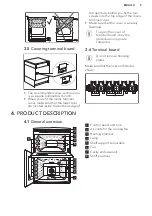
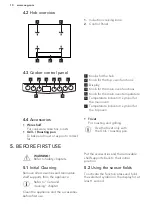
Page 9: ...rminal cover Make sure that the cover is securely fastened To open the cover of terminal board obey the procedure in opposite sequence 3 6 Terminal board Do not remove blanking plates Make sure that the links are fitted as shown N N N L L 4 PRODUCT DESCRIPTION 4 1 General overview 1 2 3 3 4 5 5 6 5 4 3 2 1 8 3 2 1 4 7 1 Control panel and hob 2 Air vents for the cooling fan 3 Heating element 4 Lamp...

Page 10: ...rill Roasting pan To bake and roast or as pan to collect fat Trivet For roasting and grilling Use the trivet only with the Grill roasting pan 5 BEFORE FIRST USE WARNING Refer to Safety chapters 5 1 Initial Cleaning Remove all accessories and removable shelf supports from the appliance Refer to Care and cleaning chapter Clean the appliance and the accessories before first use Put the accessories an...

Page 11: ...plicable 1 Set the function Set the temperature to 250ºC 2 Let the oven operate for 1 hour 3 Set the function Set the temperature to 250ºC 4 Let the oven operate for 15 minutes 5 Turn off the oven and let it cool down Accessories can become hotter than usual The oven can emit an odour and smoke Make sure that the airflow in the room is sufficient 6 HOB DAILY USE WARNING Refer to Safety chapters 6 ...

Page 12: ...The dot means a change by half of a heating level Pause operates Automatic Heat Up operates PowerBoost operates digit There is a malfunction OptiHeat Control 3 step Residual heat indicator continue cooking keep warm residual heat Lock Child Safety Device operates Incorrect or too small cookware or no cookware on the cooking zone Automatic Switch Off operates 6 3 OptiHeat Control 3 step Residual he...

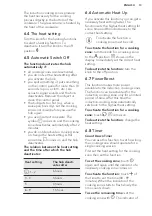
Page 13: ...utomatic Heat Up If you activate this function you can get a necessary heat setting faster The function sets the highest heat setting for some time and then decreases to the correct heat setting To activate the function a cooking zone must be cold To activate the function for a cooking zone turn the knob for a cooking zone to the position shows on the display Immediately set the correct heat setti...

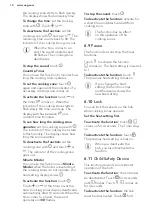
Page 14: ...ivated and the cooking zones do not operate The heat setting display shows To activate the function touch Touch or of the timer to set the time Cooking zones display deactivates automatically after 10 seconds When the time comes to an end the sound operates and 00 flashes To stop the sound touch To deactivate the function activate for a short time and deactivate left front cooking zone The functio...

Page 15: ... remote system is originally deactivated Activate it before you use the function For more information refer to hood user manual Operating the function automatically To operate the function automatically set the automatic mode to H1 H6 The hob is originally set to H5 The hood reacts whenever you operate the hob The hob recognizes temperature of the cookware automatically and adjusts the speed of th...

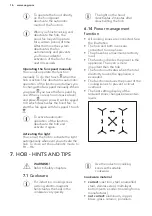
Page 16: ...e light automatically whenever you activate the hob To do so set the automatic mode to H1 H6 The light on the hood deactivates 2 minutes after deactivating the hob 6 14 Power management function All cooking zones are connected See the illustration The hob and both ovens are connected to one phase The phase has a maximum electricity load The function divides the power in the appliance The oven is m...

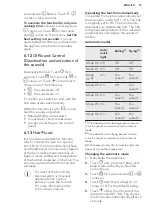
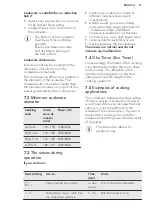
Page 17: ... construction whistle sound you use a cooking zone with a high power level and the cookware is made of different materials a sandwich construction humming you use a high power level clicking electric switching occurs hissing buzzing the fan operates The noises are normal and do not indicate any malfunction 7 4 Öko Timer Eco Timer To save energy the heater of the cooking zone deactivates before the...

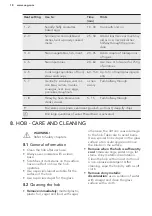
Page 18: ...rge quantities of water PowerBoost is activated 8 HOB CARE AND CLEANING WARNING Refer to Safety chapters 8 1 General information Clean the hob after each use Always use cookware with a clean base Scratches or dark stains on the surface have no effect on how the hob operates Use a special cleaner suitable for the surface of the hob Use a special scraper for the glass 8 2 Cleaning the hob Remove imm...

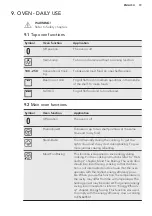
Page 19: ...od Steam Bake To add humidity during the cooking To get the right colour and crispy crust during baking To give more juiciness during reheating Moist Fan Baking This function is designed to save energy during cooking For the cooking instructions refer to Hints and tips chapter Moist Fan Baking The oven door should be closed during cooking so that the func tion is not interrupted and to ensure that...

Page 20: ...ll the cavity embossment with tap water The maximum capacity of the cavity embossment is 250 ml Fill the cavity embossment with water only when the oven is cold 3 Turn the function knob Steam Bake 4 Turn the temperature knob to set a temperature 5 Put food in the appliance and close the oven door CAUTION Do not refill the cavity embossment with water during cooking or when the oven is hot 6 To tur...

Page 21: ...the trivet into the deep pan so that the supports of the wire shelf point up 2 Put the deep pan into the oven on the necessary shelf position You can use the trivet to grill flat dishes in large quantities and to toast 1 Put the trivet into the deep pan so that the supports of the wire shelf point down 2 Put the deep pan into the oven on the necessary shelf position 10 OVEN CLOCK FUNCTIONS 10 1 Di...

Page 22: ...ture and baking times in the tables are guidelines only They depend on the recipes and the quality and quantity of the ingredients used 11 1 Top oven The top oven is smaller than the main oven It has 3 shelf positions Use it to cook smaller quantities of food It is especially good for baking fruitcakes cookies savoury flans or quiche 11 2 Main oven The main oven is particularly suitable for cookin...

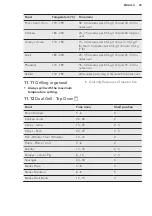
Page 23: ...the baking time is too short Next time set a longer baking time and lower oven temperature The cake batter is not even ly distributed Next time spread the cake batter evenly on the baking tray The cake is not ready in the baking time speci fied in a recipe The oven temperature is too low Next time set a slightly higher oven temperature 11 5 Conventional Baking Top Oven Food Temperature C Time min ...

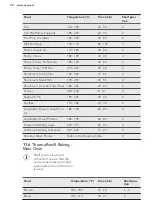
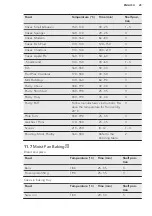
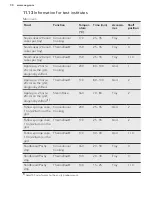
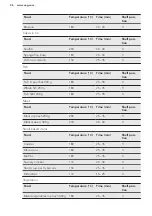
Page 24: ...crusts Quiche Tarts Flans 180 200 25 50 2 Scones 220 230 8 12 3 Shepard s Pie 190 200 30 40 2 Souffles 170 180 20 30 2 Vegetables Baked Jacket Pota tos 180 190 60 90 2 Vegetables Roast Potatos 180 190 60 90 2 Yorkshire Pudding Large 220 210 25 40 2 Yorkshire Pudding Individual 210 220 15 25 2 Roasting Meat Poultry Refer to the Roasting table 2 11 6 Thermaflow Baking Main Oven Shelf positions are n...

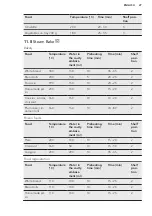
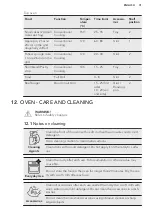
Page 25: ... Pastry Choux 180 190 30 40 3 Pastry Shortcrust 180 190 25 35 3 Pastry Flaky 180 190 30 40 3 Pastry Puff Follow manufacturer s instructions Re duce the temperature for Fan oven by 20 C 3 Plate Tarts 180 190 25 45 3 Quiches Flans 170 180 25 45 3 Scones 210 230 8 12 1 3 Roasting Meat Poultry 160 180 Refer to the Roasting table 2 11 7 Moist Fan Baking Bread and pizza Food Temperature C Time min Shelf...

Page 26: ...sh 200 g 180 25 35 3 Fish fillet 300 g 180 25 35 3 Meat Food Temperature C Time min Shelf posi tion Meat in pouch 250 g 200 25 35 3 Meat skewers 500 g 200 30 40 3 Small baked items Food Temperature C Time min Shelf posi tion Cookies 180 25 35 3 Macaroons 160 25 35 3 Muffins 180 25 35 3 Savoury cracker 170 20 30 3 Short crust pastry biscuits 150 25 35 3 Tartelettes 170 15 25 3 Vegetarian Food Tempe...

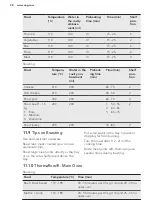
Page 27: ...za 230 100 10 15 20 2 Cookies scones croissant 160 150 10 10 20 2 Plum cake cin namon rolls 160 150 10 70 80 2 Frozen foods Food Temperature C Water in the cavity emboss ment ml Preheating time min Time min Shelf posi tion Pizza 200 100 10 15 20 2 Croissant 160 50 10 15 30 2 Lasagne 200 200 10 35 45 2 Food regeneration Food Temperature C Water in the cavity emboss ment ml Preheating time min Time ...

Page 28: ...ne 200 200 1 50 55 2 60 65 3 65 75 2 Roast turkey 200 200 70 85 2 11 9 Tips on Roasting Use heat resistant ovenware Roast lean meat covered you can use aluminium foil Roast large meat joints directly in the tray or on the wire shelf placed above the tray Put some water in the tray to prevent dripping fat from burning Turn the roast after 1 2 2 3 of the cooking time Baste meat joints with their own...

Page 29: ...0 190 35 40 minutes per 0 5 kg 1 lb and 35 40 mi nutes over Rabbit 170 190 20 minutes per 0 5 kg 1 lb and 20 minutes over 11 11 Grilling in general Always grill with the maximum temperature setting Grill only flat pieces of meat or fish 11 12 Dual Grill Top Oven Food Time min Shelf position Bacon Rashers 5 6 3 Chicken Joints 20 40 2 Chops Lamb 15 25 2 3 Chops Pork 20 25 2 3 Fish Whole Trout Makare...

Page 30: ...2 tins ø 20 cm on the grid diagonally shifted Thermaflow 170 80 100 Grid 2 Apple pie 2 tins ø 20 cm on the grid diagonally shifted 1 Steam Bake 160 70 80 Tray 2 Fatless sponge cake 1 tin ø 26 cm on the grid Conventional Cooking 200 25 35 Grid 2 Fatless sponge cake 1 tin ø 26 cm on the grid Thermaflow 170 25 35 Grid 2 Fatless sponge cake 1 tin ø 26 cm on the grid Thermaflow 170 30 40 Grid 1 4 Short...

Page 31: ... Refer to Safety chapters 12 1 Notes on cleaning Cleaning Agents Clean the front of the oven with a soft cloth with warm water and a mild detergent Use a cleaning solution to clean metal surfaces Clean stains with a mild detergent Do not apply it on the catalytic surfa ces Everyday Use Clean the cavity after each use Fat accumulation or other residue may cause fire Do not store the food in the ove...

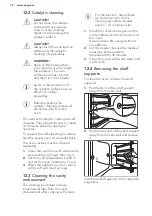
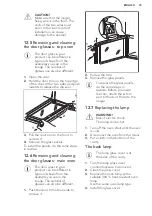
Page 32: ...e oven floor with warm water and washing up liquid then dry it 2 Set the oven temperature to 250 C and let the oven operate for 1 hour 3 When the appliance is cool clean it with a soft and moist sponge 12 3 Cleaning the cavity embossment The cleaning procedure removes limestone residue from the cavity embossment after cooking with steam For the function Steam Bake we recommend to do the cleaning p...

Page 33: ... oven The door glass in your product can be different in type and shape from the example you see in the image The number of glasses can also be different 1 Push the door trim at one side to remove it 1 2 A 2 Pull up the trim 3 Remove the glass panels To replace the glass panels do the same steps in reverse Before you lower the trim attach the A trim part to the door Refer to the image 12 7 Replaci...

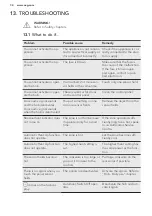
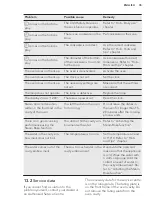
Page 34: ...An acoustic signal sounds when the hob is deactivated You put something on one or more sensor fields Remove the object from the sensor fields Residual heat indicator does not come on The zone is not hot because it operated only for a short time If the zone operated suffi ciently long to be hot speak to an Authorised Service Centre Automatic Heat Up function does not operate The zone is hot Let the...

Page 35: ...on the food and in the cavity of the oven You left the dish in the oven for too long Do not leave the dishes in the oven for longer than 15 20 minutes after the cooking process ends There is no good cooking performance using the Steam Bake function You did not fill the cavity em bossment with water Refer to Activating the Steam Bake function The water in the cavity em bossment does not boil The te...

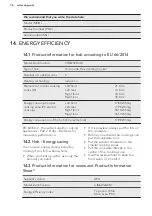
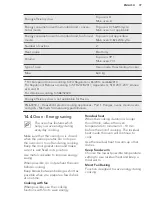
Page 36: ...y consumption of the hob EC electric hob 179 8 Wh kg EN 60350 2 Household electric cooking appliances Part 2 Hobs Methods for measuring performance 14 2 Hob Energy saving You can save energy during everyday cooking if you follow below hints When you heat up water use only the amount you need If it is possible always put the lids on the cookware Before you activate the cooking zone put the cookware...

Page 37: ...ce 14 4 Oven Energy saving The oven has features which help you save energy during everyday cooking Make sure that the oven door is closed when the oven operates Do not open the oven door too often during cooking Keep the door gasket clean and make sure it is well fixed in its position Use metal cookware to improve energy saving When possible do not preheat the oven before cooking Keep breaks betw...

Page 38: ...ers to recycle it Help protect the environment and human health by recycling waste of electrical and electronic appliances Do not dispose of appliances marked with the symbol with the household waste Return the product to your local recycling facility or contact your municipal office www aeg com 38 ...

Page 39: ......
Page 40: ...www aeg com shop 867338787 A 142020 ...

Reviews: