background image

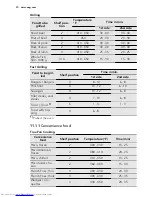
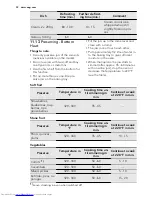
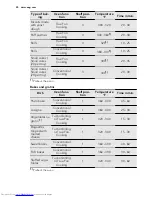
Grilling

Food to be

grilled

Shelf posi-

tion

Temperature
°F

Time in min.


1st side

2nd side

Roast beef

2

410 - 450

30 - 40

30 - 40

Filet of beef

3

450

20 - 30

20 - 30

Back of pork

2

410 - 450

30 - 40

30 - 40

Back of veal

2

410 - 450

30 - 40

30 - 40

Back of lamb

3

410 - 450

25 - 35

20 - 25

Whole Fish,
500 - 1000 g

3 / 4

410 - 450

15 - 30

15 - 30

Fast Grilling

Food to be gril-

led

Shelf position

Time in min.

1st side

2nd side

Burgers / Burgers

4

8 - 10

6 - 8

Pork fillet

4

10 - 12

6 - 10

Sausages

4

10 - 12

6 - 8

Fillet steaks, veal
steaks

4

7 - 10

6 - 8

Toast / Toast 

1)

5

1 - 3

1 - 3

Toast with top-
ping

4

6 - 8

-

1) 

Preheat the oven

11.11 

Convenience food

True Fan Cooking

Convenience

food

Shelf position

Temperature (°F)

Time (min)

Pizza, frozen

2

400 - 430

15 - 25

Pizza American,
frozen

2

380 - 410

20 - 25

Pizza, chilled

2

410 - 450

13 - 25

Pizza Snacks, fro-
zen

2

360 - 400

15 - 30

French Fries, thin

3

400 - 430

20 - 30

French Fries, thick

3

400 - 430

25 - 35

Wedges / Cro-
quettes

3

430 - 450

20 - 35

30 www.aeg.com

Summary of Contents for BP7304001

Page 1: ...BP7304001 EN User manual ...

Page 2: ... life simpler features you might not find on ordinary appliances Please spend a few minutes reading to get the very best from it Visit our website for Get usage advice brochures trouble shooter service information www aeg com Register your product for better service www aeg com productregistration Buy Accessories Consumables and Original spare parts for your appliance www aeg com shop CUSTOMER CAR...

Page 3: ...person who is responsible for their safety Do not let children play with the appliance Keep all packaging away from children Keep children and pets away from the appliance when it operates or when it cools down Accessible parts are hot If the appliance has a child safety device we recom mend that you activate it Cleaning and user maintenance shall not be made by children without supervision 1 2 Ge...

Page 4: ...ectrical connection WARNING Risk of fire and electrical shock All electrical connections should be made by a qualified electrician The appliance must be earthed Make sure that the electrical informa tion on the rating plate agrees with the power supply If not contact an electrician Always use a correctly installed shock proof socket Do not use multi plug adapters and extension cables Make sure not...

Page 5: ...n to the enamel do not put ovenware or other ob jects in the appliance directly on the bottom do not put aluminium foil directly on the bottom of the appliance do not put water directly into the hot appliance do not keep moist dishes and food in the appliance after you finish the cooking be careful when you remove or in stall the accessories Discoloration of the enamel has no ef fect on the perfor...

Page 6: ...nlike all humans some birds and reptiles can be extremely sensitive to potential fumes emitted during the cleaning process of all Pyrolytic Ovens Small pets can also be highly sensitive to the localized temperature changes in the vicinity of all Pyrolytic Ovens when the Pyrolytic self cleaning pro gram is in operation Non stick surfaces on pots pans trays utensils etc can be damaged by the high te...

Page 7: ...ating element 5 Lamp 6 Fan 7 Rear wall heating element 8 Bottom heat 9 Shelf support removable 10 Shelf positions 3 1 Accessories Wire shelf For cookware cake tins roasts Baking tray For cakes and biscuits Grill Roasting pan To bake and roast or as a pan to collect fat Core temperature sensor To measure how far the food is cooked ENGLISH 7 ...

Page 8: ...s 2 Touch or 3 Touch or to set the minutes 4 Touch or The Temperature Time display shows the new time Changing the time of day You can change the time of day only when the appliance is off Touch flashes in the display To set the new time of day use the above procedure 5 CONTROL PANEL 5 1 Electronic programmer 1 2 3 4 5 6 7 8 9 10 Use the sensor fields to operate the ap pliance Sensor Field Functio...

Page 9: ... UP DOWN To move up or down in the menu 7 OK To confirm a selection or setting To move down in the menu 8 OVEN LIGHT To activate or deactivate the oven lamp 9 CLOCK To set the clock functions 10 MINUTE MINDER To set the Minute Minder 5 2 Display 6 1 2 3 4 7 5 A Oven function symbol B Temperature Time display C Clock Residual heat display also Minute minder and Time of day D Residual heat indicator...

Page 10: ...eases When the appliance is at the set temper ature the bars go off the display 6 DAILY USE WARNING Refer to the Safety chapters To operate the appliance you can use The manual mode to set a heating function the temperature and the cooking time manually automatic programmes to prepare a dish when you do not have knowl edge or experience in cooking Oven function Application 1 True Fan Cooking To ba...

Page 11: ...ction that is almost the same 14 Pyro Cleaning For automatic pyrolytic cleaning of the oven The oven temperature is at approximately 932 F It burns off residual dirt in the oven This can then be removed with a cloth when the oven is cold 6 1 Setting the oven function 1 Activate the appliance with or The display shows the set tempera ture the symbol and the number of the oven function 2 Touch or to...

Page 12: ...r ate the cooking time must be longer than 30 minutes or you must use the clock func tions Duration End Time delay This feature does not operate with the grill func tions When the appliance is off you can use the heat to keep food warm The clock re sidual heat display shows the remaining temperature and the bars show the tem perature as it decreases Cooking with the lamp off Touch to deactivate th...

Page 13: ...te the appliance 7 3 Setting the END 1 Activate the appliance and set an oven function and temperature 2 Touch again and again until the display shows flashes in the display 3 Use or to set the END first you set the minutes and then the hours and or to confirm 4 When the set time ends an acoustic signal sounds for two minutes symbol and the time setting flash in the display The appliance deacti va...

Page 14: ...oven is to be activated and deactiva ted automatically later In this case first set the DURATION and then the END function refer to Setting the DURA TION and Setting the END When the Time delay function is activa ted the display shows a static symbol of the oven function with a dot and The dot shows which clock function is on in the Clock residual heat display 8 AUTOMATIC PROGRAMMES WARNING Refer ...

Page 15: ...e auto matic programme 3 Touch or to choose the auto matic recipe 4 Touch or the automatic recipe activates automatically after five sec onds 5 When the set time ends an acoustic signal sounds for two minutes flashes The appliance deactivates 6 Touch a sensor field or open the ap pliance door to stop the acoustic signal 8 4 Automatic programmes with weight input If you set the weight of the meat t...

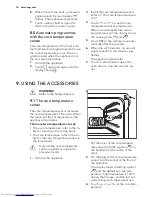
Page 16: ...iance deactivates 7 Touch a sensor field or open the oven door to stop the acoustic sig nal 9 USING THE ACCESSORIES WARNING Refer to the Safety chapters 9 1 The core temperature sensor The core temperature sensor measures the core temperature of the meat When the meat is at the set temperature the appliance deactivates There are two temperatures to set The oven temperature refer to the ta ble for ...

Page 17: ...re temperature and flash An acoustic signal sounds for two minutes Touch a sensor field to deactivate the acoustic signal 8 Remove the core temperature sen sor from the socket and remove the meat from the appliance WARNING Be careful when you remove the core temperature sensor It is hot There is a risk of burns 9 Deactivate the appliance When you put the core tempera ture sensor into the socket yo...

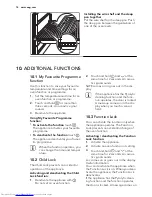
Page 18: ...nd deactivating the Child Lock function 1 Deactivate the appliance with Do not set an oven function 2 Touch and hold and at the same time for 2 seconds An acous tic signal sounds SAFE comes on or goes out in the dis play If the appliance has the Pyrolytic cleaning function and the func tion operates the door is locked A message comes on in the dis play when you touch a sensor field 10 3 Function L...

Page 19: ...s not possible to deactivate the tone of the ON OFF sensor field 2 Selected models only You can set the settings menu only when the appliance is off Activate the Settings menu 1 If necessary deactivate the appli ance 2 Touch and hold for three sec onds The display shows SET1 and 1 flashes 3 Touch to set the setting 4 Touch 5 Touch to change the value of the setting 6 Touch 10 5 Automatic switch of...

Page 20: ...ables are guidelines only They depend on the rec ipes and the quality and quantity of the ingredients used 11 2 Baking General instructions Your new oven can bake or roast dif ferently to the appliance you had be fore Adapt your usual settings tem perature cooking times and shelf po sitions to the values in the tables With longer baking times you can de activate the oven approximately 10 mi nutes ...

Page 21: ... The baking time is too long The next time you bake set a shorter baking time The cake browns un evenly The oven temperature is too high and the baking time is too short Set a lower oven temper ature and a longer bak ing time The cake browns un evenly The mixture is unevenly distributed Spread the mixture evenly on the baking tray The cake is not ready in the baking time given The oven temperature...

Page 22: ...g 1 340 380 60 90 1 Preheat the oven Cakes pastries breads on baking trays Type of bak ing Oven func tion Shelf posi tion Temperature F Time in min Plaited bread bread crown Conventional Cooking 3 340 380 30 40 Christmas stollen Conventional Cooking 2 320 360 1 50 70 Bread rye bread 1 First part of baking process 2 Second part of baking process Conventional Cooking 1 1 4501 2 320 360 1 20 2 30 60 ...

Page 23: ...with delicate toppings e g quark cream custard Conventional Cooking 3 320 360 1 40 80 1 Preheat the oven 2 Use deep pan Biscuits Type of bak ing Oven func tion Shelf posi tion Temperature F Time in min Short pastry biscuits True Fan Cooking 3 300 320 10 20 Short bread Short bread Pastry Stripes True Fan Cooking 3 280 20 35 Short bread Short bread Pastry Stripes Conventional Cooking 3 320 1 20 30 B...

Page 24: ...al Cooking 3 3401 20 30 1 Preheat the oven Bakes and gratins Dish Oven func tion Shelf posi tion Temperature F Time in min Pasta bake Conventional Cooking 1 360 400 45 60 Lasagne Conventional Cooking 1 360 400 25 40 Vegetables au gratin 1 Turbo Grilling or True Fan Cooking 1 320 340 15 30 Baguettes topped with melted cheese Turbo Grilling or True Fan Cooking 1 320 340 15 30 Sweet bakes Conventiona...

Page 25: ...Multileveled Baking Cakes pastries breads on baking trays Type of bak ing True Fan Cooking Temperature in F Time in min Shelf position 2 levels 3 levels Cream puffs Eclairs 1 4 320 360 1 25 45 Dry streusel cake 1 4 300 320 30 45 1 Preheat the oven Biscuits small cakes small cakes pastries rolls Type of bak ing True Fan Cooking Temperature in F Time in min Shelf position 2 levels 3 levels Short pas...

Page 26: ...he first 10 minutes you can set an oven temperature between 180 F and 300 F The default is 195 F After the temperature is set the oven continues to cook at 180 F Do not use the auto matic slow cook function for poultry When you use this function al ways cook dishes without a cov er 1 Sear the meat in a pan on the hob on a very high setting for 1 2 mi nutes on each side 2 Put the meat together with...

Page 27: ...wire shelf above the deep pan Roast lean meats in the roasting tin with the lid This keeps the meat more succulent All types of meat that can be browned or have crackling can be roasted in the roasting tin without the lid We recommend that you cook meat and fish weighing 1 kg and above in the oven To prevent the meat juices or fat from burning onto the pan put some liquid into the deep pan If nece...

Page 28: ...m joint 1 1 5 kg Turbo Grilling 1 320 360 90 120 Chop spare rib 1 1 5 kg Turbo Grilling 1 340 360 60 90 Meat loaf 750 g 1 kg Turbo Grilling 1 320 340 50 60 Pork knuckle precooked 750 g 1 kg Turbo Grilling 1 300 340 90 120 Veal Type of meat Quantity Oven func tion Shelf posi tion Tempera ture F Time min Roast veal 1 kg Turbo Grill ing 1 320 360 90 120 Knuckle of veal 1 5 2 kg Turbo Grill ing 1 320 ...

Page 29: ...o Grill ing 1 380 410 50 70 Duck 1 5 2 kg Turbo Grill ing 1 360 400 80 100 Goose 3 5 5 kg Turbo Grill ing 1 320 360 120 180 Turkey 2 5 3 5 kg Turbo Grill ing 1 320 360 120 150 Turkey 4 6 kg Turbo Grill ing 1 280 320 150 240 Fish steamed Type of meat Quantity Oven func tion Shelf posi tion Tempera ture F Time min Whole fish 1 1 5 kg Conven tional Cooking 1 410 430 40 60 11 10 Grilling Always grill ...

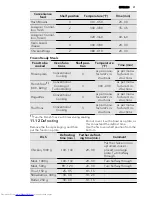
Page 30: ...ime in min 1st side 2nd side Burgers Burgers 4 8 10 6 8 Pork fillet 4 10 12 6 10 Sausages 4 10 12 6 8 Fillet steaks veal steaks 4 7 10 6 8 Toast Toast 1 5 1 3 1 3 Toast with top ping 4 6 8 1 Preheat the oven 11 11 Convenience food True Fan Cooking Convenience food Shelf position Temperature F Time min Pizza frozen 2 400 430 15 25 Pizza American frozen 2 380 410 20 25 Pizza chilled 2 410 450 13 25 ...

Page 31: ...manu facturer s in structions as per manu facturer s in structions Fruit flans Conventional Cooking 3 as per manu facturer s in structions as per manu facturer s in structions 1 Turn the French fries 2 or 3 times during cooking 11 12 Defrosting Remove the food packaging and then put the food on a plate Do not cover it with a bowl or a plate as this can extend the defrost time Use the first oven sh...

Page 32: ... tray to give sufficient moisture in the oven When the liquid in the jars starts to simmer after approx 35 60 minutes with one litre jars stop the oven or decrease the temperature to 220 F see the table Soft fruit Preserve Temperature in F Cooking time un til simmering in min Continue to cook at 220 F in min Strawberries blueberries rasp berries ripe gooseberries 320 340 35 45 Stone fruit Preserve...

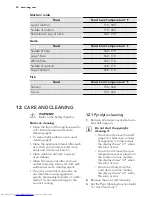
Page 33: ...rooms 3 1 4 120 140 6 8 Herbs 3 1 4 100 120 2 3 Fruit Food to be dried Shelf position Temperature F Time in hours 1 level 2 levels Plums 3 1 4 140 160 8 10 Apricots 3 1 4 140 160 8 10 Apple slices 3 1 4 140 160 6 8 Pears 3 1 4 140 160 6 9 11 15 Core temperature sensor table Beef Food Food Core Temperature F Rib Fillet steak rare 100 120 Rib Fillet steak medium 140 150 Rib Fillet steak well done 16...

Page 34: ... with a special oven cleaner Clean all accessories after each use and let them dry Use a soft cloth with warm water and a cleaning agent If you have nonstick accessories do not clean them using aggressive agents sharp edged objects or a dish washer It can cause damage to the nonstick coating 12 1 Pyrolytic cleaning 1 Remove all accessories and remova ble shelf supports Do not start the pyrolytic c...

Page 35: ...ssary the cleaning reminder symbol flashes in the display after each deactivation of the appliance for the next 10 seconds The cleaning reminder goes out After the end of the pyrolytic cleaning When you deactivate it in the basic settings refer to Set tings menu 12 2 Shelf supports Removing the shelf supports You can remove the shelf supports to clean the side walls 1 Pull the front of the shelf s...

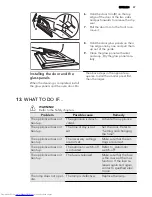
Page 36: ...an the glass cover 3 Replace the lamp with a suitable 570 F heat resistant lamp 4 Install the glass cover 5 Install the left shelf support 12 4 Cleaning the oven door Removing the door and the glass panels You can remove the oven door and the internal glass panels to clean it The number of glass panels is different for different models WARNING Be careful when you remove the door from the appliance...

Page 37: ...13 WHAT TO DO IF WARNING Refer to the Safety chapters Problem Possible cause Remedy The appliance does not heat up The appliance is deacti vated Activate the appliance The appliance does not heat up The time of day is not set Set the clock Refer to Setting and changing the time The appliance does not heat up The necessary settings are not set Make sure that the set tings are correct The appliance ...

Page 38: ...use box and activate it again If the display shows F102 again contact the Customer Care Department The display shows an er ror code that is not in this list There is an electrical fault Deactivate the appli ance with the house fuse or the safety switch in the fuse box and activate it again If the display shows the error code again contact the Customer Care Department The lamp does not oper ate You...

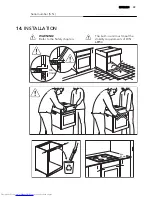
Page 39: ...Serial number S N 14 INSTALLATION WARNING Refer to the Safety chapters The built in unit must meet the stability requirements of DIN 68930 min 3 mm min 50 mm ENGLISH 39 ...

Page 40: ... 530 min 30 20 min 567 572 579 548 546 594 594 114 5 21 20 30 5 21 200 590 567 579 572 548 546 594 594 114 590 min 530 min 560 min cm2 max R1200 mm 130 140 alternativ 100 H05VV F H05RR F min 1600 mm 40 www aeg com ...

Page 41: ...pair defects in materials or work manship Service must be provided by an authorized Euro Line company un less advised otherwise THIS GUARANTEE DOES NOT COVER COMMERCIAL USE The name Euro Line Appliances for service matters incorporates work per formed by authorized service agents or service companies EXCEPTIONS EURO LINE APPLIANCES WILL NOT PAY FOR THE FOLLOWING SERVICE CALLS 1 To install or corre...

Page 42: ... CES Tel 1 800 561 4614 Fax 1 519 528 5001 Tel 1 800 678 8352 Fax 1 519 528 5001 1 800 421 6332 Tel Direct 1 905 829 3980 Fax 1 905 829 3985 User Instructions Installation Manual Service Repair To save you time and money please have the following information ready in case you have to call for service Name of the dealer from whom you purchased the appliance Model number shown on the rating plate Se...

Page 43: ...ENGLISH 43 ...
Page 44: ...www aeg com shop 892956178 A 502012 ...

Reviews: