


6
6
opERAtIoN
WARNING
Do not direct the light beam at persons or animals and do not
stare into the light beam yourself (not even from a distance).
Staring into the light beam may result in serious injury or vision
loss.
WARNING
Do not allow familiarity with tools to make you careless.
Remember that a careless fraction of a second is sufficient to
inflict serious injury.
WARNING
Do not use any attachments or accessories not recommended
by the manufacturer of this tool. The use of attachments or
accessories not recommended can result in serious personal
injury.
ApplICAtIoNS
You may use this tool for the purpose listed below:
■
General illumination of most work areas
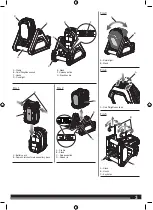
INStAllING/REMoVING BAttERY pACK
See Figure 1.
■
Align the raised rib on the battery pack with the groove inside
the flood light, then slide the battery pack into the flood light.
■
Make sure the latches on each side of the battery pack snap
into place and the battery pack is secured in the flood light
before beginning operation.
■
Depress the latches to remove the battery pack.
■
For complete charging instructions, see the operator’s manuals
for your battery pack and charger.
AttAChING thE Flood lIGht to thE StANd
See Figure 2.
■
Align the raised rib on the flood light with the groove in the
stand’s cradle, then insert the flood light into the cradle until it
clicks into place.
NotE:
The flood light is designed so that it will only install into
the cradle one way.
■
Depress the release button to remove the flood light.
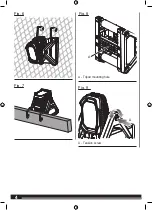
AdJUStING thE Flood lIGht poSItIoN
See Figure 3.
When the flood light is attached to the stand, it can be rotated 360
degrees. Adjust light to desired position to best illuminate the work
area.
opERAtING thE Flood lIGht
See Figure 4.
Push the on/off/brightness knob to turn the flood light on and off.
to increase brightness:
turn the on/off/brightness knob clockwise.
to decrease brightness:
turn the on/off/brightness knob counter-
clockwise.
hANGING/MoUNtING Flood lIGht StANd
See Figures 5 - 8.
Your stand has a variety of hanging options. Choose the option that
is best suited for your location.
NotE:
The stand can be hung in a vertical or horizontal position.
hanging the stand using the key holes:
■
Install two screws with a center distance of 12 mm.
■
Place the wide portions of the key holes over the heads of each
screw.
■
Slide the stand down until the screws are inside the narrow
portions of the key holes and the stand is secure.
hanging the stand using the hooks:
■
Pull the hooks completely out of their slots and rotate them as
needed.
NotE:
Hooks will not rotate until they are fully extended.
■
Hang the stand from a sturdy location.
Mounting the stand to 2x wood material using the hooks:
Pull the hooks completely out of their slots and rotate them upward
180 degrees.
NotE:
Hooks will not rotate until they are fully extended.
■
Put the wider side of the 2x wood material on the clamping
surface of the stand. The edge of the wood should rest against
the front surface of the stand.
■
Rotate the hooks down 180 degrees to clamp the stand to the
2x wood material.
■
To remove the stand from the 2x wood material, rotate the
hooks 180 degrees to the upward position.
AdJUStING tENSIoN
See Figure 9.
The cradle can become loose over time. Tension between the stand
and the cradle can be increased by turning the adjustment screw.
BAttERIES
Battery packs which have not been used for some time should be
recharged before use.
Temperatures in excess of 50°C (122°F) reduce the performance
of the battery pack. Avoid extended exposure to heat or sunshine
(risk of overheating).
The contacts of chargers and battery packs must be kept clean.
For an optimum life-time, the battery packs have to be fully charged,
after used.
To obtain the longest possible battery life remove the battery pack
from the charger once it is fully charged.
For battery pack storage longer than 30 days:
•
Store the battery pack where the temperature is below 27°C
and away from moisture.
•
Store the battery packs in a 30% - 50% charged condition.
•
Every six months of storage, charge the pack as normal.
tRANSpoRtING lIthIUM BAttERIES
Lithium-ion batteries are subject to the Dangerous Goods
Legislation requirements.


