background image

9

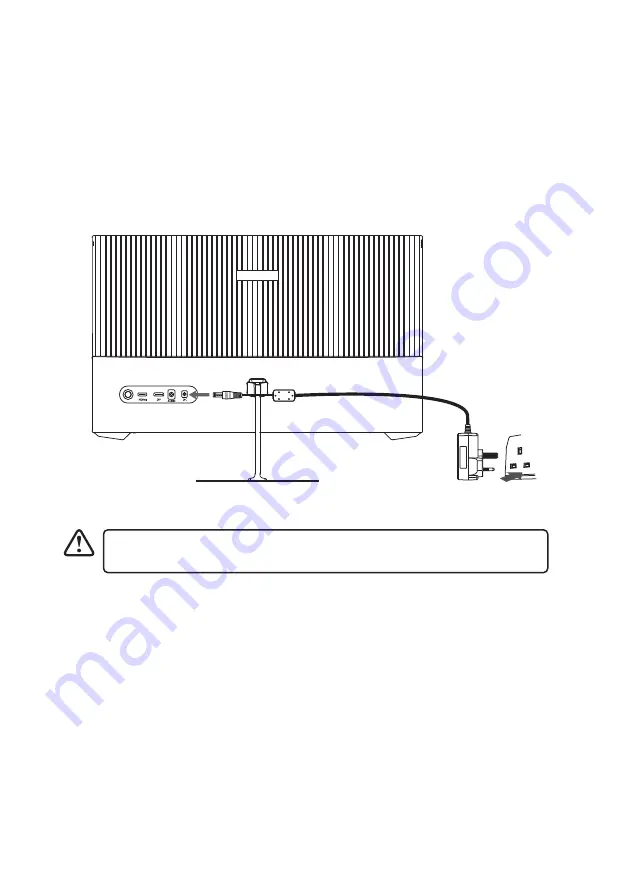
Connecting to the Mains Supply

1.  This unit operates with a mains adapter (included).
2.  Connecting the unit to any other power source may damage to the unit. Unwind the 

mains adapter to its full length. Connect the end of the cable to the DC socket of the 

unit and then connect the mains adapter to the mains socket.

3.  Make sure the mains adapter is fully inserted into the mains socket. The unit is now 

connected and ready to use.

4.  To switch the unit off completely, unplug the mains adapter from the mains socket.

Ensure all connections are completed before connecting to the mains power 

socket.

Mains Socket

Mains Adapter

Main Unit

Summary of Contents for A24GMF22

Page 1: ...FIRESIGHT HF165 24 165Hz Gaming Monitor INSTRUCTION MANUAL A24GMF22 ...

Page 2: ...Connecting to the Mains Supply 9 Installation 10 Assembling with the Base Stand 10 Adjusting the angle 11 Wall Mounting 12 Operation 13 Switching On Off 13 Input Source Selection 13 Customizing Settings 13 Contextual Mode Settings 13 Game Crosshair Mode Settings 13 General Settings 14 Virtual Response Time 16 Maintenance 16 Cleaning the Unit 16 Hints and Tips 17 Specifications 18 ...

Page 3: ...d they can be purchased from your dealer Do not install the monitor on a ceiling or an inclined wall Only use the screws supplied with the wall Safety Warnings mount bracket when attaching the monitor to the bracket See your monitor instructions for screw type Tighten the wall mount screw firmly to prevent the monitor from falling Do not over tighten the screws If you are in any doubt how to mount...

Page 4: ...t is recommended to watch the unit from a distance 3 7 times that of the screen height LCD screen The LCD screen is manufactured using high precision technology However some tiny black points and or bright points red blue or green in colour may constantly appear on the LCD screen These points are generated in the manufacturing process and are normal Screen Burn A characteristic of Plasma and Monit...

Page 5: ... instructions carefully before use and keep this instruction manual for future reference Unpacking Remove all items from the packaging Retain the packaging If you dispose of it please do so according to local regulations The following items are included Main Unit Base Screw 7 4 screws for installing Base and Stand Stem p 10 2 screws for installing the Wall Mounting Adapter p 12 Screw and Washer 4 ...

Page 6: ...Light up orange while power on 3 Indicator Light up blue while power on Light up red if no signal is detected 1 Control Stick 2 HDMI Socket 3 DP Socket 4 AUDIO Socket 5 DC Socket 1 2 3 Product Overview Front View Rear View 1 2 3 4 5 ...

Page 7: ...DMI socket of the unit to the HDMI OUT socket of your PC not included DP Cable Connection Use the DP cable to connect the DP socket of the unit to the HDMI OUT socket of your PC not included Main Unit HDMI Cable not included PC not included D D Main Unit DP Cable PC not included ...

Page 8: ...included Long term exposure to loud music may cause hearing damage It is best to avoid extreme volume when using earphones especially for extended periods Using Earphones Turn down the volume from the source input before using the earphones not included Slowly raise the volume with the earphones on until you reach your desired volume If you select the main unit A24GMF22 for audio output in your co...

Page 9: ...nd of the cable to the DC socket of the unit and then connect the mains adapter to the mains socket 3 Make sure the mains adapter is fully inserted into the mains socket The unit is now connected and ready to use 4 To switch the unit off completely unplug the mains adapter from the mains socket Ensure all connections are completed before connecting to the mains power socket Mains Socket Mains Adap...

Page 10: ...10 Installation Assembling with the Base Stand 1 Install the stand stem onto the rear of the unit 2 Tighten it with 2 screws 1 2 3 Install the base to the stem with 2 screws ...

Page 11: ...uid crystal screen with hand to avoid damage to the screen Adjusting the angle Adjust the angle of the screen The angle of the screen can be adjusted forwards or backwards from 5 to 15 for a comfortable viewing experience 5 15 Do not touch or press the screen area when adjusting the angle of the monitor ...

Page 12: ...ncluded and then mount it onto the wall The mounting hole distance of the mount for the unit is 75 75 mm Make sure that all the screws and studs are firmly installed Do not place or hang any object on the mounted unit Do not hang the unit over 2 meters from the ground Washer Wall mounting adapter Screws Wall Stud not included Wall mounting adapter Screw Washer ...

Page 13: ...p Mode if no input source is detected Then the unit will enter Sleep mode Customizing Settings Contextual Mode Settings 1 Slide upward the control stick to enter the Contextual menu 2 Slide the control stick upward downward to select OFF Movie Reading Night Care Eyes Mode Game Crosshair Mode Settings 1 Slide downward the control stick to enter the Contextual menu 2 Slide the control stick upward d...

Page 14: ...f On Shadow Balance 0 100 Response Time Off Normal Fast Ultrafast Refresh Rate Off On Position Game Crosshair Off Crosshair 1 Crosshair 2 Crosshair 3 Crosshair 4 Crosshair 5 Crosshair 6 Game Time Off 15 00 30 00 45 00 60 00 Position Dynamic Brightness Off Normal Expert Elaboration Virtual Response Time Off On Ambient Lighting Off On Picture Settings Brightness 0 100 Contrast 0 100 DCR Off On Conte...

Page 15: ...OSD Rotation Normal 90 180 270 OSD Lock Off On Hotkey1 Setting Brightness Contrast Volume Mute Shadow Balance Game Crosshair Refresh Rate Game Time Adaptive Sync Contextual Model Input Source Splicing Screen Dynamic Brightness Ambient Lighting Hotkey2 Setting Hotkey3 Setting Other Settings Input Source Auto DP HDMI Audio Volume Mute Splicing Screen Off On Auto Power Off On Eyeshield Remind Off On ...

Page 16: ...aning Use a soft dry cloth to wipe away the dust from the screen and surfaces If the surfaces are extremely dirty clean the monitor with a cloth which has been dipped in a slightly soapy water Wring the cloth until it is almost dry then use it to wipe the monitor Ensure there is no excess water on the screen Allow any water or dampness to evaporate before switching the monitor on Never use alcohol...

Page 17: ...blem Solution No image on screen Make sure that the unit is switched on Make sure that the unit is connected with a mains socket with power supply Make sure that the correct input is selected Out of Focus or poor image Check if the image signal cable is inserted properly No audio output Connect the main unit with a audio equipment speaker or earphones and then increase the volume of the connected ...

Page 18: ... 0 mg Colours 16 7 M Maximum refresh rate 165 Hz DP Aspect Ratio 16 9 Dimension L W H approx 542 4 334 5 36 5 mm monitor unit only approx 542 4 402 8 160 9 mm with stand base installed Net Weight 2 55 kg monitor unit only 3 55 kg with stand base installed include wall mounting and DP cable and power adapter Power Adapter Use only adapter listed below Power Adapter Manufacturer Dong Guan City GangQ...

Page 19: ......

Page 20: ... 0344 800 3456 UK customers only Calls charged at National Rate IB UK A24GMF22 211125V1 Currys co uk All the support you need Whether it s a tech emergency or you need plain good advice we re always on hand to help UK 0344 5611234 IRE 1 890 818 575 Currys Group Limited co no 504877 1 Portal Way London W3 6RS UK EU Representative Currys Ireland Limited 259460 3rd Floor Office Suite Omni Park SC San...

Reviews: