background image

EKI-1500 Series User Manual

64

6.8

Syslogd

The EKI serial device server provides the functionality to allow network devices to
send event messages to a logging server, also known as a Syslog server, by way of
the Syslogd function. The Syslog protocol is supported by a wide range of devices
and can be used to log different types of events.

6.8.1

Syslogd Setting

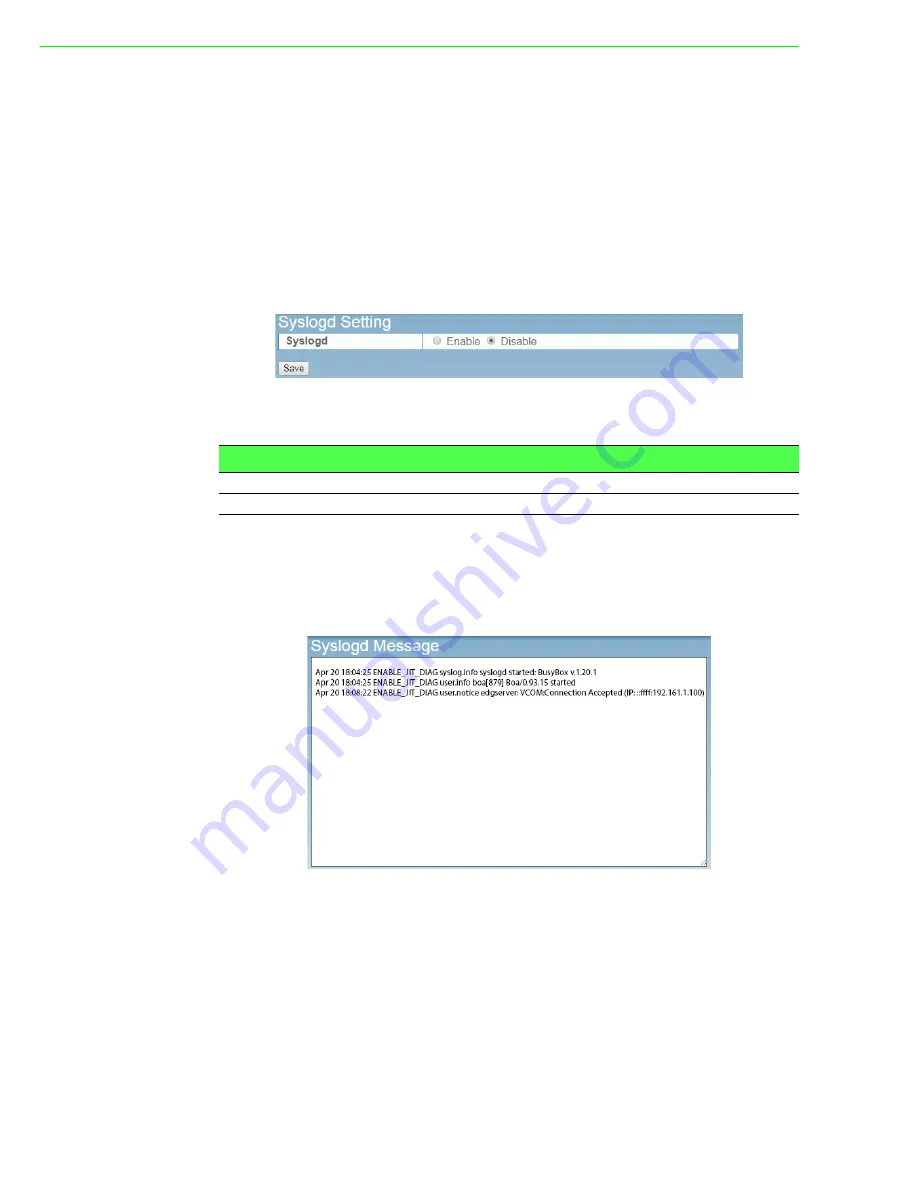
Users can enable the syslogd function to record historical events or messages locally
or on a remote syslog server.

To access this page, click 

Syslogd

 > 

Syslogd Setting

.

Figure 6.12 Syslogd > Syslogd Setting

The following table describes the items in the previous figure.

6.8.2

Syslogd Message

After enabling the syslogd function, users can check the history in the syslogd mes-
sage page.

To access this page, click 

Syslogd

 > 

Syslogd Message

.

Figure 6.13 Syslogd > Syslogd Message

Item

Description

Syslogd

Click 

Enabled

 or 

Disabled

 to set the logging service status.

Save

Click 

Save

 to save the values and update the screen.

Summary of Contents for EKI-1500 Series

Page 1: ...User Manual EKI 1500 Series 1 2 4 port RS 232 422 485 Serial Device Servers...

Page 2: ...ation Advantech assumes no liability under the terms of this warranty as a consequence of such events Because of Advantech s high quality control standards and rigorous testing most of our customers n...

Page 3: ...le protection against harmful interference when the equipment is operated in a commercial environment This equipment generates uses and can radiate radio frequency energy and if not installed and used...

Page 4: ...22 or EKI 1524 serial device server 1 x Terminal Block 1 x Document and software CD 2 x Wall panel mount kit 1 x RS 232 loopback DB9 tester Warning Warnings indicate conditions which if not observed c...

Page 5: ...the power source to avoid damage by transient overvoltage 12 Never pour any liquid into an opening This may cause fire or electrical shock 13 Never open the equipment For safety reasons the equipment...

Page 6: ...m damage To avoid electrical shock always disconnect the power from your PC chassis before you work on it Don t touch any components on the CPU card or other cards while the PC is on Disconnect power...

Page 7: ...DIN Rail 15 Figure 2 14 Installing Wall Mount Plates 16 Figure 2 15 Securing Wall Mounting Screws 17 Figure 2 16 Wall Mount Installation 17 2 3 2 Serial Connection 18 Figure 2 17 DB9 Pin Assignment 18...

Page 8: ...l COM Mode 38 4 2 1 Normal mode 38 4 2 2 Round Robin mode 38 4 3 USDG Data Mode 39 4 3 1 USDG TCP Client Mode 39 Figure 4 3 USDG TCP Client Mode 39 Figure 4 4 Peers for Receiving Data 39 4 3 2 USDG Da...

Page 9: ...ration 57 Figure 6 5 Port Configuration Operation 57 6 5 3 Advanced 58 Figure 6 6 Port Configuration Operation 58 6 6 Monitor 59 6 6 1 Setting 59 Figure 6 7 Monitor Setting 59 6 6 2 Statistic 60 Figur...

Page 10: ...nnection 70 7 2 3 Connection Success 70 Figure 7 3 Telnet Connection Console 70 7 3 Command List 71 7 3 1 system 71 7 3 2 port 71 7 3 3 portadv 72 7 3 4 mvcom 72 7 3 5 mctrl 73 7 3 6 mdata 73 7 3 7 ne...

Page 11: ...Chapter 1 1Introduction...

Page 12: ...provides various operations COM port redirection mode Virtual COM Port mode TCP Server Client mode UDP mode Control mode and RFC2217 mode Detailed descriptions of each operation are provided in a late...

Page 13: ...Chapter 2 2Getting Started...

Page 14: ...isplay System LED Power 1 Power 2 Status Port LED LAN Speed Link Active Serial Tx Rx Environment Operating Temperature EKI 1521 EKI 1522 EKI 1524 10 C 60 C 14 F 140 F CI I models 40 C 70 C 40 F 158 F...

Page 15: ...e Configuration Utility Operation Modes COM port redirection mode Virtual COM TCP UDP server polling mode TCP UDP client event handling mode Pair connection peer to peer mode Configuration Windows uti...

Page 16: ...view shows the EKI 1521 Figure 2 1 Front View No Item Description 1 System LED panel See LED Indicators on page 11 for further details 2 ETH port RJ45 ports x 2 3 Serial port DB9 pinout supports RS 23...

Page 17: ...1522 Figure 2 2 Front View No Item Description 1 System LED panel See LED Indicators on page 11 for further details 2 ETH port RJ45 ports x 2 3 Serial port DB9 pinout supports RS 232 422 485 1 1 2 De...

Page 18: ...ure 2 3 Front View No Item Description 1 System LED panel See LED Indicators on page 11 for further details 2 ETH port RJ45 ports x 2 3 Serial port DB9 pinout supports RS 232 422 485 EKI 1524 1 1 2 3...

Page 19: ...User Manual 2 2 2 Rear View The following view is valid for the EKI 1521 and EKI 1522 Figure 2 4 Rear View No Item Description 1 DIN Rail mounting plate Mounting plate used for the installation to a s...

Page 20: ...o Item Description 1 DIN Rail mounting plate Mounting plate used for the installation to a standard DIN rail 1 No Item Description 1 Terminal block Connect cabling for power and alarm wiring 2 Ground...

Page 21: ...mounting holes Screw holes x4 used in the installation of a wall mounting plate PWR2 P Fail DC12 48V PWR1 V2 V2 V1 V1 1A 24V 1 3 2 No LED Name LED Color Description 1 P1 Green Power 1 is on Off Power...

Page 22: ...KI 1500 Series User Manual 12 2 2 5 Dimensions The following view is valid for the EKI 1521 and EKI 1522 Figure 2 9 Dimensions 36 60 149 80 104 95 30 50 40 140 47 05 47 95 33 15 35 14 90 17 83 Unit mm...

Page 23: ...13 EKI 1500 Series User Manual The following view is valid for the EKI 1524 Figure 2 10 Dimensions 48 60 149 80 104 95 30 50 40 140 47 05 47 95 30 5 40 37 70 8 32 Unit mm...

Page 24: ...ht DIN rail The devices can be mounted vertically or horizontally Refer to the following guidelines for further information Installing the DIN Rail Mounting Kit 1 Align the mounting bracket on the rea...

Page 25: ...12 Installing the DIN Rail Mounting Kit Removing the DIN Rail Mounting Kit 1 Push the server down to free the bottom of the plate from the DIN rail 2 Rotate the bottom of the device towards you and aw...

Page 26: ...r panel of the server 3 Remove the DIN mounting plate Store the DIN mounting plate and provided screws for later use 4 Align the wall mounting plates on the top and bottom side The screw holes on the...

Page 27: ...10 Insert the screws into the wall sinks Figure 2 15 Securing Wall Mounting Screws 11 Align the wall mount plate over the screws on the wall 12 Install the wall mount plate on the screws and slide it...

Page 28: ...4 5 6 7 8 9 RS 232 DCD RX TX DTR GND DSR RTS CTS RI RS 422 TX TX GND RX RX RS 485 DATA DATA GND 1 9 6 5 Warning Power down and disconnect the power cord before servicing or wiring the serial device se...

Page 29: ...minal block Figure 2 18 Power Wiring for EKI 1500 Series You can connect an alarm indicator buzzer or other signaling equipment through the relay output The relay opens if power input 1 or 2 fails In...

Page 30: ...Chapter 3 3Utility Configuration...

Page 31: ...pro gram the path for the setup program on the CD ROM is as follows E EKI_Device_Configuration_Utility_v2 01 exe 3 If there is an existing COM port mapping utility on the host PC remove it at this tim...

Page 32: ...ess I Agree to continue or Cancel to stop the installation Figure 3 2 InstallShield Wizard 2 of 4 The InstallShield continues and a status screen displays The default installation path is C Program Fi...

Page 33: ...User Manual 6 Once the installation of the package is finished a Configuration Utility Setup screen displays Click Finish to conclude the process and exit the InstallShield Wizard Figure 3 4 InstallSh...

Page 34: ...port parameters configure operating mode baud rate serial port settings and operating mode settings Perform diagnostic tests virtual COM port testing port status list Perform administrative functions...

Page 35: ...name to show the features of the specific device Click on the before the model name and the utility will expand the tree structure to show the individual device name Click on the before the model name...

Page 36: ...connected host IP Figure 3 7 Selecting a Group Click on the before the device name and the utility will expand the interfaces on this device server Figure 3 8 Selecting a Device Click on each item to...

Page 37: ...cally assign an IP address through the con figuration server DHCP BOOTP AutoIP mode to automatically assign an IP address using a Bootstrap Protocol or DHCP server The server is set with the following...

Page 38: ...not respond DNS Setting In order to use DNS feature you need to set the IP address of the DNS server to be able to access the host with the domain name The EKI serial device server provides Primary D...

Page 39: ...a specific serial device is possible through the Locate function To locate the serial device server 1 From the device list frame locate the desired device and right click on it to dis play the setting...

Page 40: ...utility provides the Lock Device function to make it more secure To lock the serial device server 1 Right click a desired device to display the settings menu 2 Select Lock Device Figure 3 13 Lock the...

Page 41: ...ce 3 4 2 2 Unlock the Serial Device Server To unlock the serial device server 1 Right click a desired device to display the settings menu 2 Select Unlock Device 3 Enter the password as entered in the...

Page 42: ...nfirm message will display after clicking Restore to Factory Default Set tings If you really want to restore the serial device sever to factory default settings please click Yes button to continue Pow...

Page 43: ...he Save function to accept the changes You will need to reset the device to save the settings to flash memory From the To access this page click Tools Reboot Click Reboot to reboot the serial device s...

Page 44: ...y bookmarking specific devices you can create quickly accessible shortcuts for exist ing critical devices from the vast pool of locally or remotely networked EKI devices Figure 3 19 Add to Favorite 3...

Page 45: ...erver or the host can establish the TCP connection to the serial device server To update firmware 1 Right click a desired device to display the settings menu 2 Select Update Firmware Figure 3 20 Updat...

Page 46: ...Chapter 4 4Selecting An Operating Mode...

Page 47: ...a serial COM port redirector that cre ates virtual COM ports and provides access to serial device connected to Advantech serial device server You can configure the serial device server and enable the...

Page 48: ...l port are mixed When the EKI 1500 Series receives data from serial port the data will also be transmitted to the connected hosts simultaneously 4 2 2 Round Robin mode By enabling the Response Timeout...

Page 49: ...work hosts connected to the EKI serial device server using the Advantech Serial Device Server Configuration Utility After configuring the devices when the EKI serial device server receives the data fr...

Page 50: ...ted to the EKI 1500 Series USDG UDP Port Default Port 5300 In the default UDP client mode EKI serial device servers simultaneously transmits UDP messages to a maximum of 16 peers USDG Data mode suppor...

Page 51: ...data listen port cannot be set to the same value You can transmit receive data to from devices via the data listen port 4 3 3 3 Command Listen Port Each port has its own command listen port to accept...

Page 52: ...our device Command Function ATD IP address TCP port CR Forms a TCP connection to the specified host Ex ATDT 192 0 55 22 5201 In above example the EKI serial device server forms a raw TCP connection to...

Page 53: ...Chapter 5 5Setting up Virtual COM Port...

Page 54: ...e COM redirector utility and the virtual COM port management utility are integrated into one utility with same GUI The Advantech Serial Device Server Configuration Utility can create all Virtual COM p...

Page 55: ...port which will be the VCOM port for the PC Figure 5 2 Selecting Auto Mapping 7 From the network address list select the address options to map 8 Click Map Selected Ports to set the configuration Figu...

Page 56: ...t device and right click on it to open up the options menu win dow 4 Locate Manual Mapping and select it Figure 5 5 Selecting Manual Mapping The Manual Mapping Virtual COM Port window displays 5 In th...

Page 57: ...Configuration Wizard 1 On your desktop navigate to Start All Programs EKI Device Configura tion Utility and click Advantech EKI Device Configuration Utility to open the utility 2 Under Serial Device...

Page 58: ...VCOM port to view its settings Figure 5 9 Serial Port Listing on EKI Device For the next step you will need to open the device manager on your system Using the Device Manager you can both view and ch...

Page 59: ...ation The newly mapped VCOM port is listed under the same mapped settings used in the previous steps The settings correspond to the VCOM port configuration on the EKI device see the following figure F...

Page 60: ...Importing and exporting Virtual COM Port Mapping is useful when the factory has already used a number of serial device servers in VCOM mode You can easily upgrade to a new utility and don t need to re...

Page 61: ...he server 1 Connect the loopack connector to a COM port on the EKI serial device server 2 On your desktop navigate to Start All Programs EKI Device Configura tion Utility and click Advantech EKI Devic...

Page 62: ...Chapter 6 6Web Interface...

Page 63: ...r this device Once the IP is entered you will be presented with the following windows 6 2 Accessing the Web Page 6 2 1 Accessing the Web Page via Configuration Utility To access the web page via confi...

Page 64: ...wing table describes the items in the previous figure Item Description Firmware version Displays the current firmware version of the device Revision number Displays the revision number of the device D...

Page 65: ...to it Save Click Save to save the values and update the screen Item Description Item Description Mode Click the drop down menu to select the IP Address Setting mode Static or DHCP MAC Address Enter t...

Page 66: ...igure Item Description Type Click the drop down menu to select a serial interface RS 422 or RS 485 Baud Rate Enter a value to specify the baud rate The value should conform to the current transmission...

Page 67: ...to define the host idle timeout period Response Timeout s Enter a value to define the response timeout period Frame Break ms Enter a value to specify the frame break time Pack conditions Pack sent imm...

Page 68: ...fferData Size Click the option to enter the value to queue data to become a packet Port Timeout Settings determine the time period that received data from serial port is postponed Click the option to...

Page 69: ...g Figure 6 7 Monitor Setting The following table describes the items in the previous figure DTR Control Click the drop down menu to select the status of DTR ON OFF Toggle By Connect or Toggle By Data...

Page 70: ...t Rx Count Display the current Rx count of the selected port Total Tx Count Display the current total Tx count of the selected port Total Rx Count Display the current total Rx count of the selected po...

Page 71: ...event notification Mail Sever SNMP Trap Server and the SNMP Agent Setting At the top of the list is the Mail Server setting which allows you to specify the mail server to be used by the serial device...

Page 72: ...l address 4 Enter the email address 4 to receive alarm emails SNMP Trap Server Trap Server Enter the SNMP Trap server address Trap Server Port Enter the SNMP Trap server port Trap Version Click the ra...

Page 73: ...ess changed Click the option to select a warning type when the IP address is changed Password changed Click the option to select a warning type when the password is changed Ethernet1 link down Click t...

Page 74: ...logd function to record historical events or messages locally or on a remote syslog server To access this page click Syslogd Syslogd Setting Figure 6 12 Syslogd Syslogd Setting The following table des...

Page 75: ...figure Item Description IP Enter the IP address or host name of the station to ping The initial value is blank The IP Address or host name you enter is not retained across a power cycle Host names are...

Page 76: ...rver allows for easy installation and maintenance and reli able maintenance access from anywhere With the reliable management tools avail able you can streamline staffing and troubleshooting requireme...

Page 77: ...ss the Save button and reboot the serial device server to make the change effective 6 10 3 Export Device Settings Export the server configuration settings to a conf file To access this page click Mana...

Page 78: ...Chapter 7 7Telnet Serial Console Configuration...

Page 79: ...tions of the console mode is to change the web con figuration login password You can use terminal software like Hyper Terminal Telix and other related terminal software 7 2 Telnet Console 7 2 1 Create...

Page 80: ...ver and the Telnet TCP port number is 23 Figure 7 2 Creating a Telnet Connection 7 2 3 Connection Success After connecting to the serial device server in HyperTerminal console a welcome greeting displ...

Page 81: ...115200 230400 460800 and 921600 parity n None Parity parity e Even Parity parity o Odd Parity parity m Mark Parity Command Function Description system Show or configure the system information port Sho...

Page 82: ...portfch Usage portadv nn all fifosize size null Set port Writed size of FIFO null for disable Usage portadv nn all rts Set port RTS status value 0 None Setting value 1 Setting power on value 2 Setting...

Page 83: ...bk Set response timeout ms and frame break ms Usage mdata nn all bysize bytime bychar NULL bychartimeout ON OFF Set datapackage as size bytes or time ms or character HEX and character timeout value 0...

Page 84: ...community null name wcommunity null name contact null name location null name Set current snmp agent configuration Usage alarm event mail cstart wstart auth ip passwd eth1 eth2 Set current mail event...

Page 85: ...mode and mode informations Usage mrfc2217 nn all Set port nn all as RFC2217 mode Usage mrfc2217 nn all idleto lsport Set host idle timeout s and listen port 7 3 14 apply Usage apply Save the settings...

Page 86: ...Appendix A ATCP and UDP Port Numbers...

Page 87: ...ion Utility 5202 TDP VCOM RVCOM 9999 TDP Firmware Download 22 TDP SSH 23 TDP Telnet 25 TDP SMTP Mail Client 53 TCP UDP DNS 67 UDP BOOTP Server DHCP 68 UDP BOOTP Client DHCP 80 TDP Web Interface HTTP 1...

Page 88: ...tions are subject to change without notice No part of this publication may be reproduced in any form or by any means electronic photocopying recording or otherwise without prior written permis sion of...

Reviews: