background image

46

USING ADOBE AUDITION

Editing audio files

Last updated 2/16/2012

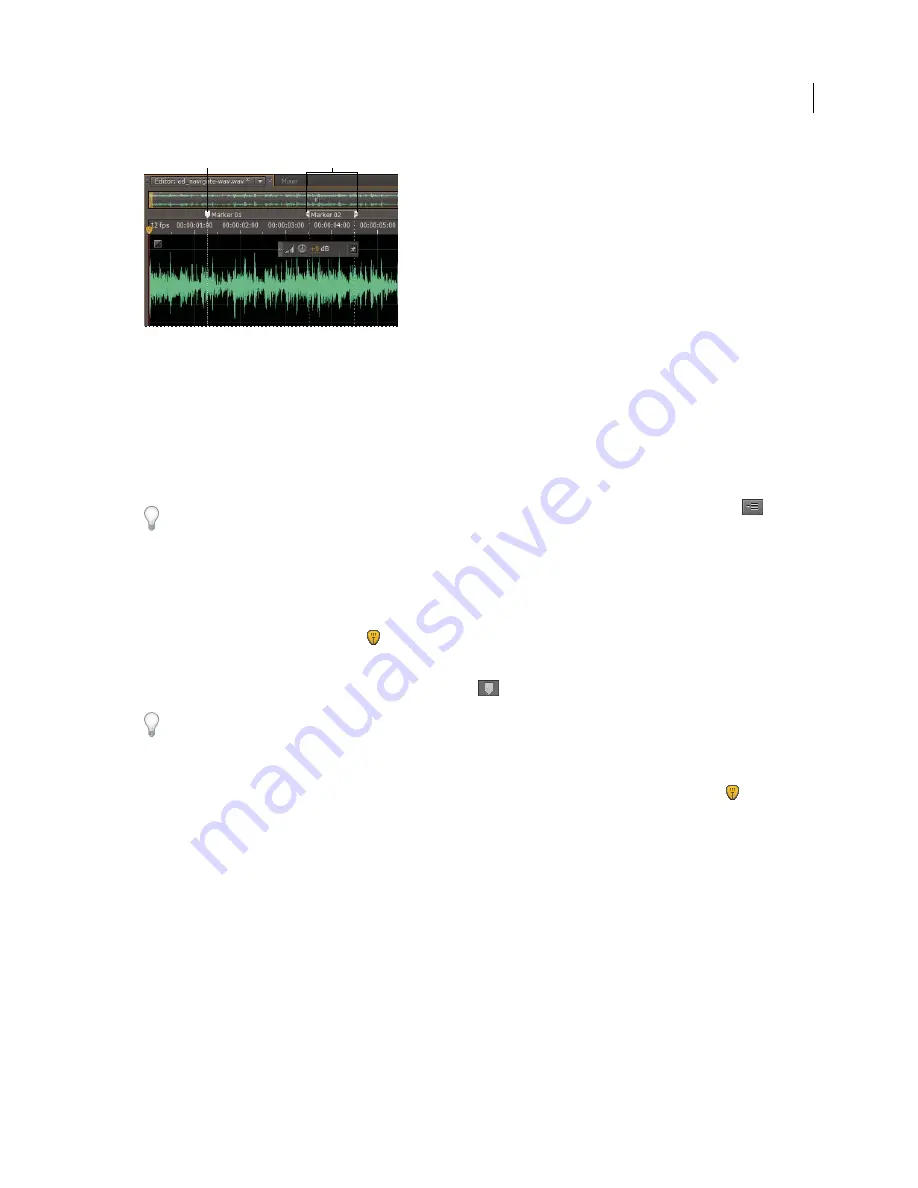
Examples of markers

A. 

Marker point  

B. 

Marker range  

Note: 

To preserve markers when you save a file, select Include Markers and Other Metadata. 

Add, select, and rename markers

Though you can add markers directly in the Editor panel, you use the Markers panel (Windows


> Markers) to define 

and select markers.

To hide or show information such as Duration and Type, choose Markers Display from the panel menu


Add a marker

1

Do one of the following:

Play audio.

Place the current-time indicator 

 where you want a marker point to be.

Select the audio data you want to define as a marker range.

2

Either press the M key, or click the Add Marker button


 in the Markers panel. 

To automatically create markers where silence occurs, see “

Delete Silence and Mark Audio options

” on page

  80. 

Select markers

Click a marker in the Editor or Markers panel. Or double-click to move the current-time indicator 

 to that 

location and select the area for range markers.

To select adjacent markers, click the first marker you want to select in the Markers panel, and then Shift-click the 
last. 

To select nonadjacent markers, Ctrl-click (Windows) or Command-click (Mac OS) them in the Markers panel.

To move the current-time indicator to the nearest marker, choose Edit > Marker > Move CTI to Next or Previous.

Rename a marker

1

In the Markers panel, select the marker.

2

Click the marker name, and enter a new name.

Adjust, merge, convert, or delete markers

After creating markers, you can fine-tune them to best address the needs of an audio project.

B

A

Summary of Contents for 22011292 - Audition - PC

Page 1: ...Using ADOBE AUDITION CS5 5...

Page 2: ...Last updated 2 16 2012 Legal notices Legal notices For legal notices see http help adobe com en_US legalnotices index html...

Page 3: ...ring recording and playback levels 32 Chapter 5 Editing audio files Displaying audio in the Waveform Editor 35 Selecting audio 38 Copying cutting pasting and deleting audio 42 Visually fading and chan...

Page 4: ...ultitrack routing and EQ controls 111 Arranging and editing multitrack clips 116 Looping clips 119 Clip volume matching fading and mixing 120 Automating mixes with envelopes 123 Chapter 9 Video and su...

Page 5: ...ng Mix 5 1 surround directly in the Multitrack Editor The Track Panner panel provides intuitive controls and visual feedback that help you locate sounds precisely in the surround field Open 5 1 mixdow...

Page 6: ...sis Analyze phase relationships and frequency response in real time using the Phase Meter and Frequency Analysis panel See Analyze phase on page 49 and Analyze frequency range on page 50 Simultaneous...

Page 7: ...own to a trough it represents lower pressure A sound wave represented as a visual waveform A Zero line B Low pressure area C High pressure area Waveform measurements Several measurements describe wave...

Page 8: ...he peaks and troughs of two waveforms are perfectly out of phase they cancel each other out resulting in no waveform at all Out of phase waves cancel each other out In most cases however waves are out...

Page 9: ...process is typically known as digitizing or sampling the audio but it is sometimes called analog to digital conversion When you record from a microphone into a computer for example analog to digital c...

Page 10: ...sound pressure level measured in acoustic dB Audio file contents and size An audio file on your hard drive such as a WAV file consists of a small header indicating sample rate and bit depth and then...

Page 11: ...stop recording When you play a file in Adobe Audition the process happens in reverse Adobe Audition sends a series of digital samples to the sound card The card reconstructs the original waveform and...

Page 12: ...d instantaneous requiring more processing power but increasing flexibility This flexibility is preferable when gradually building and reevaluating a multilayered musical composition or video soundtrac...

Page 13: ...p to open it in the Waveform Editor Alternatively double click a file in the Files panel In the Waveform Editor choose Edit Edit Original to open the multitrack session that created a mixdown file Thi...

Page 14: ...with two fingers In the Waveform Editor this zoom method also works when the pointer is over the waveform Roll or drag over the spectral display and press Shift to switch between logarithmic and line...

Page 15: ...be video and audio applications provide a consistent customizable workspace Although each application has its own set of panels such as Project Metadata and Timeline you move and group panels in the s...

Page 16: ...project you want to work on choose Window Workspace and select the desired workspace Dock group or float panels You can dock panels together move them into or out of groups and undock them so they fl...

Page 17: ...f panels Dropping a panel on a grouping zone stacks it with other panels Dragging panel A onto grouping zone B to group it with existing panels C Dock or group panels 1 If the panel you want to dock o...

Page 18: ...ck if it s not visible choose it from the Window menu and then do one of the following Choose Undock Panel or Undock Frame from the panel menu Undock Frame undocks the panel group Hold down Ctrl Windo...

Page 19: ...inal group with resize icon B Resized groups Open close and scroll to panels When you close a panel group in the application window the other groups resize to use the newly available space When you cl...

Page 20: ...nverting it to the Tools panel which you can manipulate like any other panel To show or hide the toolbar choose Window Tools A check mark by the Tools command indicates that it is shown To undock the...

Page 21: ...n is 1 247 seconds long Free Space Shows how much space is available on your hard drive Free Space Time Displays the time remaining for recording based upon the currently selected sample rate This val...

Page 22: ...turn to its original saved layout of panels Choose Window Workspace Reset workspace name Delete a workspace 1 Choose Window Workspace Delete Workspace 2 Choose the workspace you want to delete and the...

Page 23: ...on page 5 7 Optional To optimize the performance of ASIO and CoreAudio cards click Settings For more information consult the documentation for the sound card Note By default Adobe Audition controls A...

Page 24: ...ing time and playing audio on page 27 Restore preferences to default settings Unexpected behavior may indicate damaged preferences files To re create preferences files do the following Hold down the S...

Page 25: ...e of the file The 32 bit level provides maximum processing flexibility in Adobe Audition For compatibility with common applications however convert to a lower bit depth when editing is complete See Un...

Page 26: ...Waveform Editor including the audio portion of video files Important SES session files from previous Audition versions are unsupported If you have Audition 3 0 save sessions to XML format to open them...

Page 27: ...Multitrack Insert File 3 Select an audio or video file See Supported import formats on page 24 More Help topics Insert a video file into a multitrack session on page 130 Importing with the Files panel...

Page 28: ...n Then choose either New Multitrack Session see Create a new multitrack session on page 21 or an open session The files are inserted on separate tracks at the current time position Change displayed me...

Page 29: ...n open all uncompressed WAV files and most common compressed versions WVE XI More Help topics Saving and exporting files on page 134 Video file formats The Waveform Editor lets you open the audio port...

Page 30: ...t Audio From CD 3 For Drive choose the drive that contains the audio CD 4 For Speed choose from all the extraction speeds that the selected drive supports The Maximum Speed option usually produces sat...

Page 31: ...ly change it See Change the time display format on page 29 The same format is used by the timeline To show the time display in separate panel choose Window Time Features that help you monitor time A C...

Page 32: ...of the following Return CTI to Start Position on Stop Reflects the behavior of Audition 3 0 and earlier Press Shift X to toggle this option on and off Play Spectral Selection Only Plays only frequenci...

Page 33: ...ormat where each second equals 24 frames suitable for film Samples Displays time numerically using as a reference the actual number of samples that have passed since the beginning of the edited file B...

Page 34: ...le In the Waveform Editor choose Favorites Repair DC Offset To measure DC offset see Analyze amplitude on page 51 Direct to file recording in the Multitrack Editor In the Multitrack Editor Adobe Audit...

Page 35: ...evels on page 32 Punch into a selected range in the Multitrack Editor If you re dissatisfied with a time range of a recorded clip you can select that range and punch in a new recording leaving the ori...

Page 36: ...anted playback 4 Play the session If you prefer a take you previously moved drag it back to the selected range To mute the original clip for the duration of the punch in range adjust the volume envelo...

Page 37: ...indicators to a new peak level after 1 5 seconds letting you easily see recent peak amplitude As the audio gets quieter the peak indicators recede Static Peaks retains peak indicators letting you det...

Page 38: ...Select the input source you want to use and adjust the Volume slider as needed Adjust sound card levels in Mac OS 1 Choose System Preferences from the Apple menu 2 Click Sound and then click the Inpu...

Page 39: ...hide the spectral display double click the handle or click the triangle to its right Viewing the waveform and spectral displays A Drag the divider to change the proportion of each B Click the triangl...

Page 40: ...nterface colors brightness and performance on page 17 About the spectral display The spectral display shows a waveform by its frequency components where the x axis horizontal ruler measures time and t...

Page 41: ...m shape These functions are listed in order from narrowest to widest Narrower functions include fewer surrounding frequencies but less precisely reflect center frequencies Wider functions include more...

Page 42: ...th on page 6 32 bit float values reflect the normalized scale below Normalized Values Indicates amplitude on a normalized scale that ranges from 1 to 1 Change the frequency scale of the spectral displ...

Page 43: ...ools allow for detailed editing and processing including incredible flexibility in audio restoration work For example if you find audio artifacts you can select and edit just the affected frequencies...

Page 44: ...spectral display on page 36 Select artifacts and repair them automatically For the quickest repair of small individual audio artifacts like isolated clicks or pops use the Spot Healing Brush When you...

Page 45: ...ing across the very top or bottom of the Editor panel select Allow Context Sensitive Channel Editing in the General section of the Preferences dialog box Selecting specific channels of a 5 1 surround...

Page 46: ...ay more accurate subdivisions and place the cursor more precisely Snap To Zero Crossings Snaps to the nearest place where audio crosses the center line the zero amplitude point Snap To Frames Snaps to...

Page 47: ...Copied Audio Reverses the phase of copied audio either exaggerating or reducing phase cancellation if the existing audio contains similar content To understand phase cancellation see How sound waves i...

Page 48: ...irst rapidly through the bulk of the fade and slowly at the finish Note In the Waveform Editor fades permanently change audio data To apply fades you can readjust in the Multitrack Editor see Fade or...

Page 49: ...following To lock the HUD in one location click the Pin button To show the HUD only over highlighted selections select Show HUD for Selection Ranges Only in the General preferences To totally hide the...

Page 50: ...Add Marker button in the Markers panel To automatically create markers where silence occurs see Delete Silence and Mark Audio options on page 80 Select markers Click a marker in the Editor or Markers...

Page 51: ...or panel and choose Delete Marker Save audio between markers to new files 1 In the Waveform Editor choose Window Markers 2 Select one or more marker ranges See Working with markers on page 45 3 Click...

Page 52: ...p or down Play items in a playlist To play all or part of the list select the first item you want to play Then click the Play button at the top of the panel To play a specific item click the Play butt...

Page 53: ...ct existing audio Then choose Edit Insert Silence and enter the number of seconds Any audio to the right is pushed out in time lengthening duration Multitrack clips are split if necessary More Help to...

Page 54: ...ich is rendered in the same color as the button clicked is frozen on the graph and overlaid on other frequency outlines To clear a frozen frequency outline click its corresponding Hold button again Di...

Page 55: ...requency graphs In the Frequency Analysis panel you can zoom graphs to analyze frequency in more detail Do any of the following To zoom in on a graph right click and drag the magnifying glass icon in...

Page 56: ...how the root mean square values of the selection RMS values are based on the prevalence of specific amplitudes often reflecting perceived loudness better than absolute or average amplitudes DC Offset...

Page 57: ...able of playing all rates properly To determine supported sample rates consult the documentation for the card Convert the sample rate of a file The sample rate of a file determines the frequency range...

Page 58: ...he text box 3 In the Advanced section set the following options Dithering Enables or disables dithering when converting to lower bit depths If dithering is disabled bit depth is abruptly truncated pro...

Page 59: ...ove 8kHz Crossover Specifies the frequency above which noise shaping will occur Strength Specify the maximum amplitude of noise added to any one frequency Adaptive Mode Varies the distribution of nois...

Page 60: ...imum Number Of Concurrent File Processes in the Data preferences 3 Optional To display amplitude statistics such as perceived and peak volume for each file click the Compute icon Then click Settings t...

Page 61: ...ht occur Make sure that the value is at least 5 milliseconds Release Time Specifies the number of milliseconds for attenuation to rebound 12 dB roughly the amount needed to resume normal volume after...

Page 62: ...do or redo changes do any of the following To undo a change choose Edit Undo name of change To redo a change choose Edit Redo name of change To repeat the last command in the Waveform Editor choose Ed...

Page 63: ...titrack editors on page 8 Controls unique to the Waveform Editor In the Waveform Editor the Effects Rack provides a Process menu that that lets you modify a selection or the entire file and an Apply b...

Page 64: ...der by dragging B Insert with the slot menu To insert an effect choose it from a slot s pop up menu Then adjust effect settings as desired To later reaccess effect settings double click the effect nam...

Page 65: ...graph you can precisely tailor effect settings Graph control points function together with related numerical settings If you change or disable a numerical setting the related graph control follows sui...

Page 66: ...of effects It doesn t provide process effects such as Noise Reduction which must be applied individually 1 Choose Window Effects Rack 2 In the numbered list choose effects for up to 16 slots See Inse...

Page 67: ...ects can be applied only individually so they aren t accessible in the Effects Rack Applying effects in the Multitrack Editor Apply effects to clips or tracks In the Multitrack Editor you can apply up...

Page 68: ...ack Editor pre render track effects to address heavy CPU usage improving performance for complex mixes or low latency recording Latency measures the delay between user input and sound output from a co...

Page 69: ...in effects For information about plug in features consult the documentation provided by the plug in manufacturer Enable VST and Audio Units plug ins To access third party plug ins in Adobe Audition yo...

Page 70: ...e If a third party effect is incompatible Adobe Audition adds it to an Unsupported submenu in effects menus More Help topics Applying effects in the Waveform Editor on page 62 Applying effects in the...

Page 71: ...smatched levels or address phasing issues Channel tabs Select the output channel Input channel sliders Determine the percentage of the current channels to mix into the output channel For a stereo file...

Page 72: ...sing effect can be used as a compressor limiter or expander As a compressor and limiter this effect reduces dynamic range producing consistent volume levels As an expander it increases dynamic range b...

Page 73: ...io gets loud ensuring that amplitude never exceeds a certain level Conversely reducing Look Ahead Time may be desirable to enhance the impact of percussive music like drum hits Noise Gating Completely...

Page 74: ...th 16 bit audio set this value to no more than 0 3 dB If you set it even lower to 3 dB you ll have a little more clearance for any future edits Input Boost Preamplifies audio before you limit it makin...

Page 75: ...the width of each band Either enter specific Low Midrange and High frequencies or drag the crossover markers above the graph Band specific controls in the Multiband Compressor A Solo B Bypass C Thres...

Page 76: ...ain Double click the meters to reset peak and clip indicators Limiter Applies limiting after Output Gain at the end of the signal path optimizing overall levels Specify Threshold Attack and Release se...

Page 77: ...effects on page 63 Apply individual effects in the Waveform Editor on page 62 Single band Compressor effect The Amplitude And Compression Single band Compressor effect reduces dynamic range producing...

Page 78: ...tion to produce smoother sound Advanced settings Click the triangle to access the following options Compressor Maintains a strong level if the processed signal falls below a threshold relative to zero...

Page 79: ...sients and slower settings for less percussive audio More Help topics Applying effects in the Waveform Editor on page 62 Applying effects in the Multitrack Editor on page 63 Use effect presets on page...

Page 80: ...y times of 35 milliseconds or more to create more subtle effects specify shorter times Mode Specifies the type of hardware emulation determining equalization and distortion characteristics Tape and Tu...

Page 81: ...d decaying echoes to a sound For a single echo use the Delay effect instead You can create effects ranging from a Grand Canyon type Hello ello llo lo o to metallic clanging drainpipe sounds by varying...

Page 82: ...ntrol use diagnostics together with Spectral Display tools and Noise Reduction effects See Techniques for restoring audio on page 86 More Help topics About process effects on page 63 Apply individual...

Page 83: ...o high You can monitor clipping during recording or playback by watching the Level Meters when clipping occurs the boxes on the far right of the meters turn red Visually clipped audio appears as broad...

Page 84: ...er and equalizer effects FFT Filter effect The graphic nature of the Filter And EQ FFT Filter effect makes it easy to draw curves or notches that reject or boost specific frequencies FFT stands for Fa...

Page 85: ...lizers with fewer bands provide quicker adjustment more bands provide greater precision Gain sliders Sets the exact boost or attenuation measured in decibels for the chosen band Range Defines the rang...

Page 86: ...d pass and shelving filters Use the low shelving filter to reduce low end rumble hum or other unwanted low frequency sounds Use the high shelving filter to reduce hiss amplifier noise and the like Gai...

Page 87: ...ases or decreases over time giving the effect of separate slightly out of tune voices For example a rate of 2 Hz would vary the delay from zero to the maximum and back twice per second simulating a pi...

Page 88: ...ced evenly from left to right At higher settings voices move to the outer edges If you use an odd number of voices one is always directly in the center Output Level Sets the ratio of original Dry sign...

Page 89: ...the percentage of the flanged signal that is fed back into the flanger With no feedback the effect uses only the original signal With feedback added the effect uses a percentage of the affected signal...

Page 90: ...y identical Upper Freq Sets the upper most frequency from which the filters sweep To produce the most dramatic results select a frequency near the middle of the selected audio s range Feedback Feeds a...

Page 91: ...d noise with a minimal reduction in signal quality This effect can remove a combination of noise including tape hiss microphone background noise power line hum or any noise that is constant throughout...

Page 92: ...nformation about sample type FFT Fast Fourier Transform size and three sets of FFT coefficients one for the lowest amount of noise found one for the highest amount and one for the power average Load a...

Page 93: ...nd noise level Precision Factor Controls changes in amplitude Values of 5 10 work best and odd numbers are ideal for symmetrical processing With values of 3 or less the Fast Fourier transform is perfo...

Page 94: ...oo long create a reverb effect Broadband Preservation Retains desirable audio in specified frequency bands between found artifacts A setting of 100 Hz for example ensures that no audio is removed 100...

Page 95: ...ess Determines overall processing speed Slow settings increase accuracy fast settings increase performance Channel Specifies the channels phase correction will be applied to Analysis Size Specifies th...

Page 96: ...t Waveform Editor only on page 87 Using the Hiss Reduction graph to adjust the noise floor Capture Noise Floor Graphs an estimate of the noise floor The estimate is used by the Hiss Reduction effect t...

Page 97: ...ncountered above the estimated noise floor determines how much audio in surrounding frequencies is assumed to follow With low values less audio is assumed to follow and hiss reduction will cut more cl...

Page 98: ...or impulse collections available online For best results impulse files should be uncompressed 16 or 32 bit files matching the sample rate of the current audio file Impulse length should be no more th...

Page 99: ...effect settings with graphs on page 61 Reverb Settings Decay Time Specifies how many milliseconds the reverb takes to decay 60 dB However depending on the Coloration parameters certain frequencies ma...

Page 100: ...to increase reverb warmth lower the high shelf frequency while also reducing its gain Gain Boosts or attenuates reverb in different frequency ranges To subtly enhance audio boost reverb frequencies ar...

Page 101: ...iseconds reverb takes to build to its maximum amplitude For a short Decay Time the Pre Delay Time time should also be smaller In general a value about 10 as long as the Decay Time sounds most realisti...

Page 102: ...lected off of surfaces such as carpeting and drapes Lower settings create more echoes while higher settings produce a smoother reverberation with fewer echoes Dry Sets the percentage of source audio t...

Page 103: ...l to reverberant sound A setting of 100 outputs only reverb Gain Boosts or attenuates amplitude after processing More Help topics 5 1 surround sound on page 131 Channel Mixer effect on page 67 Applyin...

Page 104: ...rums or other audio to create textured effects Compressor Reduces dynamic range to maintain consistent amplitude and help guitar tracks stand out in a mix Filter Simulates guitar filters ranging from...

Page 105: ...3 affect a larger range of frequencies and are best for overall audio enhancement High Q values 6 12 affect a very narrow band and are ideal for removing a particular problematic frequency like 60 Hz...

Page 106: ...tom and specify the precise phase degree pan percentage and delay time for audio you want to extract or remove The Surround option extracts audio that is perfectly out of phase between the left and ri...

Page 107: ...For example you can use the effect to transpose a song to a higher key without changing the tempo or you can use it to slow down a spoken passage without changing the pitch Note This effect requires...

Page 108: ...introduce more pitch modulation Advanced settings Audition algorithm Click the triangle to access these options Splicing Frequency Determines how big each chunk of audio data is when you preserve pit...

Page 109: ...ing and removing effects to create different sonic textures Adobe Audition saves information about source files and mix settings in session sesx files Session files are relatively small because they c...

Page 110: ...tracks and controls simultaneously without showing clips The Mixer is ideal for mixing large sessions with many tracks Controls in the Mixer A Inputs B Effects C Sends D Equalization E Volume F Output...

Page 111: ...Display settings for the active session set the Time Format and Custom Frame Rate settings For details see Change the time display format on page 29 Basic multitrack controls Understanding video audio...

Page 112: ...dio clips however add 5 1 audio tracks to contain them To identify track channels note the meters in the Editor or Mixer panel A Mono B Stereo C 5 1 Add or delete tracks Note A multitrack session supp...

Page 113: ...u use the vertical Zoom options in the lower right of the Editor panel all tracks zoom simultaneously If a session contains many tracks however you may prefer to zoom them individually In the track co...

Page 114: ...nputs and outputs to tracks on page 112 Record audio clips in the Multitrack Editor on page 30 Set track output volume Do any of the following In the Editor panel drag the Volume knob Hold down Shift...

Page 115: ...nd solo tracks on page 110 Applying effects in the Multitrack Editor on page 63 Multitrack routing and EQ controls Show or hide track routing and EQ controls Although the wide variety of routing and E...

Page 116: ...ation see the following Record audio clips in the Multitrack Editor on page 30 Set track output volume on page 110 Invert the polarity of an input If a pair of stereo inputs such as overhead drum micr...

Page 117: ...sources Although bus tracks lack a hardware input they have all the other features of audio tracks You can apply effects and equalization and automate your changes over time For most mixes you ll outp...

Page 118: ...outing options than audio and bus tracks The Master track can t directly connect to audio inputs or output to sends or buses it can only output directly to hardware ports The Master track always exist...

Page 119: ...re information see Insert effects before or after sends and EQ on page 64 More Help topics Routing audio to buses sends and the Master track on page 112 Set track output volume on page 110 Pan tracks...

Page 120: ...clip header with any tool Snap to clip endpoints Snapping lets you quickly align clips with other clips If snapping is enabled both dragged clips and the current time indicator snap to selected items...

Page 121: ...lbar click the Time Selection tool 2 Drag across one or more clips to select them and a range 3 Do one of the following To remove the range from clips and leave a gap in the timeline choose Edit Delet...

Page 122: ...r panel click where you want the split to occur Split all clips at the current time indicator 1 Position the current time indicator where one or more audio clips exist 2 Choose Clip Split Set audio cl...

Page 123: ...dition you can either create your own loops or choose from thousands supplied for free via the Resource Central panel Loops let you create extremely flexible multitrack sessions Though loops typically...

Page 124: ...and end of loops within clips More Help topics Snap to markers rulers frames and zero crossings on page 42 Snap to clip endpoints on page 116 Change the time display format on page 29 Enable a looped...

Page 125: ...ronounced in a short passage but bass frequencies are elsewhere Peak Volume Matches a maximum amplitude you specify normalizing the clips Because this option retains dynamic range it s a good choice f...

Page 126: ...right fade curves interact when you drag them up and down Symmetrical adjusts both fades identically while asymetrical lets you adjust fades independently Linear or Cosine Applies either an even linea...

Page 127: ...utomating mixes with envelopes Note Some features in the Windows version of Adobe Audition 3 0 are not available in CS5 5 Examples include control surface support CD burning MIDI some file formats and...

Page 128: ...for graphs on page 61 Show or hide clip envelopes Clip envelopes are visible by default but if they interfere with editing or are visually distracting you can hide them From the View menu choose any o...

Page 129: ...and Mixer on page 105 Create track envelopes Track envelopes let you precisely change track settings at specific points in time Showing automation lanes in Editor panel 1 In Editor panel click the tri...

Page 130: ...e Linear transitions create a gradual even change between keyframes You can also apply spline curves to an entire envelope overriding the keyframe specific setting above to create natural sounding tra...

Page 131: ...of an envelope without creating a keyframe hold down Ctrl Windows or Command Mac OS and drag Change the transition between two keyframes Right click the first keyframe and select Hold Keyframe to abr...

Page 132: ...Pro CS5 5 Adobe Premiere Pro and Audition CS5 5 directly exchange audio between sequences and multitrack sessions Any sequence markers appear in Audition and separate tracks can be retained for maximu...

Page 133: ...ions to exported mixdown files When you select the exported files in an application such as Adobe Premiere Pro you can either remix or edit them in Adobe Audition As a video project evolves simply rep...

Page 134: ...oundtrack To instead keep such clips synchronized before moving them select both Ctrl click Windows or Command click Mac OS Note A session can contain only one video clip at a time Related video and a...

Page 135: ...precisely synchronize a soundtrack with specific video events such as scene changes title sequences or special effects To hide or show the Video panel choose Window Video Video panel and related clip...

Page 136: ...a mono or stereo track in the Editor panel In the Editor or Mixer panel double click a surround plot for a mono or stereo track Note You can pan only mono and stereo tracks not 5 1 tracks To adjust t...

Page 137: ...evel relative to Left and Right level LFE Controls the level of signal sent to the subwoofer 4 To pan additional tracks simply select them in the Editor panel The Track Panner automatically displays e...

Page 138: ...e File Save All Use the Save Selection As command to break up a long recording into smaller more manageable files 2 Specify a filename and location and choose a file format 3 Set the following options...

Page 139: ...to OMF or Final Cut Pro Interchange format To transfer complete mixes to other applications in your workflow export to OMF or Final Cut Pro Interchange format OMF was originally created for Avid Pro...

Page 140: ...track use the Multitrack Bounce To New Track command See Create a single audio clip from multiple clips on page 122 1 If you want to export part of a session use the Time Selection tool to select the...

Page 141: ...sequence for bytes of data Choose the Little Endian method for systems with Intel processors and the Big Endian method for systems with PowerPC processors mp3 format settings mp3 is the standard comp...

Page 142: ...t To preserve metadata when you save files select Include Markers and Other Metadata in the Save or Export dialog box The BWF tab applies to Broadcast Wave files which let you specify a time offset fo...

Page 143: ...les don t support XMP Examples from Adobe Premiere Pro include Bars and Tone Universal Counting Leader Color Matte Titles Black Video and Transparent Video To customize the creation and exchange of me...

Page 144: ...e Metadata panel provides more extensive properties 1 In the Editor panel open the desired file or session 2 In the Metadata panel edit text or adjust values as needed Search XMP metadata 1 In the Edi...

Page 145: ...mands 1 Choose Edit Keyboard Shortcuts 2 In the Command column select the command you want to customize 3 If you want to replace or remove an existing shortcut choose it from the Shortcuts For Command...

Page 146: ...r to previous marker clip or selection edge Ctrl left arrow Command left arrow Move current time indicator to next marker clip or selection edge Ctrl right arrow Command right arrow Toggle preference...

Page 147: ...or down arrow Result Windows shortcut Mac OS shortcut Select the same input or output for all audio tracks Ctrl Shift select Command Shift select Activate or deactivate Mute Solo Arm For Record or Mon...

Reviews: