background image

5.0 Installation

This section describe the different steps for successful installation of the light. Before you start, make sure you have read and

understand 

Safety instructions

.

The following tools and accessories are required for installation and removal of the unit:
Standard tools and accessories:

Allen key

Socket wrench

A wrench/spanner of 50 mm

One brush or cloth

Note

Provided that the base intended to receive the light fixture has been properly installed, no other specific tool is

required.

The installation steps refer to:

1. Installing/removing the light from its support
2. Adjusting the light
3. Applying a system solution

5.1 Install/remove the light from its support

Install

1. Open the box and verify that the characteristics of the light fixture correspond to your design requirements, such as type,

actual installation position, color, direction and electrical supply.

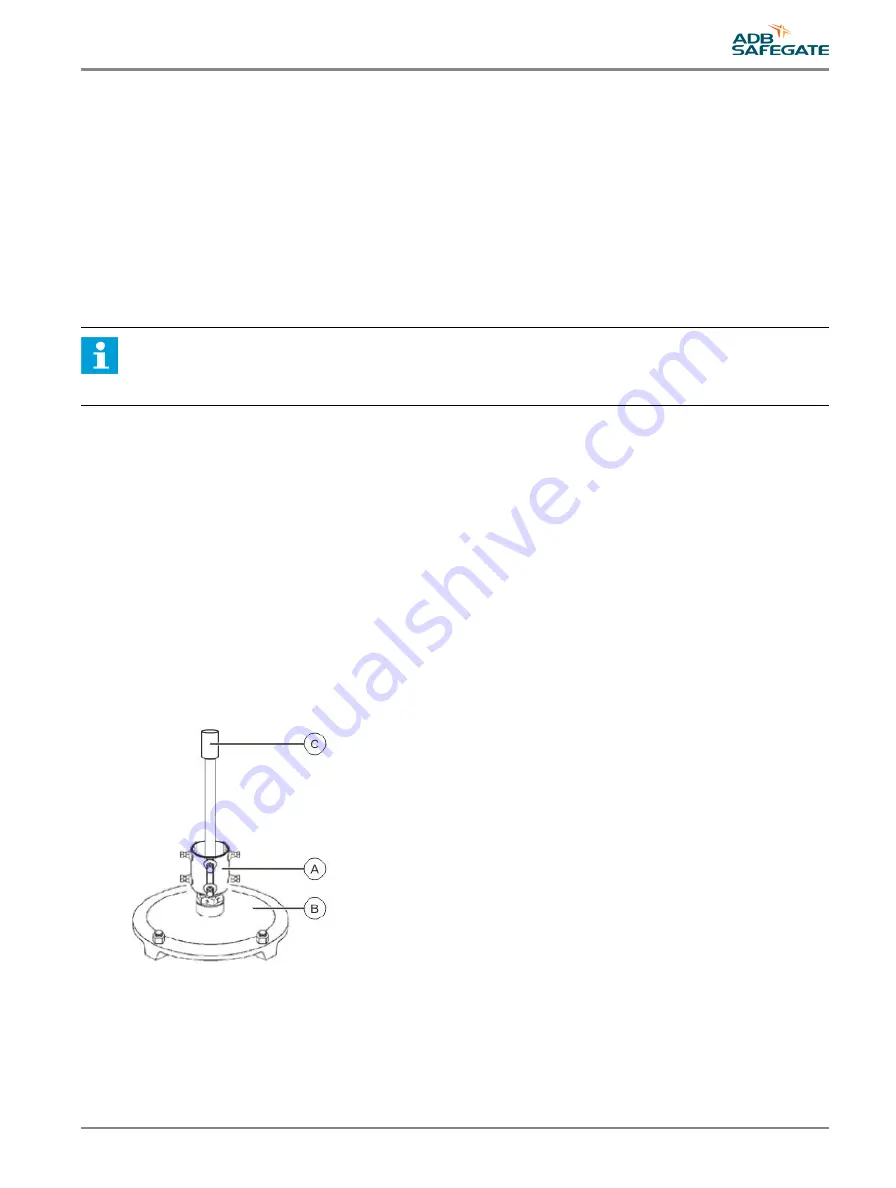
2. Prepare the installation by fixating the appropriate coupling (A) to the base plate (B), then pull out the power supply cable

(C), see 

Figure 1

.

Figure 1: Base plate and coupling

3. Carefully clean all contact surfaces of the light fixture and the support.
4. Connect the light plug to the power supply cable plug.

UM-0102, Rev. 2.5, 2019/05/07

13

Copyright 

©

 ADB Safegate, All Rights Reserved

Summary of Contents for SafeLED IQ SL-RGL-E

Page 1: ...SafeLED IQ Elevated Light SL RGL E Elevated Runway Guard Light User Manual UM 0102 Rev 2 5 2019 05 07 ...

Page 2: ......

Page 3: ... are guaranteed to be merchantable and fit for the ordinary purposes for which such products are made ADB SAFEGATE L858 Airfield Guidance Signs are warranted against mechanical and physical defects in design or manufacture for a period of 2 years from date of installation per FAA AC 150 5345 44 applicable edition Note See your sales order contract for a complete warranty description All Products G...

Page 4: ...DB SAFEGATE replacement parts or accessories Failing to make sure that auxiliary equipment complies with approval agency requirements local codes and all applicable safety standards if not in contradiction with the general rules Using materials or auxiliary equipment that are inappropriate or incompatible with your ADB SAFEGATE equipment Allowing unskilled personnel to perform any task on or with ...

Page 5: ... 19 6 1 1 ASP Safecontrol System Technology 19 6 1 2 SafeLED IQ and the 2A Concept 19 6 1 3 Sensor Interface Unit SIU 19 6 1 4 Network Concentrator Unit NCU 19 6 1 5 Series Circuit Modem SCM 19 6 1 6 Series Circuit Filter SCF 19 6 1 7 Control System Interface 19 6 2 Programming SafeLED IQ 19 6 2 1 Hardware equipment set up 20 6 2 2 Software programming 22 6 3 Connecting the light in a series circu...

Page 6: ...PORT 33 9 1 ADB SAFEGATE website 33 9 2 Recycling 33 9 2 1 Local authority recycling 33 9 2 2 ADB SAFEGATE recycling 33 SafeLED IQ Elevated Light TABLE OF CONTENTS vi Copyright ADB Safegate All Rights Reserved ...

Page 7: ...ertical adjustment 16 Figure 6 RGL E solution 17 Figure 7 RGL E solution with summary alarm outputs 17 Figure 8 RGL E solution with alarm presentation 18 Figure 9 LPC and SCM unit 20 Figure 10 PC and SCM unit 21 Figure 11 LPC and SafeLED IQ product 21 Figure 12 Series circuit connection 26 UM 0102 Rev 2 5 2019 05 07 vii Copyright ADB Safegate All Rights Reserved ...

Page 8: ...SafeLED IQ Elevated Light List of Figures viii Copyright ADB Safegate All Rights Reserved ...

Page 9: ...List of Tables Table 1 ADB SAFEGATE Support 33 UM 0102 Rev 2 5 2019 05 07 ix Copyright ADB Safegate All Rights Reserved ...

Page 10: ...SafeLED IQ Elevated Light List of Tables x Copyright ADB Safegate All Rights Reserved ...

Page 11: ... observe this warning may result in personal injury death or equipment damage ARC Flash may cause blindness severe burns or death WARNING Wear personal protective equipment Failure to observe may result in serious injury WARNING Do not touch Failure to observe this warning may result in personal injury death or equipment damage CAUTION Failure to observe a caution may result in equipment damage Qu...

Page 12: ...evices as specified by applicable safety regulations If safety devices must be removed for installation install them immediately after the work is completed and check them for proper functioning prior to returning power to the circuit Failure to follow this instruction can result in serious injury or equipment damage Additional Reference Materials Important Information IEC International Standards ...

Page 13: ...ty devices as specified by applicable safety regulations If safety devices must be removed for installation install them immediately after the work is completed and check them for proper functioning Route electrical wiring along a protected path Make sure they will not be damaged by moving equipment Never operate equipment with a known malfunction Do not attempt to operate or service electrical eq...

Page 14: ... same potential as the cabinet by touching a conductive earthed part of the cabinet Electronic modules or components must not be brought in contact with highly insulating materials such as plastic sheets synthetic fiber clothing They must be laid down on conductive surfaces The tip of the soldering iron must be grounded Electronic modules and components must be stored and transported in conductive...

Page 15: ...ces at the airport with regard to the duration of the work and so on It is recommended that prior to starting any cutting work the nature and location of services such as cable ducts and so on Should be identified any installation or maintenance work should only be carried out by trained and experienced personnel High intensity Do not stare directly into the light beam at close distance UM 0102 Re...

Page 16: ...SafeLED IQ Elevated Light Safety instructions 6 Copyright ADB Safegate All Rights Reserved ...

Page 17: ...nformation with a focus on safety installation and maintenance procedures For more information see www adbsafegate com Note It is very important to read this document before any work is started UM 0102 Rev 2 5 2019 05 07 7 Copyright ADB Safegate All Rights Reserved ...

Page 18: ...SafeLED IQ Elevated Light About this manual 8 Copyright ADB Safegate All Rights Reserved ...

Page 19: ... using photocell 4 1 Abbreviations and terms Abbrevation Term ASP SC Airfield Smart Power SafeControl A SMGCS Advanced Surface Movement Guidance and Control System CAA Civil Aviation Authority CCR Constant Current Regulator FAA Federal Aviation Administration ICAO International Civil Aviation Organization IEC International Electrotechnical Committee LED Light Emitting Diode LMS Light Monitor and S...

Page 20: ...he isolation transformer size for a 2A system i e a series circuit with SLIQ2A that only is supposed to run at 2A it is important to know that the regular method by adding up the total wattage on the isolation transformer secondary side cannot be used This is because a standard isolation transformer 6 6A 6 6A is marked with a maximum wattage running at 6 6A Following the Lenz Law of Induction it c...

Page 21: ...g the secondary load of the transformer Total load 44 W This load must be considered only when calculating the secondary load of the Isolation Transformer 4 3 3 Transformer selection guidelines Cable area 2 5 mm2 Cable area 4 mm2 Total load W Transformer W SafeLED IQ 50 m 74 100 50 100 m 104 150 50 m 64 100 50 100 m 84 100 SafeLED IQ 2A 50 m 47 200 50 100 m 50 200 50 m 46 200 50 100 m 48 200 UM 01...

Page 22: ...SafeLED IQ Elevated Light Introduction 12 Copyright ADB Safegate All Rights Reserved ...

Page 23: ... to 1 Installing removing the light from its support 2 Adjusting the light 3 Applying a system solution 5 1 Install remove the light from its support Install 1 Open the box and verify that the characteristics of the light fixture correspond to your design requirements such as type actual installation position color direction and electrical supply 2 Prepare the installation by fixating the appropri...

Page 24: ...ing 6 Lock the light fixture with the setting screws using a wrench Remove 1 Loosen without removing the setting screws on the frangible coupling with a wrench 2 Remove the light from its support 3 Disconnect the light plug from the power supply cable plug SafeLED IQ Elevated Light Installation 14 Copyright ADB Safegate All Rights Reserved ...

Page 25: ...e horizontal using the horizontal setting screws A see Figure 2 Figure 2 Horizontal adjustment 2 Adjust the light to the vertical using the vertical setting screws A see Figure 3 Figure 3 Vertical adjustment UM 0102 Rev 2 5 2019 05 07 15 Copyright ADB Safegate All Rights Reserved ...

Page 26: ...g the horizontal setting screws A see Figure 4 Figure 4 Horizontal adjustment 2 Adjust the light to the vertical using the vertical setting screws A see Figure 5 Figure 5 Vertical adjustment SafeLED IQ Elevated Light Installation 16 Copyright ADB Safegate All Rights Reserved ...

Page 27: ...t system solutions can be applied see Figure 6 Figure 6 RGL E solution With summary alarm outputs for lamp faults and system fault see Figure 7 Figure 7 RGL E solution with summary alarm outputs UM 0102 Rev 2 5 2019 05 07 17 Copyright ADB Safegate All Rights Reserved ...

Page 28: ...larm presentation on a PC of individual lamp and system faults see Figure 8 Figure 8 RGL E solution with alarm presentation SafeLED IQ Elevated Light Installation 18 Copyright ADB Safegate All Rights Reserved ...

Page 29: ...ircuit in the same manner as the SafeLED IQ The SIU is also connected to the secondary side of a standard isolation transformer using a standard 2 pin FAA style connector Connection to the sensor is established using an IP68 rated 7 pin connector The SIU can also supply the sensor with DC voltage from a built in current to voltage converter 6 1 4 Network Concentrator Unit NCU The NCU concentrates ...

Page 30: ...nstructions how to set up the hardware equipment required for SafeLED IQ programming Figure 9 LPC and SCM unit Connection Box Arbitrary wire orientation 230 240 VAC or 100 115 VAC Cable 5949114 Connection Box SDM 591677 LPC 591859 LPC 1859 SCM 591677 SCM 591677 LPC 591859 Power cord Power cord Power cord Disassemble assemble EMI cable gland with cable and make sure that shield gets properly connec...

Page 31: ...Figure 10 PC and SCM unit Rs232 Cable COM 1 COM 1 SCM Note For more information see the marking on the LOAD RESET box Connect the LPC to a SafeLED IQ product Figure 11 LPC and SafeLED IQ product 2 3 1 Using the cable supplied 594115 connect to Output 1 or Output 2 to a SafeLED IQ product UM 0102 Rev 2 5 2019 05 07 21 Copyright ADB Safegate All Rights Reserved ...

Page 32: ...LED IQ product configuration The following are instructions how to use AMT software version 3 3 or later for SafeLED IQ product configuration Program a SafeLED IQ product 1 Make sure the Remote button on the LPC is NOT pressed in off before you start programming 2 Start the AMT program on the PC If Can t open COM port appears click OK 3 Enter Username and Password for example guest and adbsafegate...

Page 33: ...operties Select the Hardware tab and click Device Manager Select Ports COM LPT to view the COM port in use for example USB to Serial bridge COM 2 6 Set the connection to LPU Note If an RS232 Error window appears click OK 7 Check the LPU tab default appears in the upper area of the window UM 0102 Rev 2 5 2019 05 07 23 Copyright ADB Safegate All Rights Reserved ...

Page 34: ...ight parameter name to configure for example SB1_B 9 Check the bottom of a SafeLED IQ for the Production ID PID number 10 From the LPU Manager tab enter the PID Number in the text field manually or using a bar code reader Note The number corresponds to the product information number found on the bottom of the SafeLED IQ as in the previous step SafeLED IQ Elevated Light Operation 24 Copyright ADB S...

Page 35: ...ding the parameters is complete a checksum check is performed to ensure the SafeLED IQ has received the new parameters without fault If the unit without fault click OK and the unit is now ready to use 15 Disconnect the SafeLED IQ product cable 16 Turn off the SCM LPC for at least 30 seconds to fully power down the SafeLED IQ or when no more SafeLED IQ products are to be configured 17 Turn on the L...

Page 36: ...amp status for a limited amount of time The IQ can be configured once current is restored in the circuit to set the lamp to the previous state typically the last commanded state before a power loss This feature when enabled overrides the default state It is possible to apply a condition based on the amount of time current was lost The SafeLED IQ sets the lamp to the default state if current was re...

Page 37: ...dow check for mechanical damage Check for proper fixing of the light fixture in its base Yearly Detailed inspection of the light fixture Check of the body resistance check for mechanical damage for example cracks around prism windows Clean of the optical windows A daily function check is referred to in the document ICAO Airport Services Manual Part 9 Airport Maintenance Practice and FAA AC 150 534...

Page 38: ...lace the front plate A in position 4 Fasten the screws on the front plate with a torque of 6 5Nm 7 2 2 Replace LED PCB Remove 1 Disassemble the front plate A 2 Remove the gaskets and the glass B 3 Unscrew the light fixture screws in the LED PCB 4 Disconnect the cable to the LED PCB C and remove the LED PCB Replace 1 Connect the cable to the LED PCB C unit and place it in position 2 Fasten the scre...

Page 39: ...for Airfield Lighting lights Note Contact ADB SAFEGATE for assistance with ordering spare parts 8 1 SafeLED IQ Elevated Light SL RGL E L 804 L Elevated Runway Guard Light UM 0102 Rev 2 5 2019 05 07 29 Copyright ADB Safegate All Rights Reserved ...

Page 40: ...15537 7 230 VAC cable with cable gland and protective tube 1 10 15646 SGE SP15646 8 FAA stand including fasteners1 1 1 15540 SGE SP15540 9 IEC stand including fasteners1 1 1 15539 SGE SP15539 Notes 1 All screws for fastening are included Note Component availability or design may be subject to change due to unforeseen circumstances This document is subject to change or new information from ADB SAFE...

Page 41: ...15535 SGE SP15535 5 Gasket kit 1x463mm 2x204mm and 4 bonded seals 1 10 15536 SGE SP15536 6 Front plate with visors2 1 1 15537 SGE SP15537 7 Cable style 1 L 823 connector with cable gland and protection tube 1 10 15538 SGE SP15538 8 FAA stand including fasteners2 1 1 15540 SGE SP15540 9 IEC stand including fasteners2 1 1 15539 SGE SP15539 Notes 2 All screws for fastening are included Note Component...

Page 42: ... seals 1 10 15536 SGE SP15536 6 Front plate with visors3 1 1 15537 SGE SP15537 7 Cable style 1 L 823 connector with cable gland and protection tube 1 10 15538 SGE SP15538 8 FAA stand including fasteners3 1 1 15540 SGE SP15540 9 IEC stand including fasteners3 1 1 15539 SGE SP15539 10 LED cable 180 mm4 2 10 18650 SGE SP18650 Notes 3 All screws for fastening are included 4 Not in the illustration Not...

Page 43: ...ct s manual and troubleshooting guide Do you have a True RMS meter available and any other necessary tools Be located with the product ready to troubleshoot Note For more information see www adbsafegate com or contact ADB SAFEGATE Support via email at support adbsafegate com or Brussels 32 2 722 17 11 Rest of Europe 46 0 40 699 17 40 Americas 1 614 861 1304 Press 3 for technical service or press 4...

Page 44: ...follows For ROHS WEEE Recycling Sender contact information Name Business Address Phone number Main Unit Serial Number ADB SAFEGATE will continue to monitor and update according for any future requirements for EU directives as and when EU member states implement new regulations and or amendments It is our aim to maintain our compliance plan and assist our customers SafeLED IQ Elevated Light SUPPORT...

Page 45: ...UM 0102 Rev 2 5 2019 05 07 35 Copyright ADB Safegate All Rights Reserved ...

Page 46: ......

Reviews: