


9
D
ETAILED
O
PERATING
I
NSTRUCTIONS
B
ASIC
F
EATURES
The VoicePal Max provides a total of 60 or 90
seconds of recording time, depending on the version.
The recording time can be divided among two, three,
four, or ten messages. There are two main methods of
selecting messages for playback: direct selection and
scanning selection.
With direct selection, the ten front panel buttons
are used to select the desired message. Button 1 is in the
upper left corner. Button 2 is the second one from the
left on the top row and so on. Button 10 is in the lower
right corner. There are ten jacks corresponding to
Buttons 1 through 10 that accept either external switches
or Adaptivation’s Taction Pads. Messages can be
directly selected using these external switches in addition
to the front panel buttons. Scanning capabilities are
described later in this manual.
You can custom create your own symbol or picture
overlays and slip them in the VoicePal Max’s pouch.
Templates are provided for each configuration to help
you position pictures and punch out holes in your
overlays so the LEDs are visible.
B
ATTERIES
The VoicePal Max operates on four AA batteries.
Alkaline, rechargeable alkaline or rechargeable NiMH
batteries are recommended. Under normal use, alkaline
batteries can be expected to last up to 6 months using
direct selection and up to four months when using
scanning.
10
DIP S
WITCHES
There are six DIP switches on the VoicePal Max,
designated as SW1 through SW6. These switches are
used to configure various features on the VoicePal Max.
The meanings of these features are summarized on page
35 of this manual. The VoicePal Max can be in one of
two states: Setup state, and Active state. The Setup state
is used to program various options that affect the way the
VoicePal Max operates. The VoicePal Max is placed in
the Active state by placing SW1 in the ON position.
To
record messages or to play them back, the VoicePal
Max must be in the Active state.
The VoicePal Max is
placed in the Setup state by placing SW1 in the OFF
position.
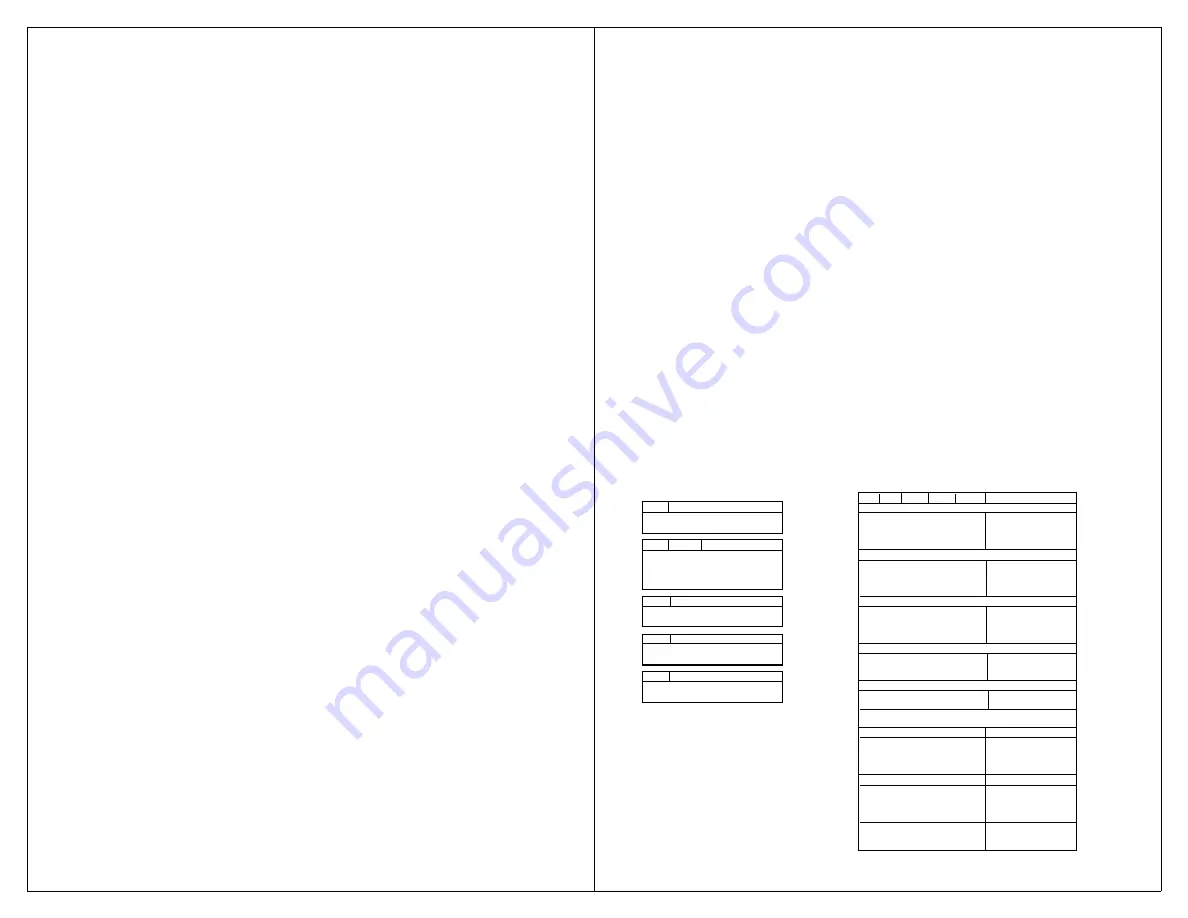
The following chart contains DIP switch settings
and can be found on the back of your VoicePal Max.
This chart can be used as a quick reference guide to
programming.
ACTIVE STATE Switch1 = ON
SETUP STATE: Switch1 = OFF’
SW2 SW3
SW4
SW5
SW6
Function
SW2
Two Button Scanning
Delayed Activation
ON
ON
ON
ON
ON
ON
ON
0 Sec
*
OFF
OFF
ON
ON
ON
OFF
ON
½ Sec
ON
ON
OFF
ON
ON
1 Sec
SW3
SW4
Keypad Configuration
ON
ON
OFF
OFF
ON
1½ Sec
ON
ON
2 messages
Scan Speed - Visual Scanning
ON
OFF
3 messages
ON
ON
ON
ON
OFF
Sequential Messaging
OFF
ON
4 messages
ON
ON
ON
OFF
OFF
1 Sec *
OFF
OFF
10 messages
ON
ON
OFF
ON
OFF
2 Sec
ON
ON
OFF
OFF
OFF
4 Sec
SW5
Repeat message?
Inter-auditory Pause
ON
No
ON
ON
ON
ON
OFF
0 Sec
OFF
Yes
ON
ON
ON
OFF
OFF
1 Sec *
ON
ON
OFF
ON
OFF
2 Sec
SW5
Scanning Selection
ON
ON
OFF
OFF
OFF
4 Sec
ON
INVERSE (touch-release)/STEP
After Message Activity
OFF
POSITIVE(touch-touch)
ON
OFF
ON
ON
OFF
Stop scanning
*
ON
OFF
ON
OFF
OFF
Cont scan w/ mess one
SW6
Auditory Scan
ON
OFF
OFF
ON
OFF
Cont scan w/ next mess
ON
ON
No. of Scanning Cycles BeforeShutdown
OFF
OFF
OFF OFF
OFF
ON
OFF
4 cycles
*
OFF OFF
OFF
OFF
OFF
8 cycles
Clear all relays from selected message(s)
²
ON
OFF
OFF
OFF
OFF
*
Factory Default Settings
Relay A Control
³
¹
To memorize settings in SETUP STATE
OFF ON
ON
ON
ON
Duration of Message
press REC button until it lights up.
OFF ON
ON
OFF
ON
0 sec delay
²
Press button 1-10 to disconnect all
OFF ON
OFF
ON
ON
2 sec delay
relays from corresponding messages.
OFF ON
OFF
OFF
ON
4 sec delay
³
Press button 1-10 to attach selected
Relay B Control
³
relay to corresponding message. Press
ON
OFF
ON
ON
ON
Duration of message
REC to detach selected relay from
ON
OFF
ON
OFF
ON
0 sec delay
all messages.
ON
OFF
OFF
ON
ON
2 sec delay
ON
OFF
OFF
OFF
ON
6 sec delay
OFF ON
ON
ON
OFF
Cue Word Scanning
OFF ON
ON
OFF
OFF
Standard Scanning


